- Startseite
- Blog
- We invent you live
- Wi-Fi-installationsanleitung
We invent you live
01 / 08 / 2017
Wi-Fi-installationsanleitung
RUBRIKEN
BEITRÄGE
Wifi connection guide for Smartphone & Tablet devices
Bitte wählen Sie unten
Inventor Control Applikation (für Comfort-Klimageräte)
Herunterladen & Kontoregistrierung
Schritt 1
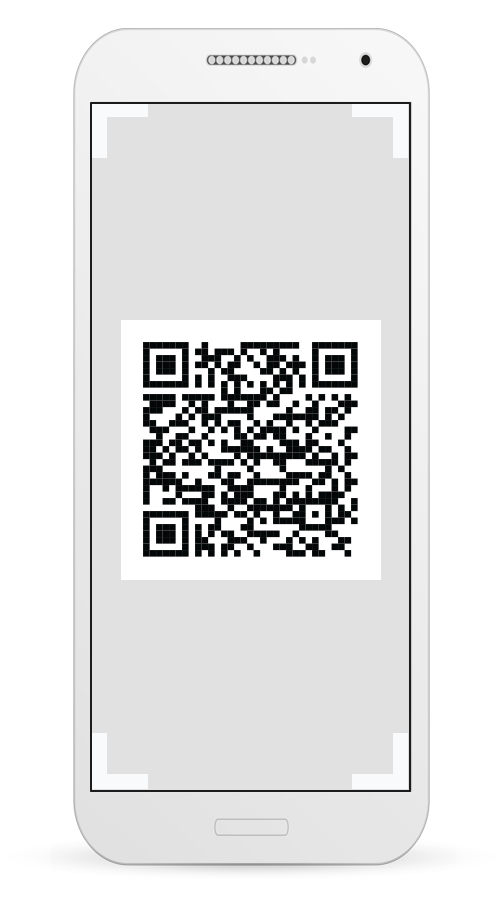
Android Operationssystem QR-Code scannen
Schritt 1
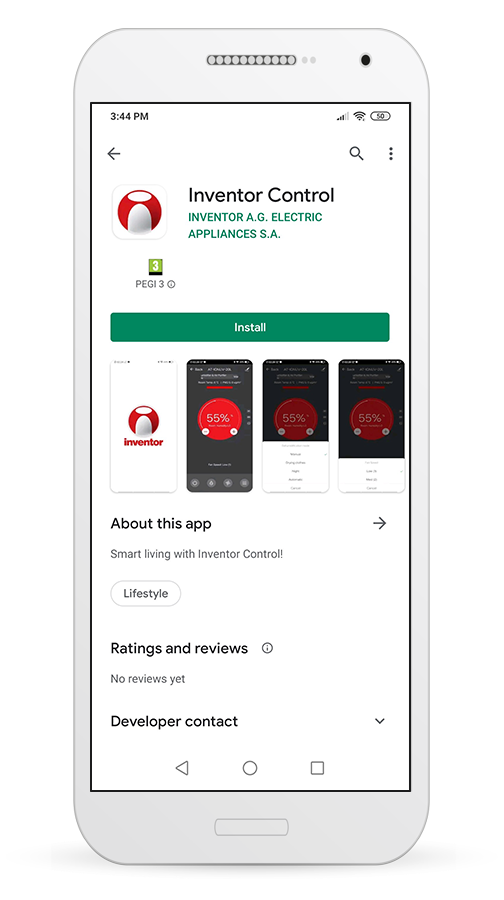
Oder besuchen Sie den Google Play Store und suchen Sie nach der Applikation "Inventor Control".
Schritt 2
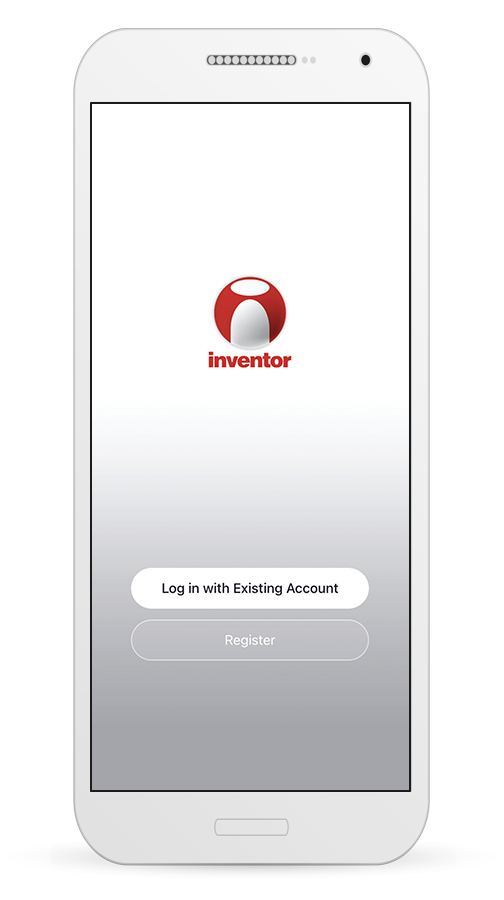
Wählen Sie "Registrieren" (Register), um ein neues Konto zu erstellen.
Schritt 3
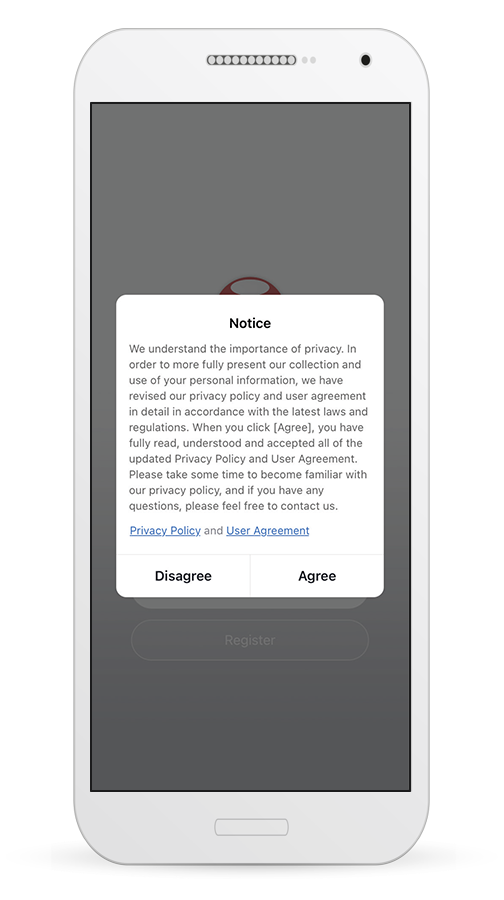
Lesen Sie die Datenschutzrichtlinie und die Benutzervereinbarung und wählen Sie Zustimmen, um fortzufahren.
Schritt 4
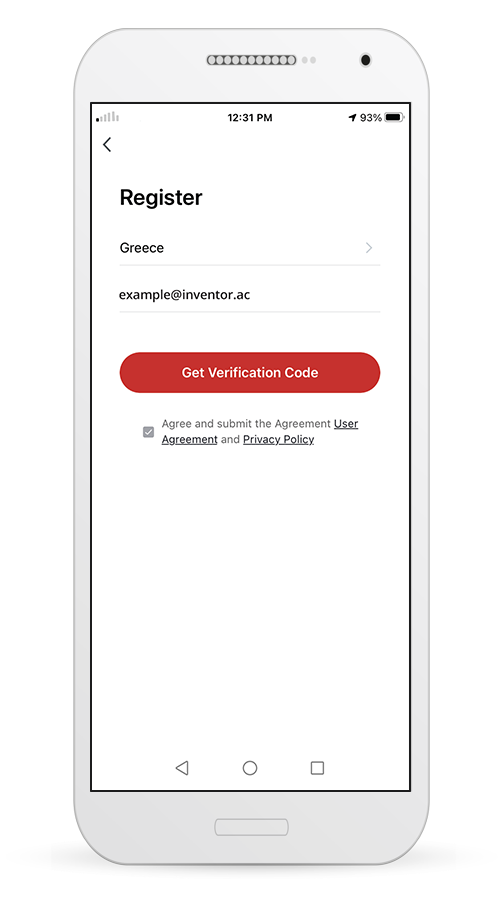
Wählen Sie Ihre Region und geben Sie Ihre E-Mail-Adresse oder Ihre Mobiltelefonnummer ein, um einen Verifizierungscode zu erhalten. Drücken Sie "Get Verification Code".
Schritt 5
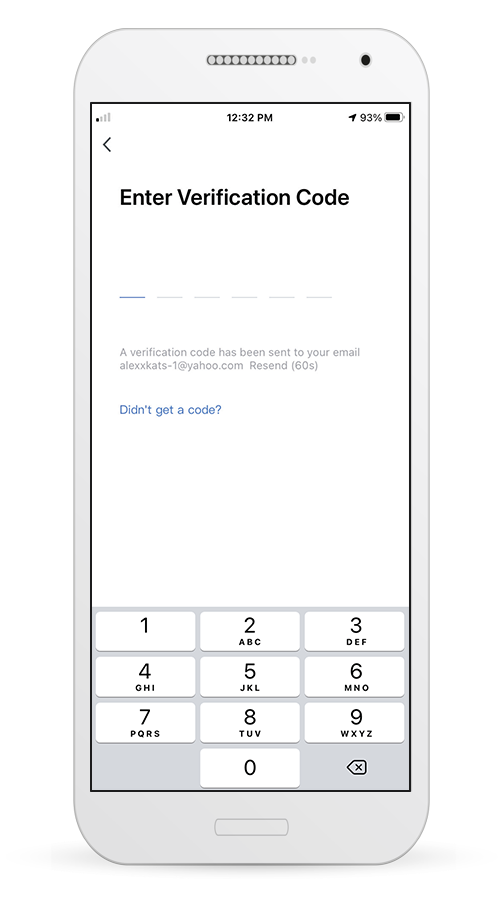
Geben Sie den Verifizierungscode ein, den Sie erhalten haben.
Schritt 6
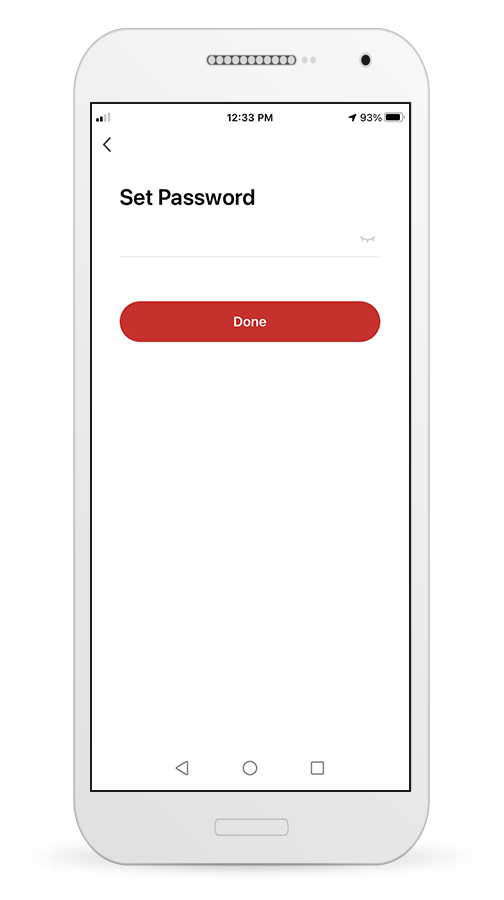
Fahren Sie fort, indem Sie Ihr eigenes Passwort festlegen.
Anlegen eines Domizils
Ein neues Zuhause anlegen und den Standort einrichten
Schritt 1
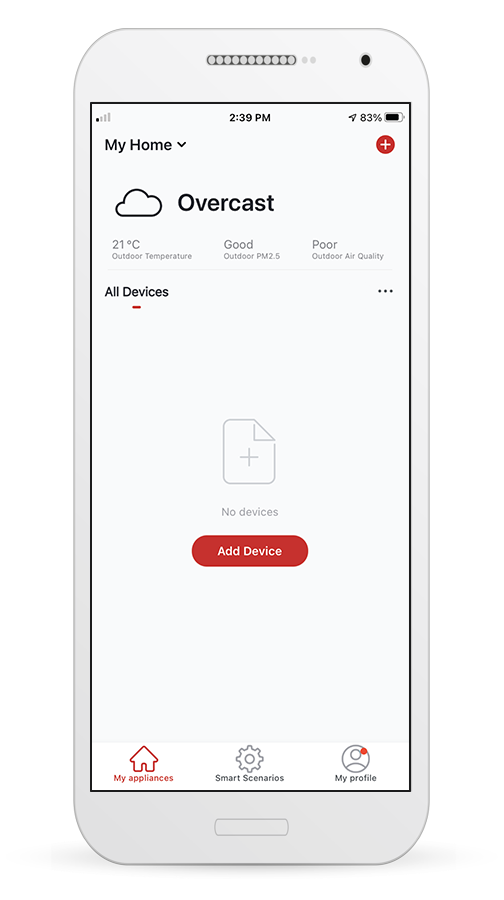
Drücken Sie auf "Mein Zuhause..." (My Home) in der oberen linken Ecke Ihres Bildschirms.
Schritt 2
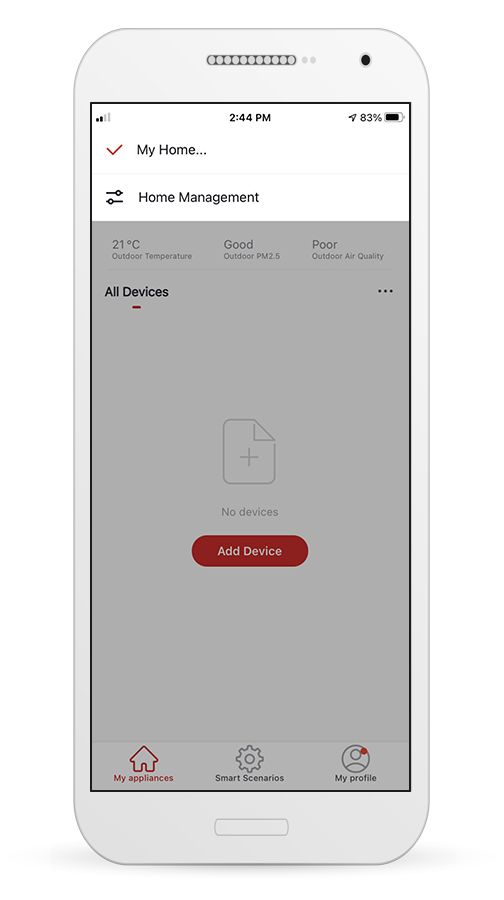
Wählen Sie "Hausverwaltung".(Home Management)
Schritt 3
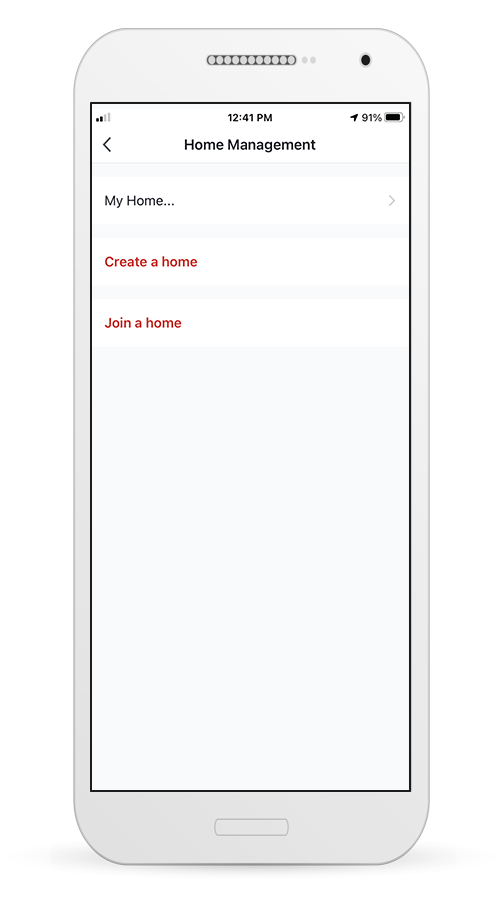
Wählen Sie das Standard-Home "Mein Home..." (My Home), um es zu bearbeiten.
Schritt 4
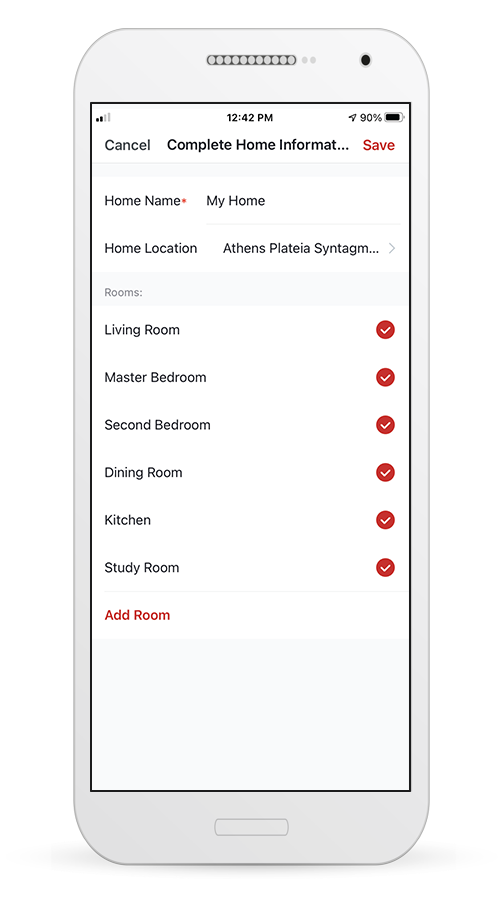
Geben Sie den identifizierenden Namen Ihres Hauses ein und drücken Sie die Taste "Home Location" (Standort des Hauses ).
Schritt 5
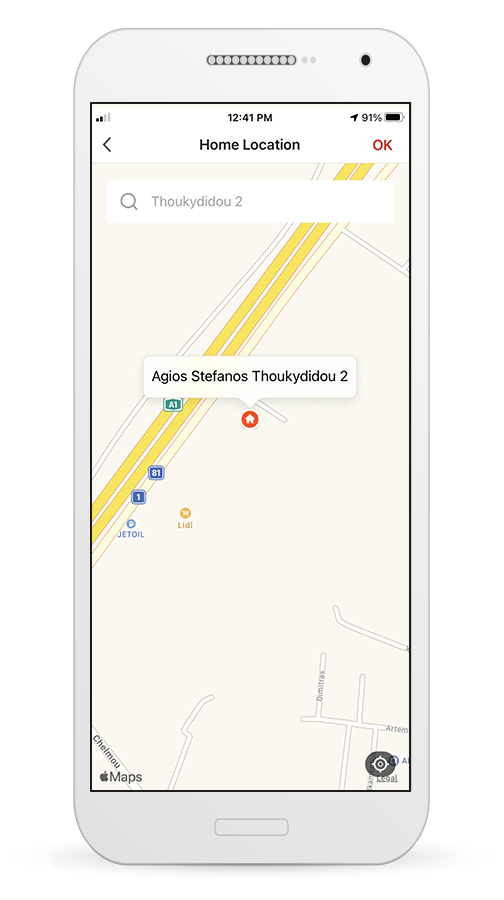
Use the built-in map to pinpoint your Home’s Location and press "OK".
Joining an existing Home
Schritt 1
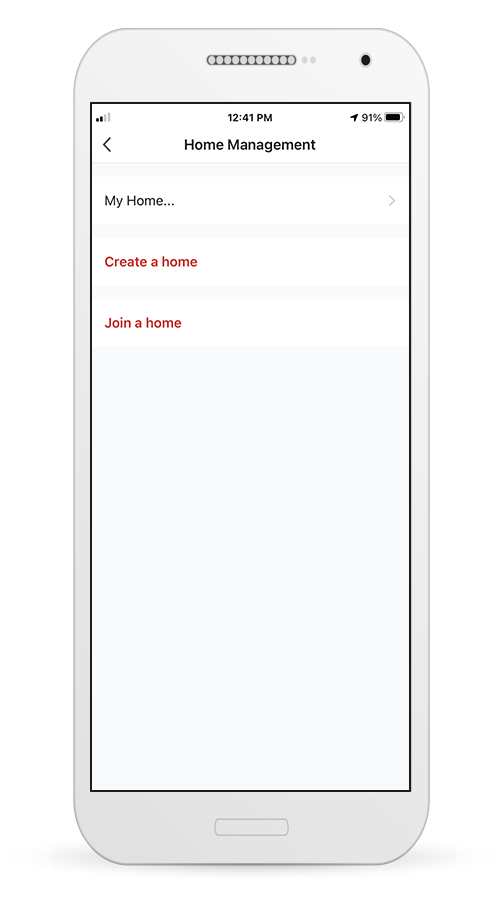
To join an existing Home, contact the administrator to get the invitation code.
Schritt 2
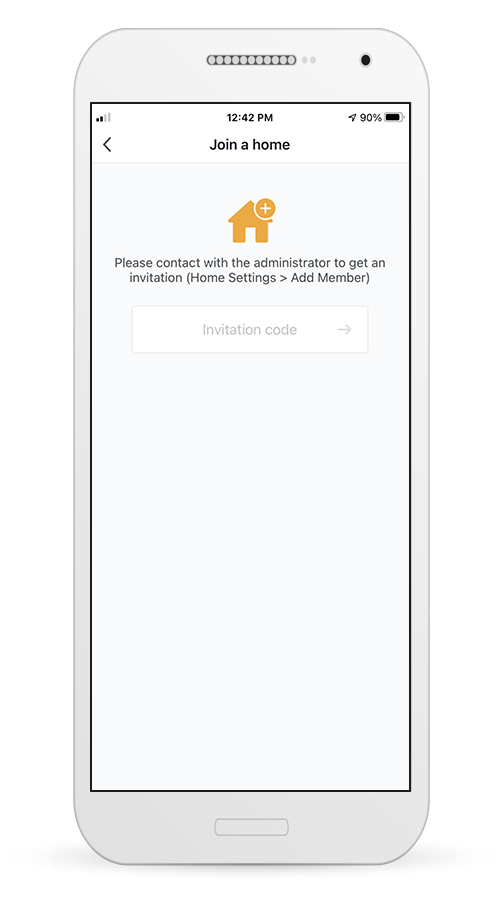
Geben Sie dann den Code ein, den Sie erhalten haben, um fortzufahren.
Verbinden Sie Ihr Klimagerät mit Inventor Control Applikation
Manuelles Hinzufügen mit AP-Modus
Schritt 1
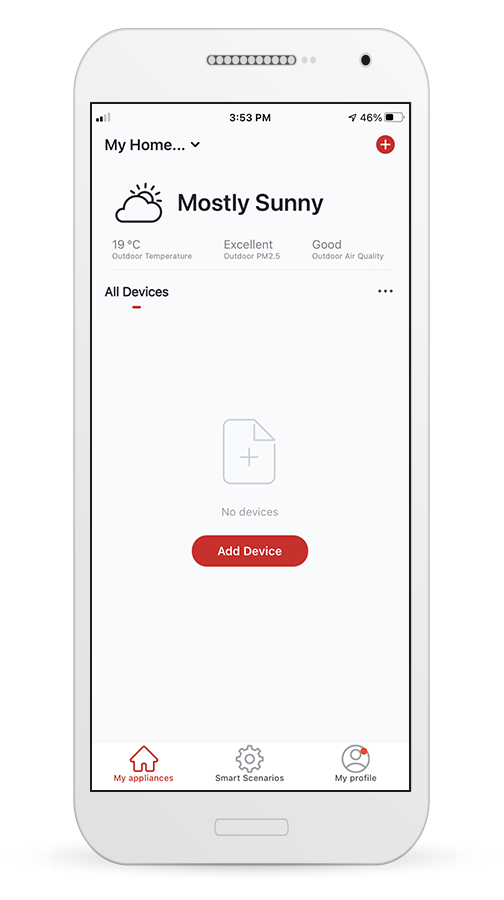
Wählen Sie "Gerät hinzufügen" (Add Device) oder das "+"-Symbol oben rechts auf dem Bildschirm.
Schritt 2
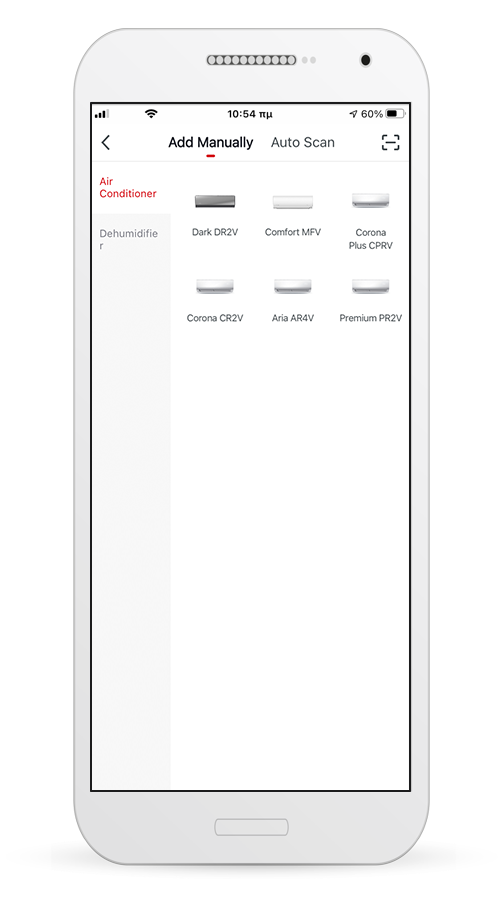
Wählen Sie in der oberen Leiste "Manuell hinzufügen" (Add Manually) und dann im Menü auf der linken Seite "Klimagerät" und den jeweiligen Modellnamen.
Schritt 3
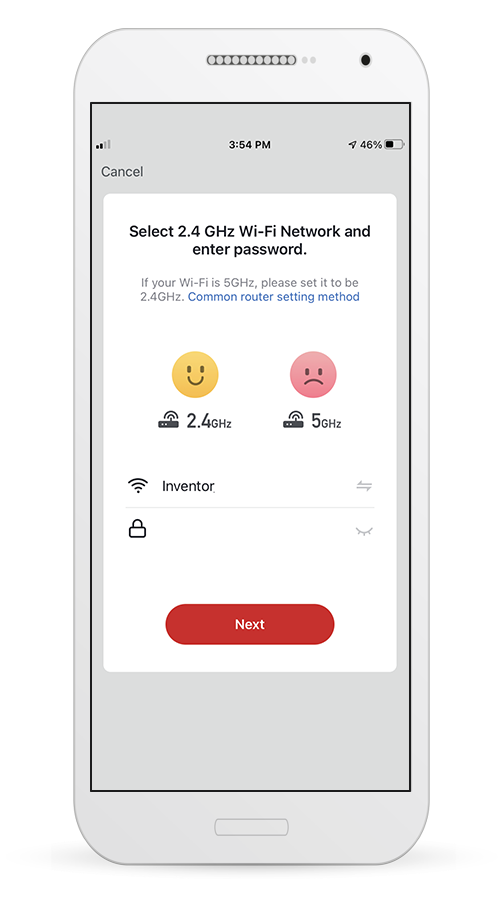
Wählen Sie Ihr Wi-Fi aus und geben Sie Ihr Passwort ein.
Schritt 4
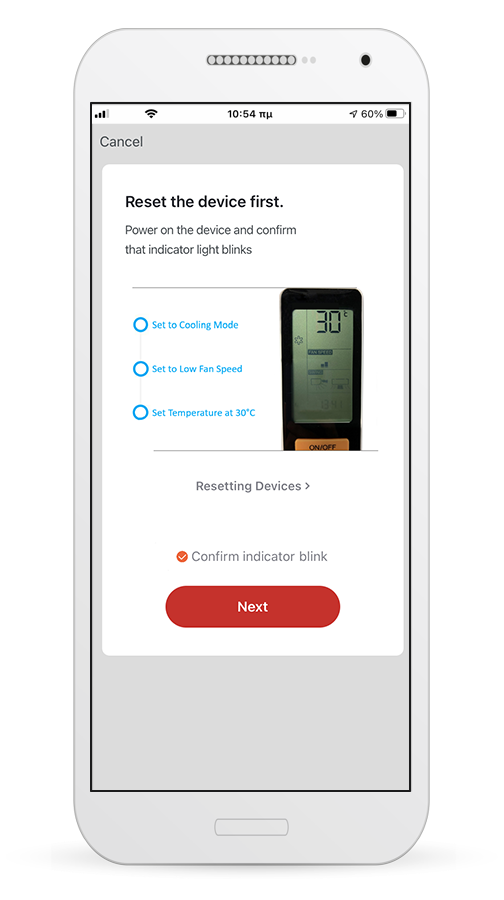
Schließen Sie das Klimagerät an das Stromnetz an und schalten Sie es ein. Stellen Sie das Klimagerät auf Kühlmodus, niedrige Gebläsedrehzahl und 30°C Temperatur ein. Vergewissern Sie sich, dass die Kopplungsanzeige auf der Anzeige des Gerätes blinkt und drücken Sie Bestätigen (Confirm) , um fortzufahren.
Schritt 5
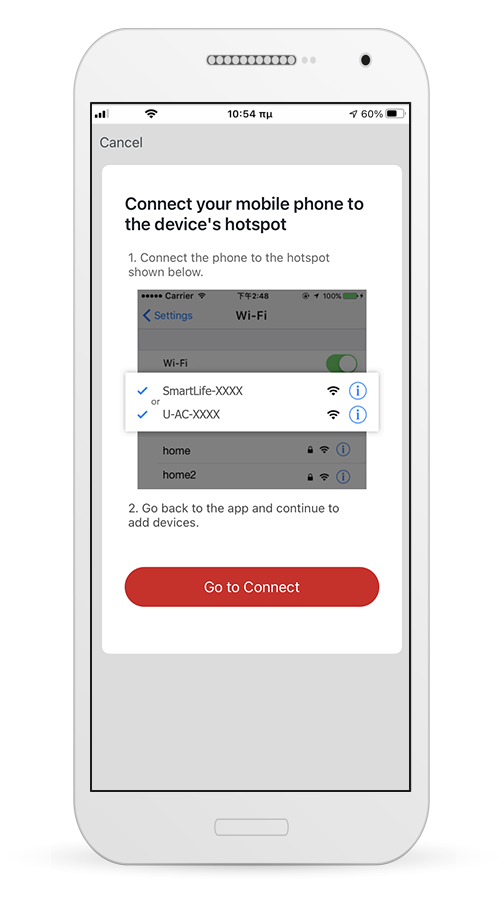
Drücken Sie "Go to Connect", um die Wi-Fi-Netzwerke Ihres Gerätes einzugeben.
Schritt 6
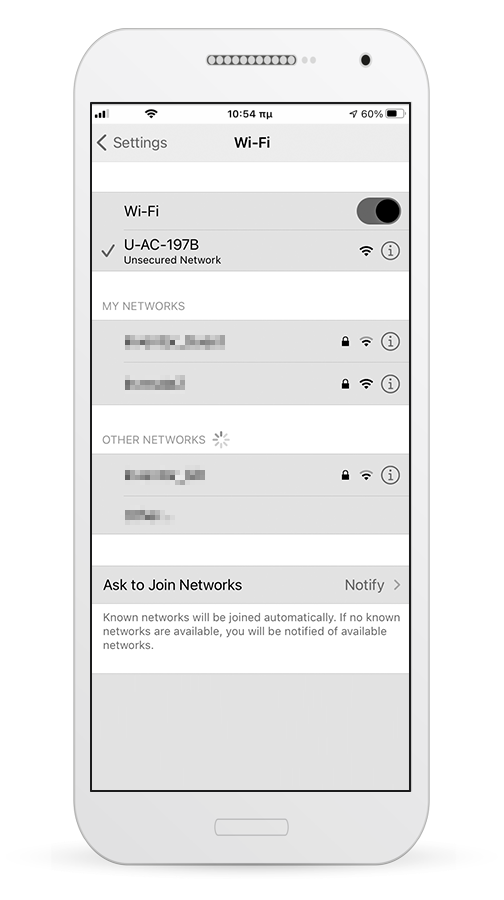
Verbinden Sie sich in den Einstellungen Ihres Mobilgerätes mit dem Netzwerk des Klimagerätes "U-AC-XXXX", kehren Sie zur Applikation zurück und drücken Sie "Weiter"(Next).
Schritt 7
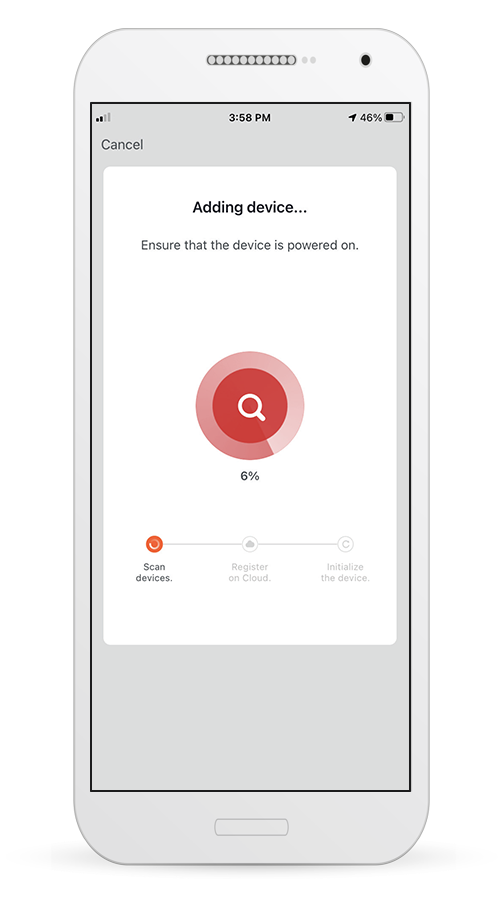
Warten Sie ein paar Augenblicke, bis der Kopplungsvorgang abgeschlossen ist.
Schritt 8
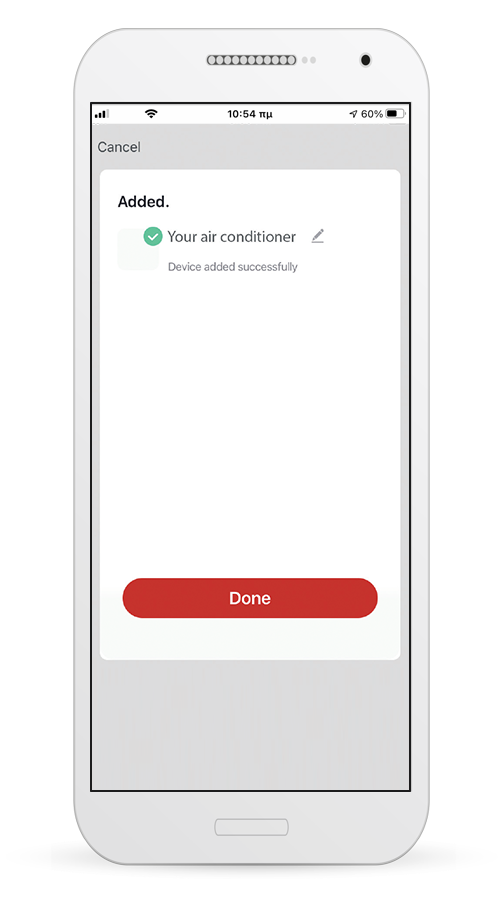
Wenn das Kopplungsverfahren abgeschlossen ist, können Sie, falls gewünscht, Ihr Gerät umbenennen. Drücken Sie "Fertig" (Done), wenn Sie fertig sind.
Schritt 9
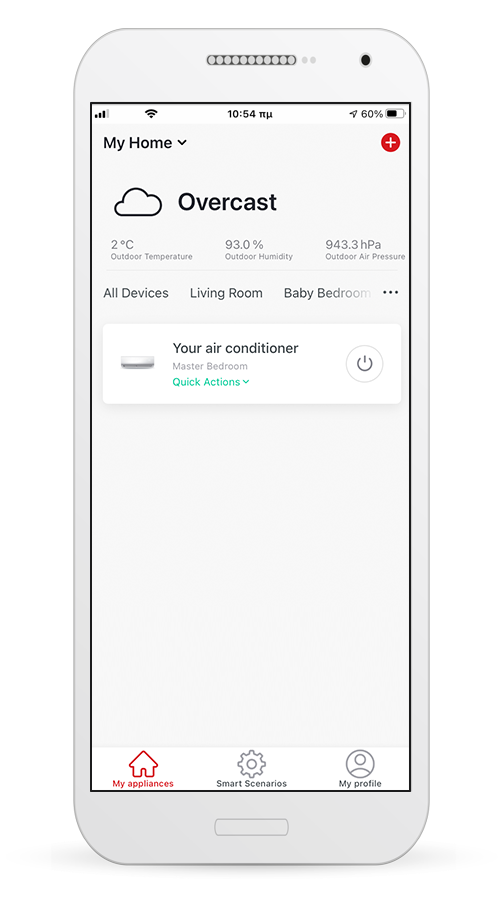
Sie sind bereit für die Fernverwaltung Ihrer Anlage!
Bedienungsanleitung
Applikation Vorteile
Benutzervereinbarung
Hinweis zum Datenschutz
Inventor Control Applikation (für Comfort-Klimageräte)
Herunterladen & Kontoregistrierung
Schritt 1
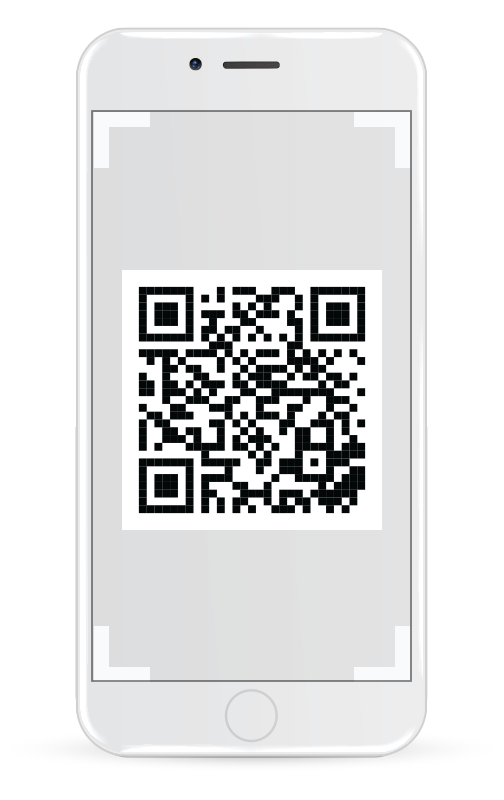
iOS Operationssystem QR-Code scannen
Schritt 1
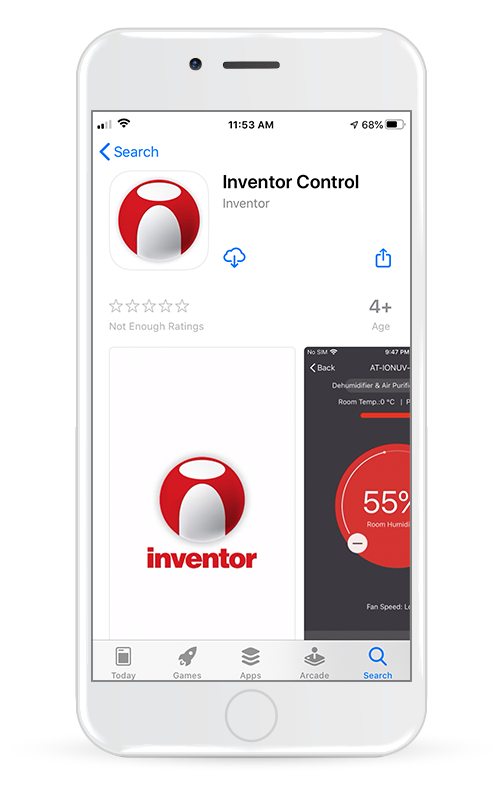
Oder besuchen Sie den App Store und suchen Sie nach der Applikation "Inventor Control"
Schritt 2
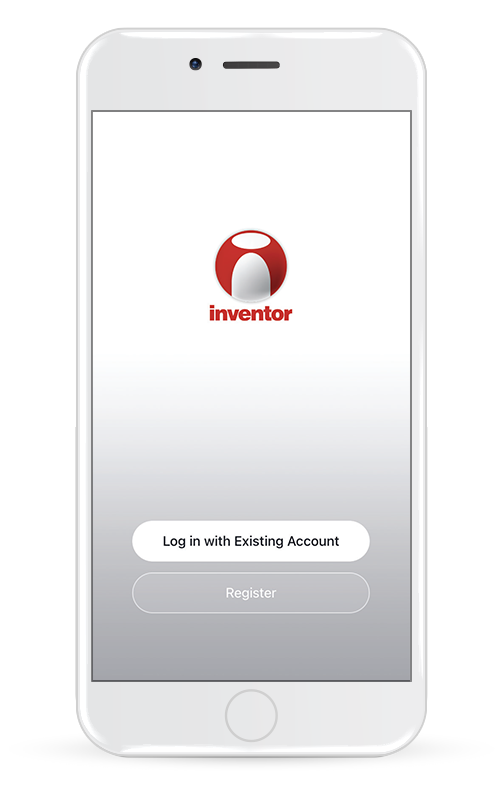
Wählen Sie "Registrieren" (Register), um ein neues Konto zu erstellen.
Schritt 3
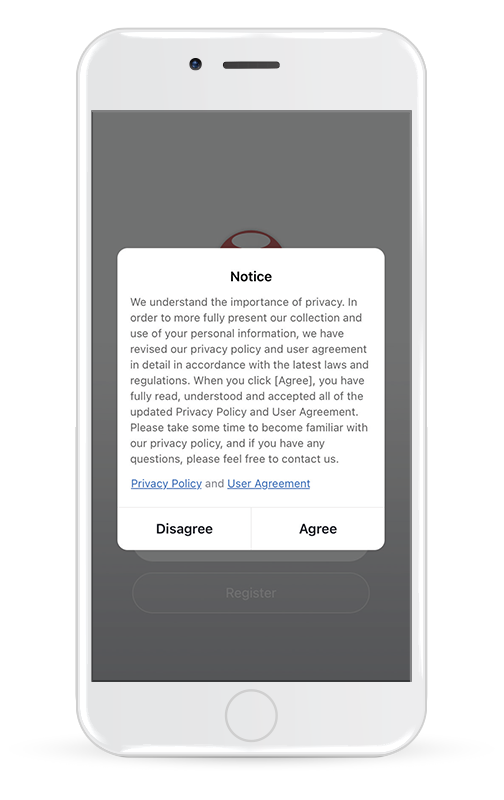
Lesen Sie die Datenschutzrichtlinie und die Benutzervereinbarung und wählen Sie Zustimmen, um fortzufahren.
Schritt 4
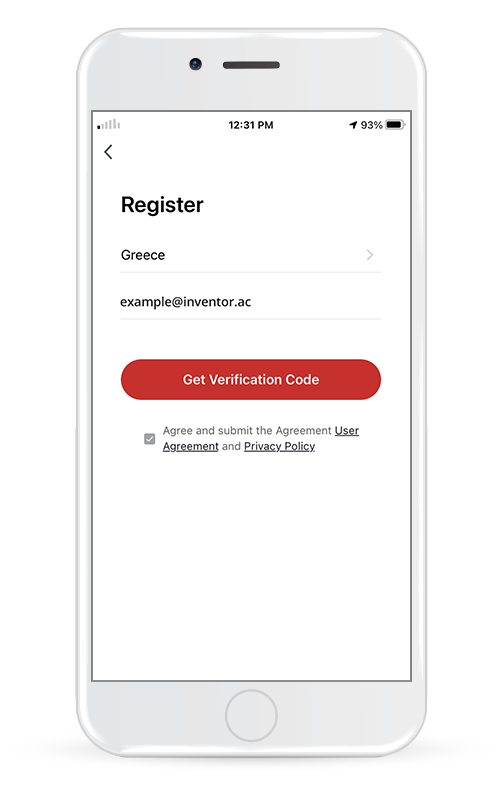
Wählen Sie Ihre Region und geben Sie Ihre E-Mail-Adresse oder Ihre Mobiltelefonnummer ein, um einen Verifizierungscode zu erhalten. Drücken Sie "Get Verification Code".
Schritt 5
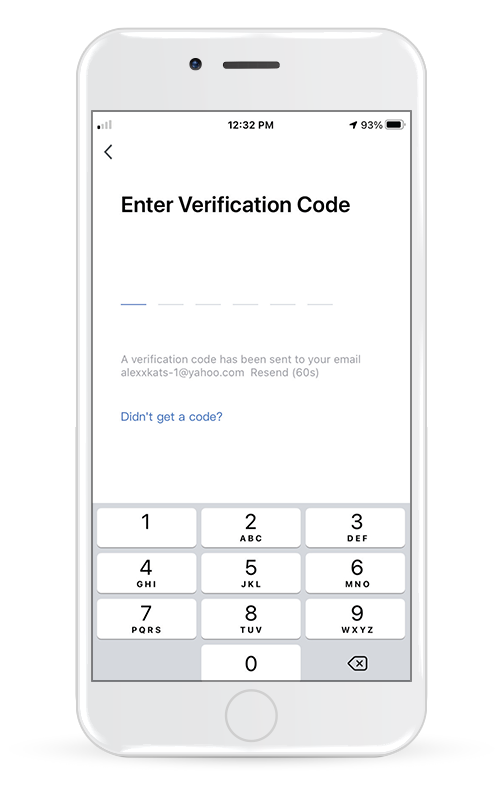
Geben Sie den Verifizierungscode ein, den Sie erhalten haben.
Schritt 6
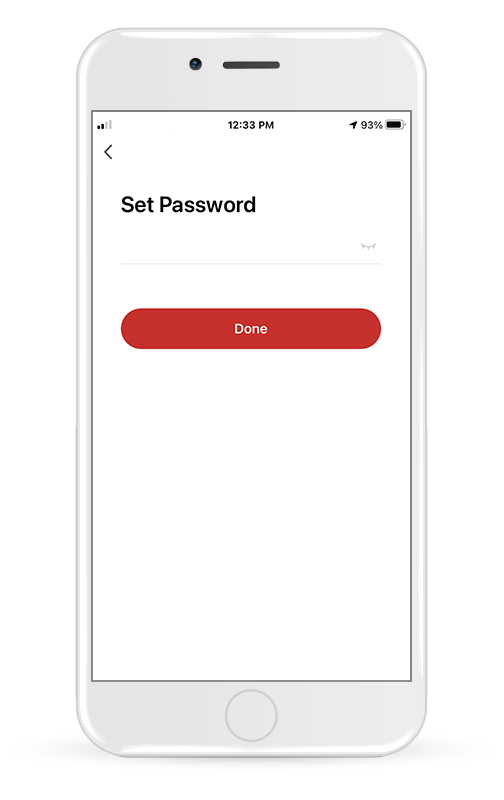
Fahren Sie fort, indem Sie Ihr eigenes Passwort festlegen.
Anlegen eines Domizils
Ein neues Zuhause anlegen und den Standort einrichten
Schritt 1
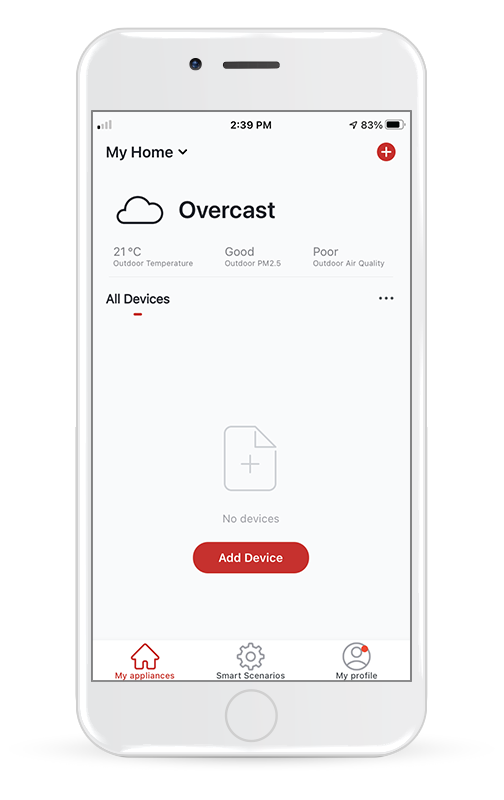
Drücken Sie auf "Mein Zuhause..." (My Home) in der oberen linken Ecke Ihres Bildschirms.
Schritt 2
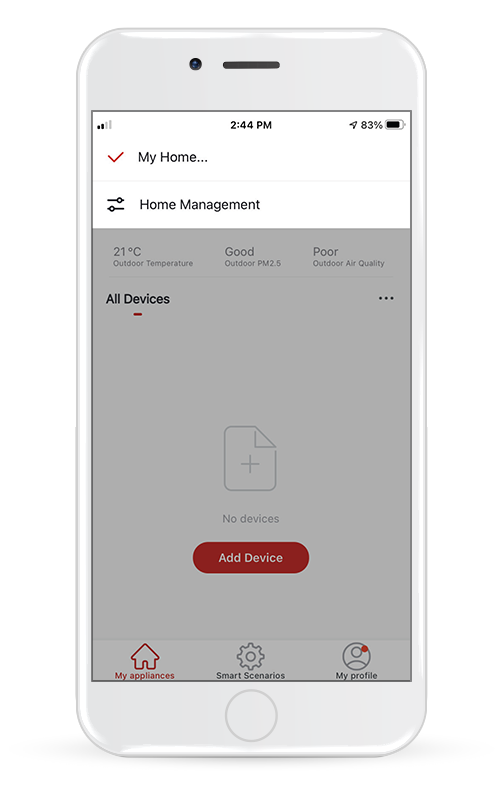
Wählen Sie "Hausverwaltung".(Home Management)
Schritt 3
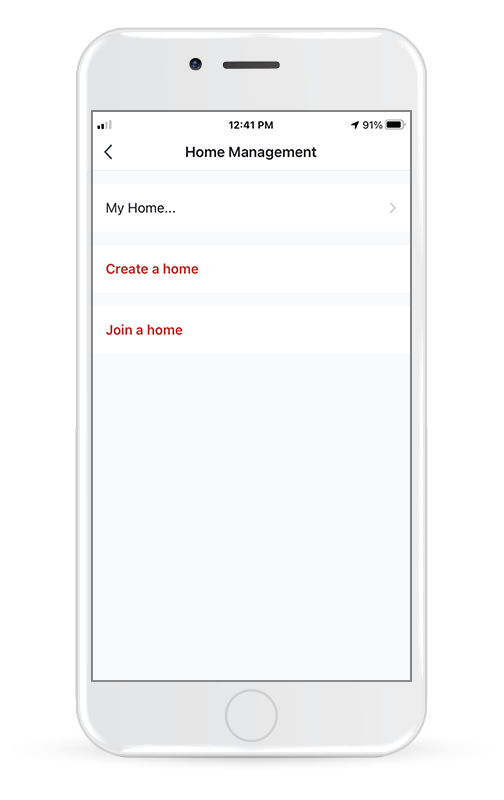
Wählen Sie das Standard-Home "Mein Home..." (My Home), um es zu bearbeiten.
Schritt 4
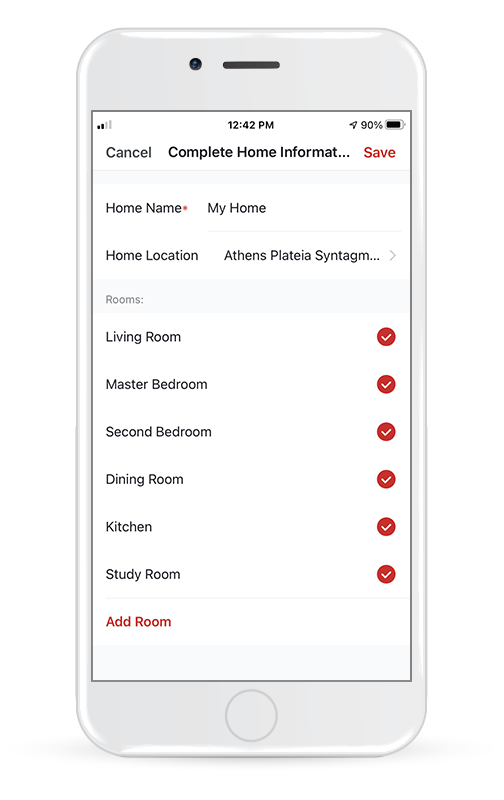
Geben Sie den identifizierenden Namen Ihres Hauses ein und drücken Sie die Taste "Home Location" (Standort des Hauses ).
Schritt 5
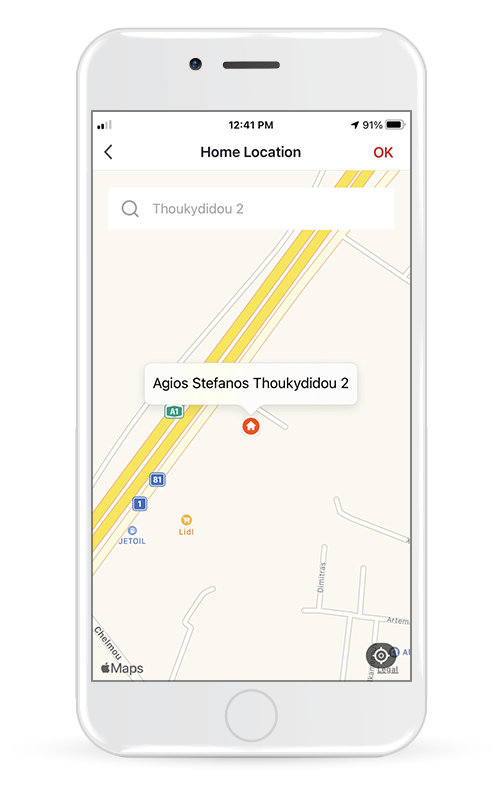
Use the built-in map to pinpoint your Home’s Location and press "OK".
Joining an existing Home
Schritt 1
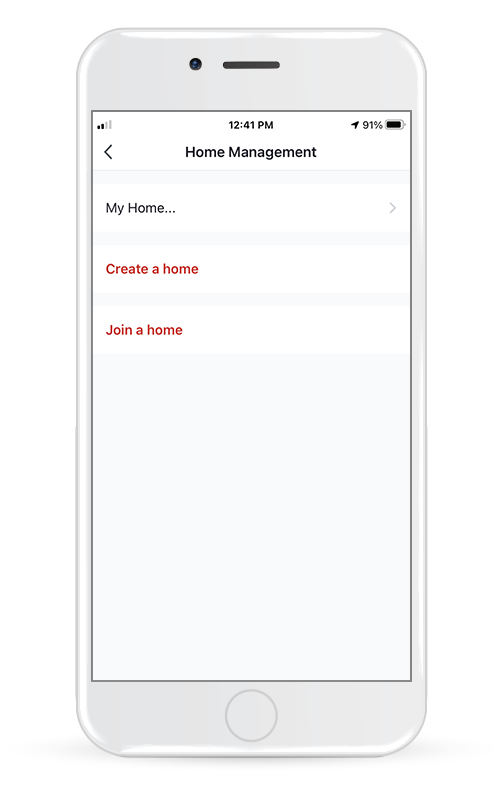
To join an existing Home, contact the administrator to get the invitation code.
Schritt 2
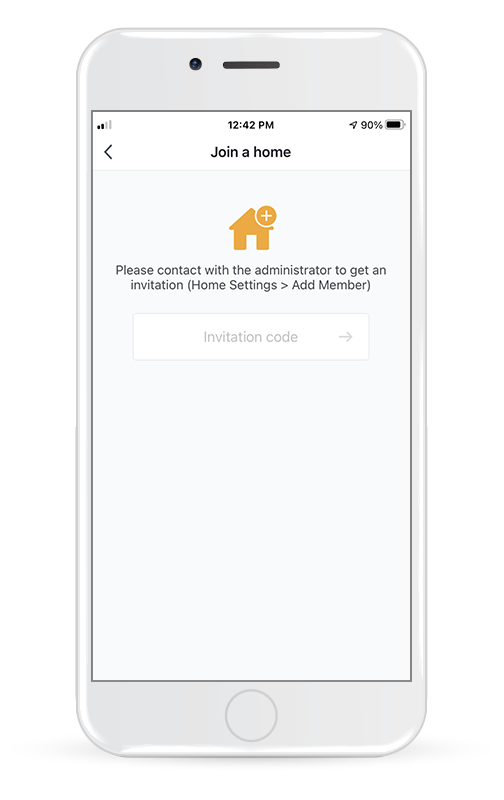
Then enter the code you have received to proceed.
Verbinden Sie Ihr Klimagerät mit Inventor Control Applikation
Manuelles Hinzufügen mit AP-Modus
Schritt 1
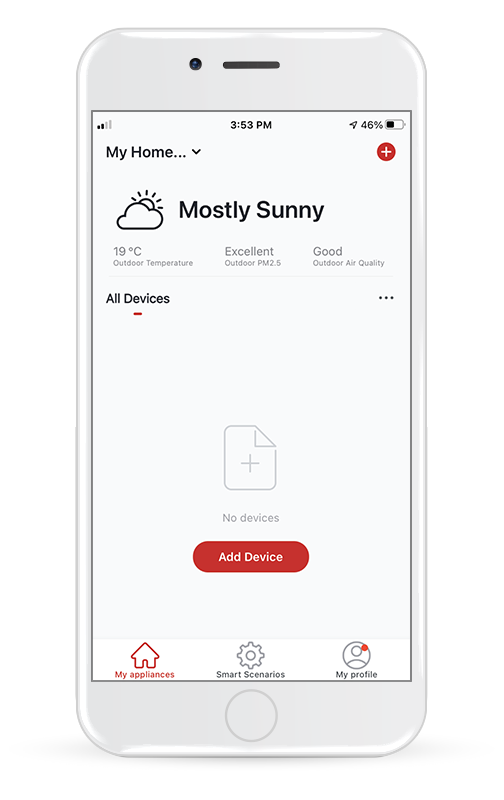
Wählen Sie "Gerät hinzufügen" (Add Device) oder das "+"-Symbol oben rechts auf dem Bildschirm.
Schritt 2
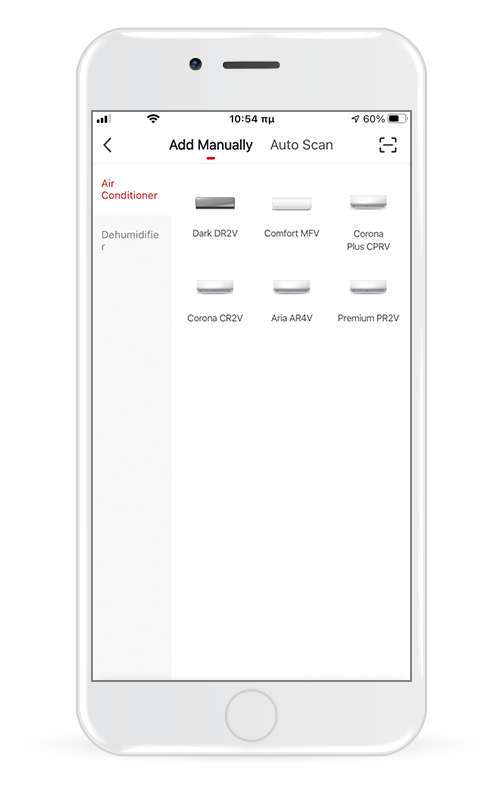
Wählen Sie in der oberen Leiste "Manuell hinzufügen" (Add Manually) und dann im Menü auf der linken Seite "Klimagerät" und den jeweiligen Modellnamen.
Schritt 3
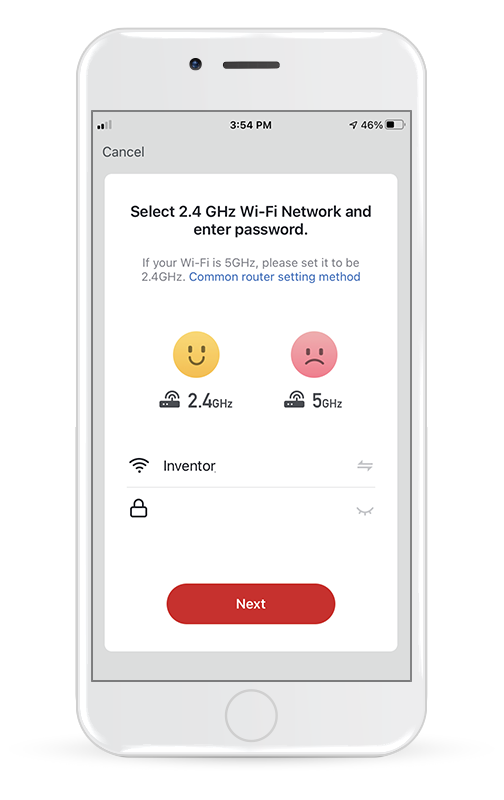
Wählen Sie Ihr Wi-Fi aus und geben Sie Ihr Passwort ein.
Schritt 4
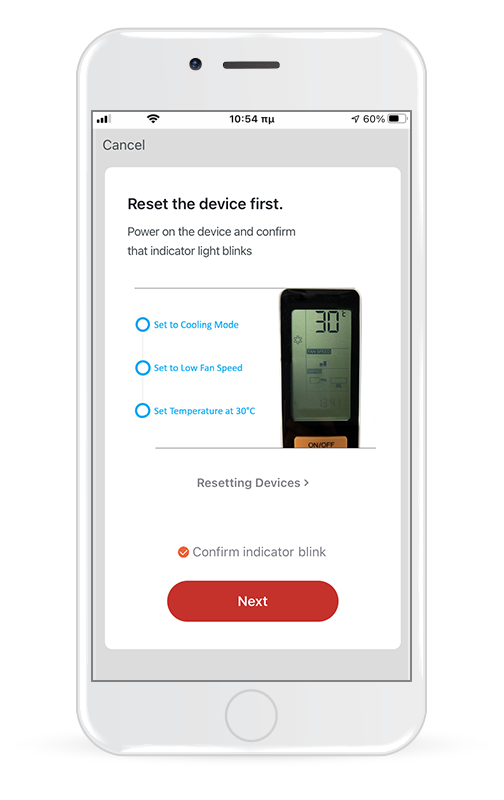
Schließen Sie das Klimagerät an das Stromnetz an und schalten Sie es ein. Stellen Sie das Klimagerät auf Kühlmodus, niedrige Gebläsedrehzahl und 30°C Temperatur ein. Vergewissern Sie sich, dass die Kopplungsanzeige auf der Anzeige des Gerätes blinkt und drücken Sie Bestätigen (Confirm) , um fortzufahren.
Schritt 5
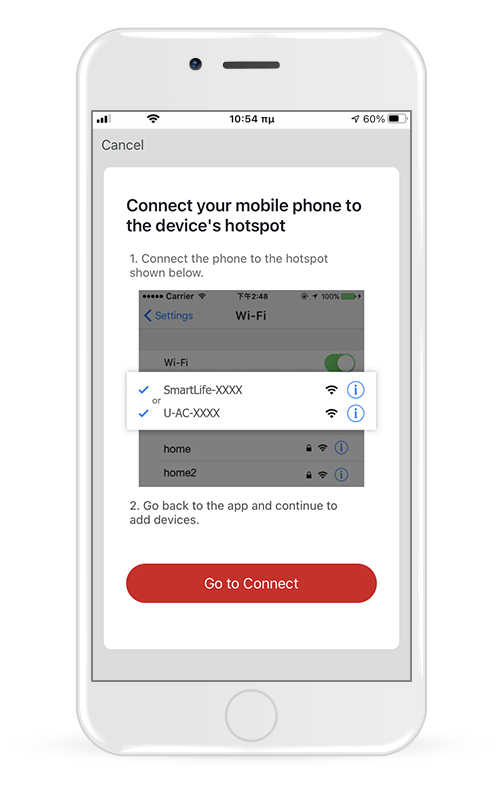
Drücken Sie "Go to Connect", um die Wi-Fi-Netzwerke Ihres Gerätes einzugeben.
Schritt 6
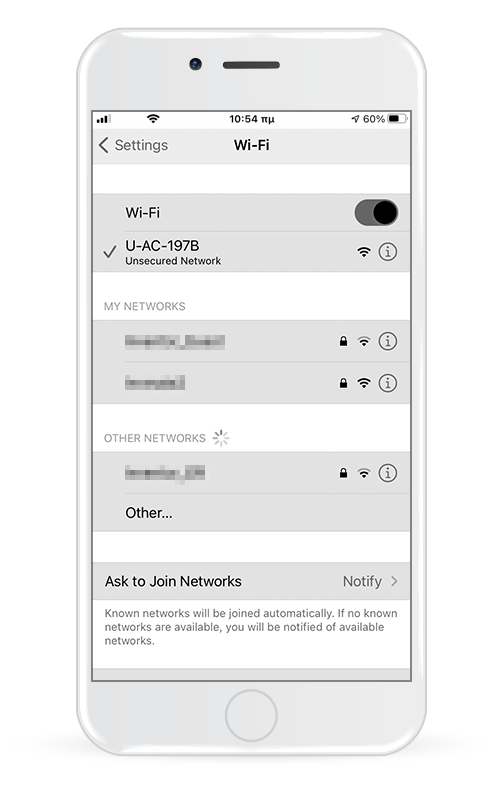
Verbinden Sie sich in den Einstellungen Ihres Mobilgerätes mit dem Netzwerk des Klimagerätes "U-AC-XXXX", kehren Sie zur Applikation zurück und drücken Sie "Weiter"(Next).
Schritt 7
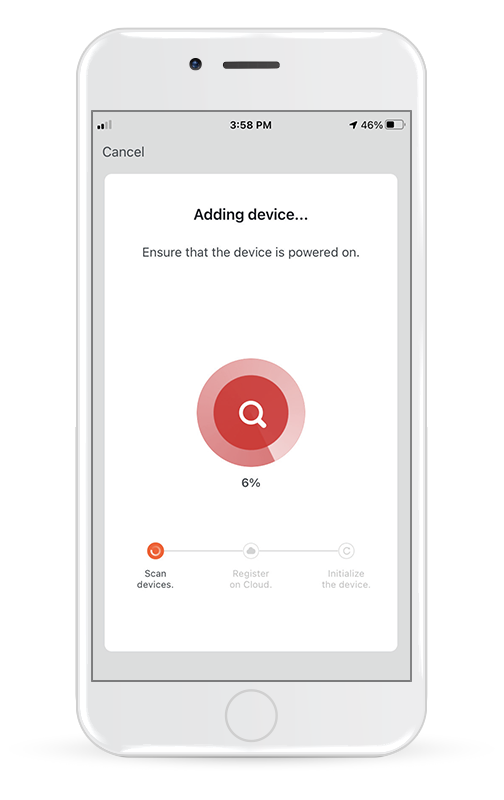
Warten Sie ein paar Augenblicke, bis der Kopplungsvorgang abgeschlossen ist.
Schritt 8
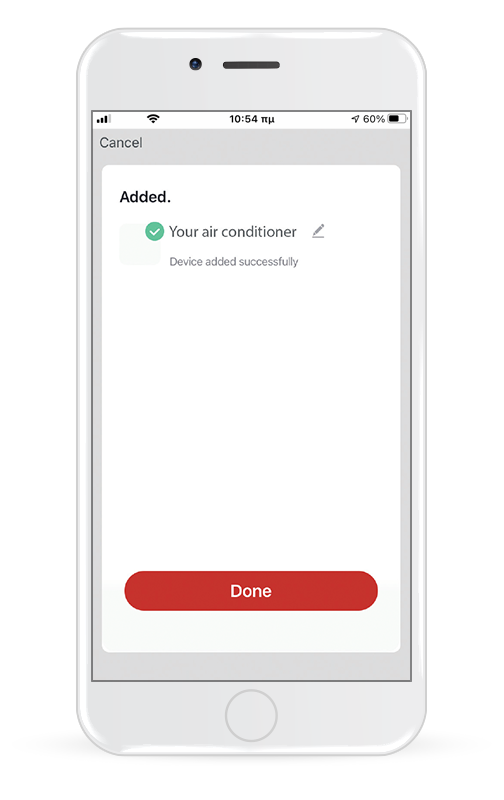
Wenn das Kopplungsverfahren abgeschlossen ist, können Sie, falls gewünscht, Ihr Gerät umbenennen. Drücken Sie "Fertig"(Done), wenn Sie fertig sind.
Schritt 9
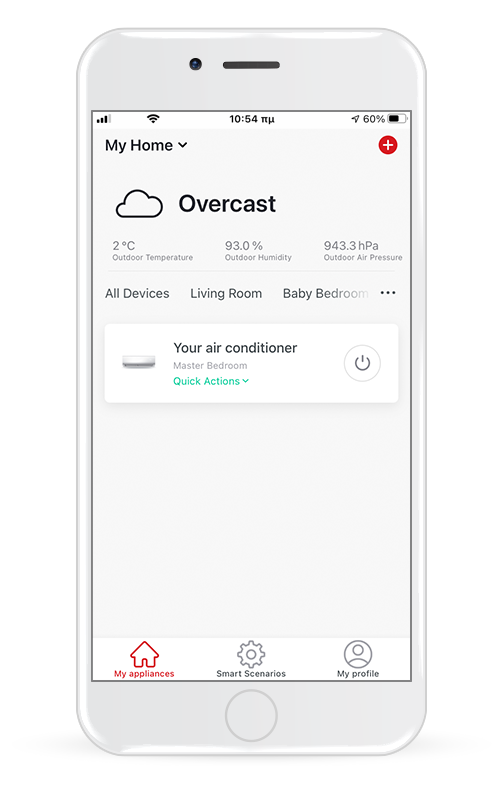
Sie sind bereit für die Fernverwaltung Ihrer Anlage!
Bedienungsanleitung
Applikation Vorteile
Benutzervereinbarung
Hinweis zum Datenschutz
Inventor Control (for Atmosphere XL dehumidifiers)
Download & Account Registration
Schritt 1

Scan Android QR code
Schritt 1

Or visit Play Store and search for “Inventor Control” app
Schritt 2

Select “Register” to create a new account.
Schritt 3

Read the Privacy Policy and User Agreement and select Agree to continue.
Schritt 4

Select your Region and enter you email address or your mobile phone number to receive a verification code. Press “Get Verification Code”.
Schritt 5

Enter the verification code you have received.
Schritt 6

Proceed by setting your own password.
Creating my Home
Creating a new Home and setting up the location
Schritt 1

Press "My Home…" on the top left corner of your screen.
Schritt 2

Select “Home Management”.
Schritt 3

Select the default Home “My Home…” to edit it.
Schritt 4

Insert your Home’s identifying name and press the “Home Location”.
Schritt 5

Use the built-in map to pinpoint your Home’s Location and press "OK".
Joining an existing Home
Schritt 1

To join an existing Home, contact the administrator to get the invitation code.
Schritt 2

Then enter the code you have received to proceed.
Connecting your Dehumidifier with Inventor Control
Add Manually with Easy Pairing
Schritt 1
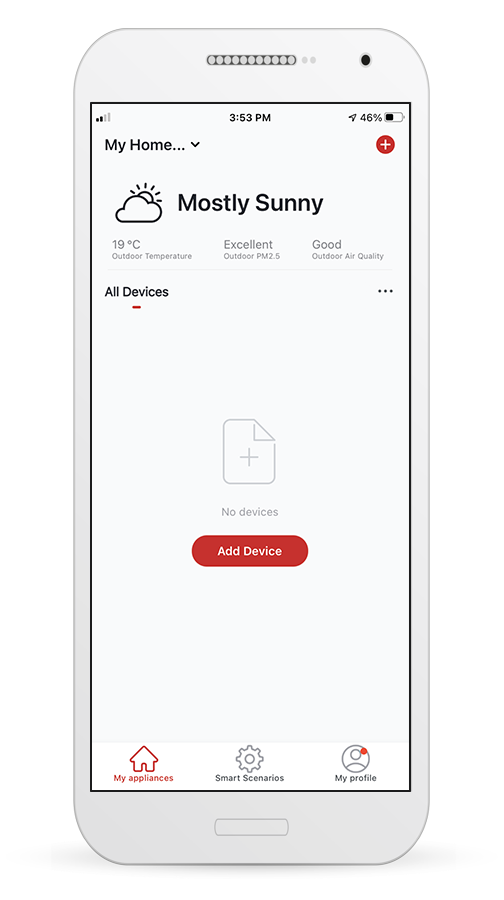
Select “Add Device” or the “+” icon on the top right of the screen.
Schritt 2
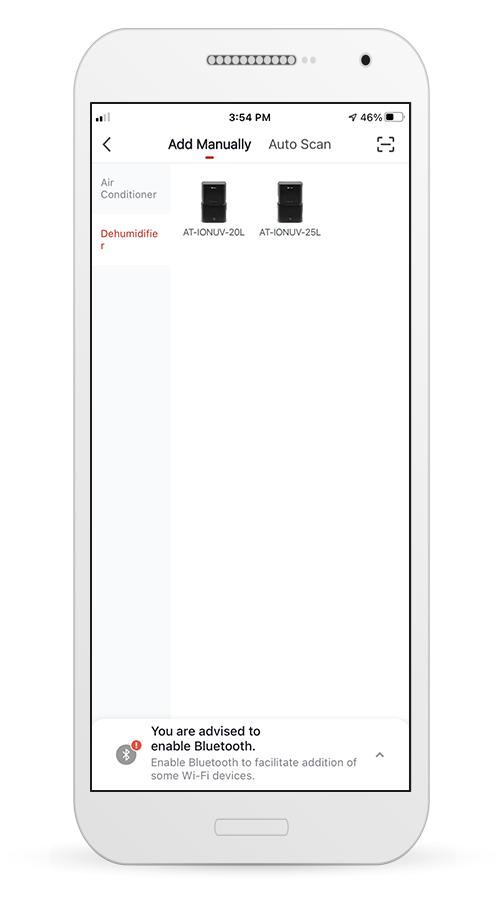
Select "Add Manually" on the top bar, select “Dehumidifier” in the left side menu and then choose the particular model.
Schritt 3
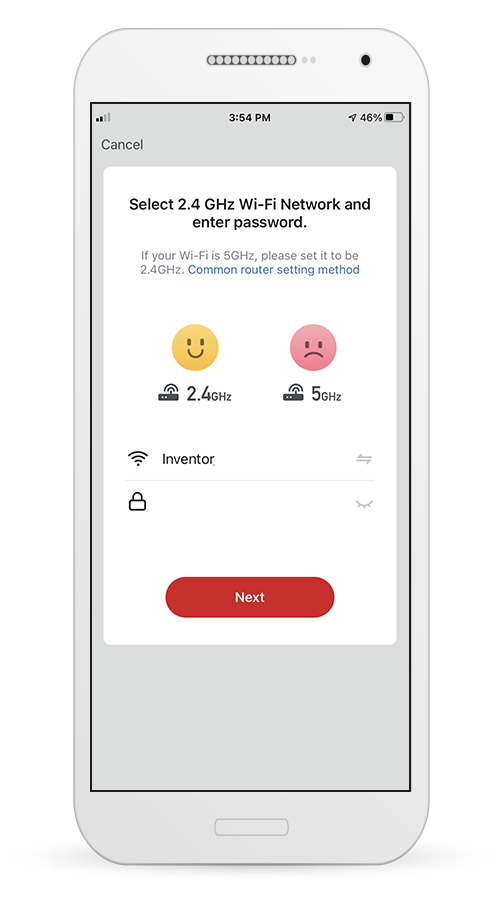
Select your Wi-Fi and input your password.
Schritt 4
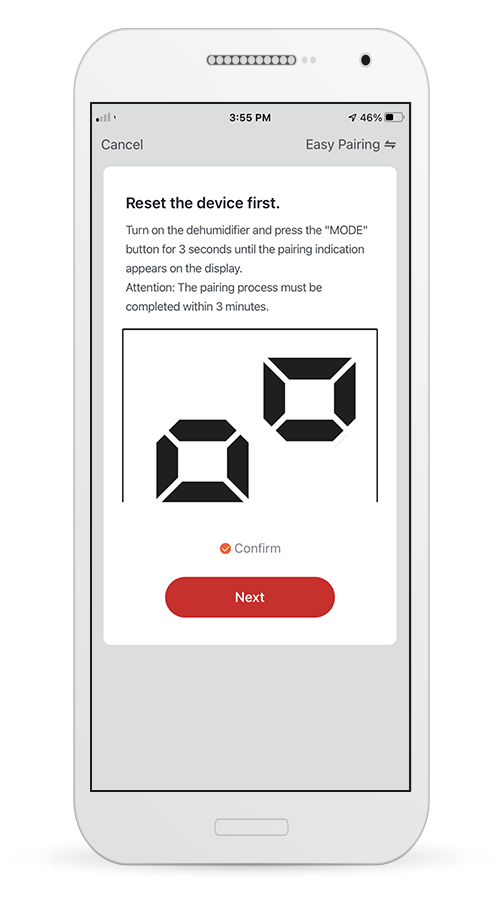
Press the "MODE" button on the dehumidifier for 3 seconds to enter the pairing mode. Verify that the pairing indication on the display of the device flashes quickly and press "Next".
Schritt 5
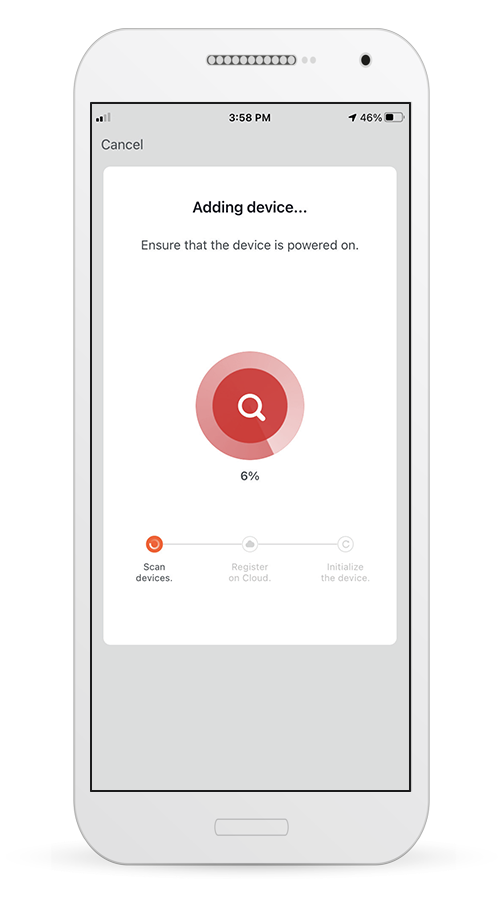
Allow a few moments for the pairing process to complete.
Schritt 6
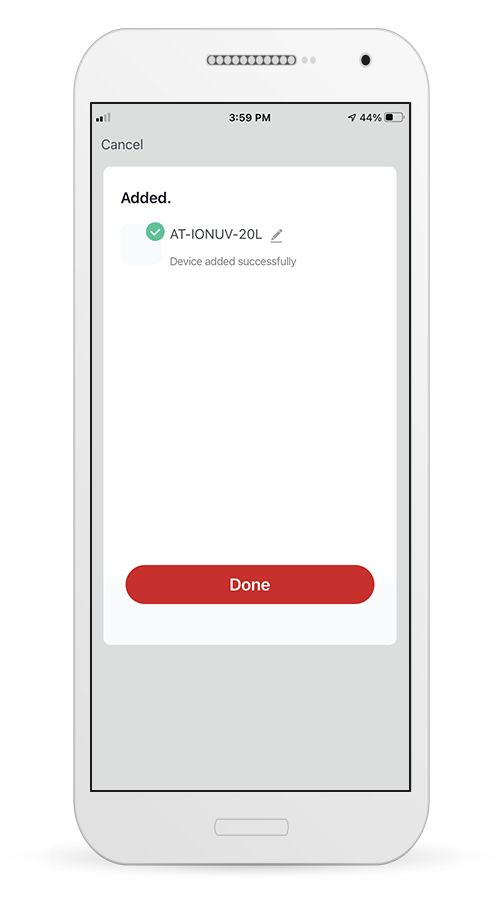
When the pairing is completed if you wish, you may rename your device. Press "Done" when ready.
Schritt 7
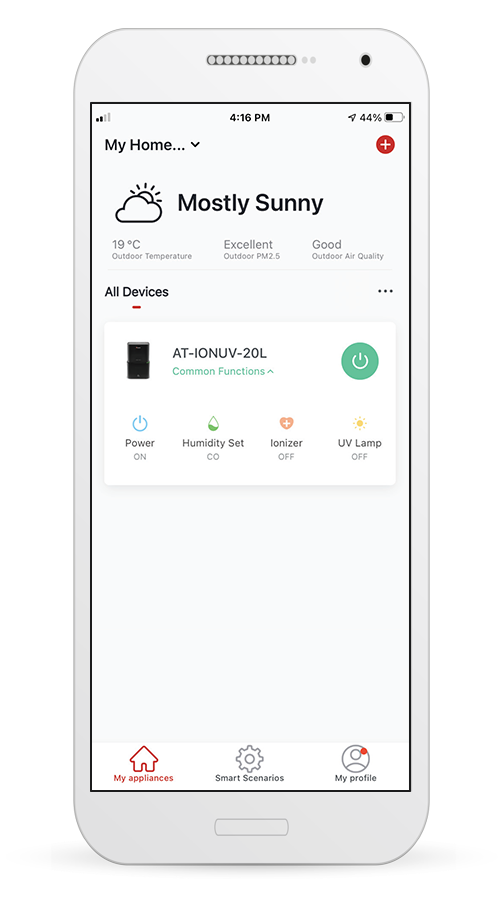
You are all set with the remote management of your appliance!
Add Manually with AP Mode
Schritt 1

Select “Add Device” or the “+” icon on the top right of the screen.
Schritt 2
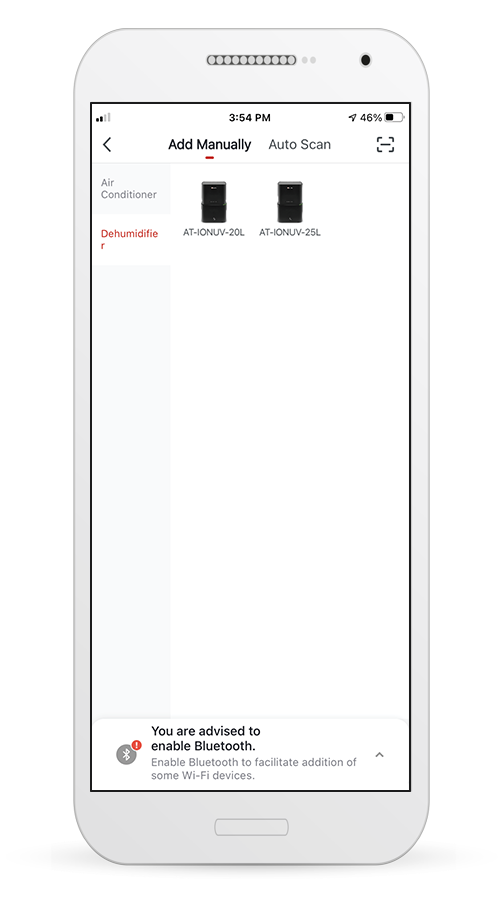
Select "Add Manually" on the top bar, then in the left side menu, select Dehumidifier and the particular model name.
Schritt 3

Select your Wi-Fi and input your password.
Schritt 4
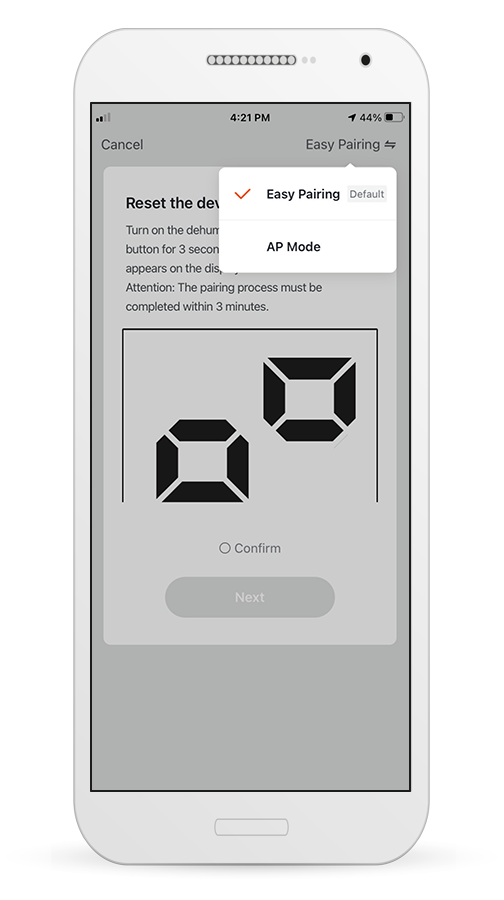
Tap on "Easy Pairing" on the top right of the screen and select "AP Mode".
Schritt 5
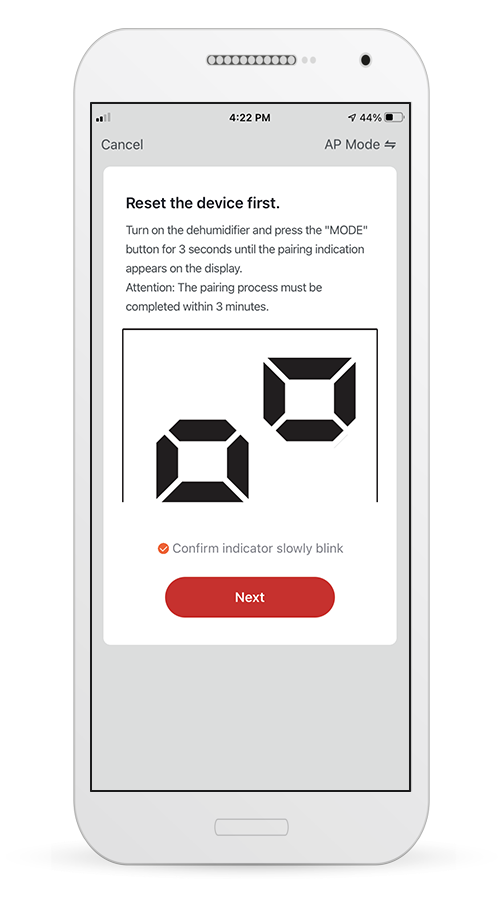
Press the "MODE" button on the dehumidifier for 3 seconds to enter the pairing mode. Verify that the pairing indication on the display of the device flashes quickly and press "Next".
Schritt 6
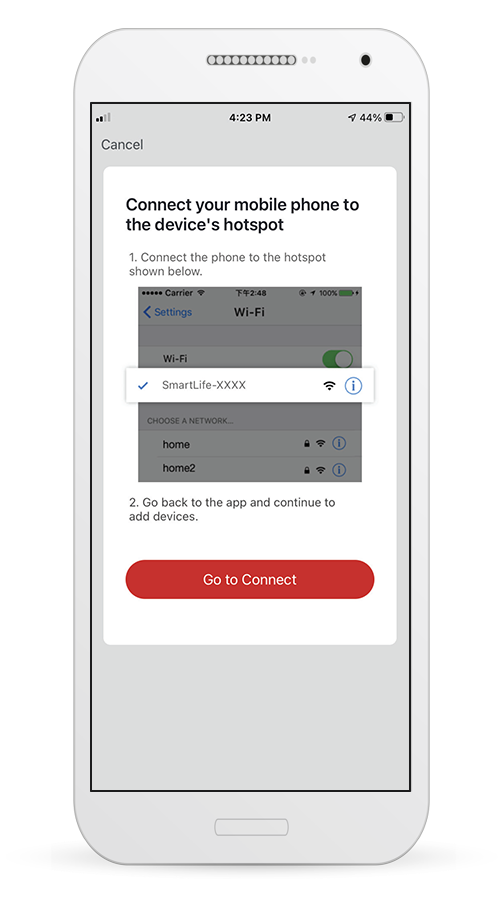
Press “Go to Connect” to enter your device’s Wi-Fi Networks.
Schritt 7
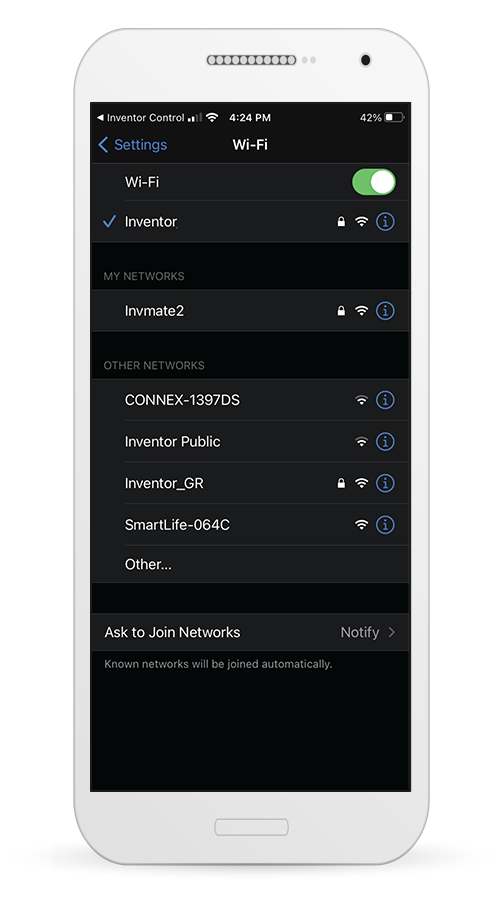
From your mobile device settings, connect to the dehumidifier's network "SmartLife-XXXX". Return to the app and press "Next".
Schritt 8

Allow a few moments for the pairing process to complete.
Schritt 9
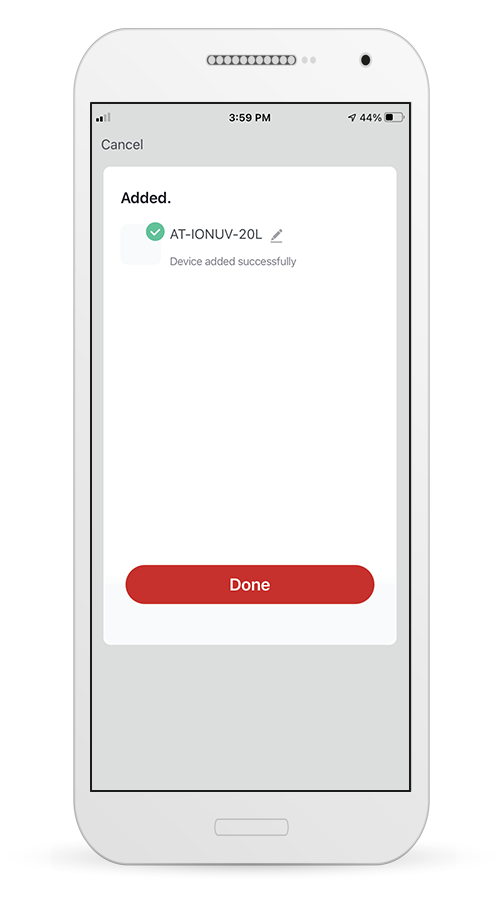
When the pairing is completed if you wish, you may rename your device. Press "Done" when ready.
Schritt 10
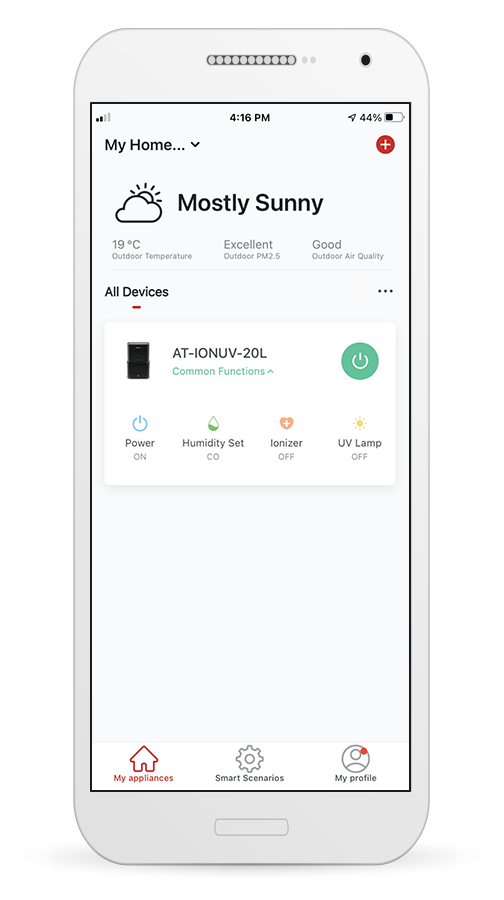
You are all set with the remote management of your appliance!
Add Automatically
Schritt 1
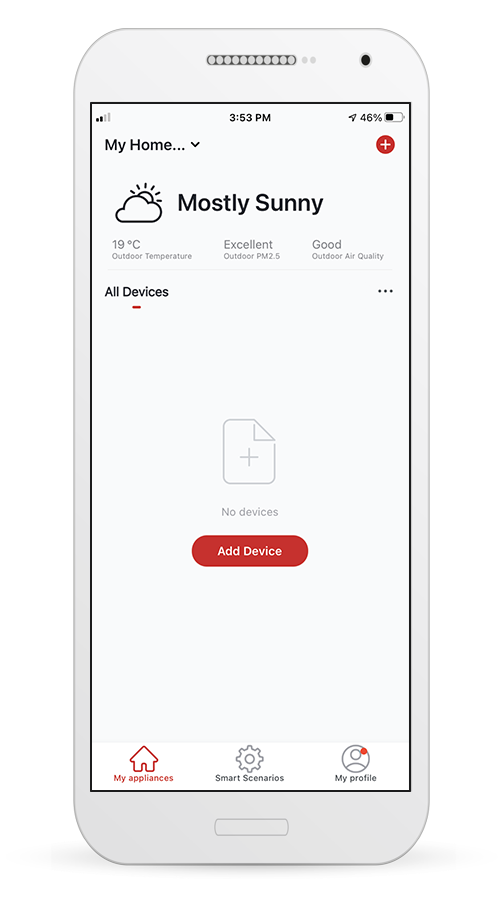
Select “Add Device” or the “+” icon on the top right of the screen.
Schritt 2
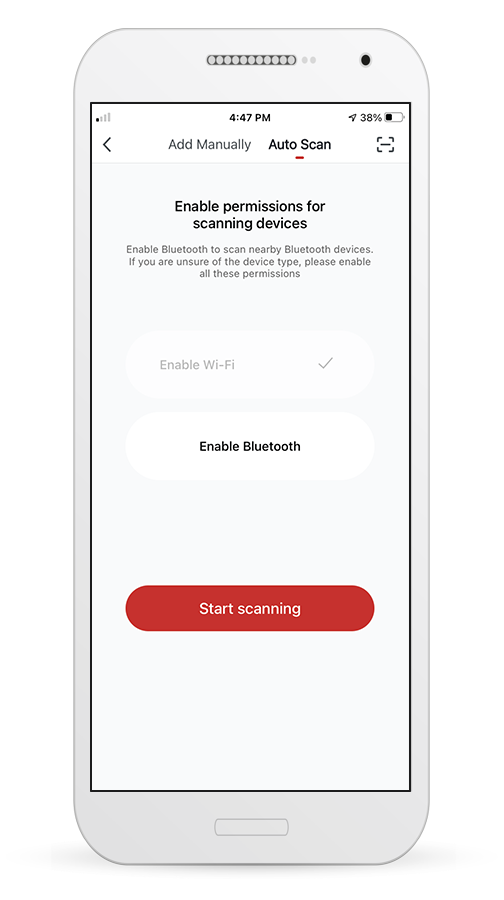
Select "Auto Scan" on the top bar and press "Start scanning".
Schritt 3
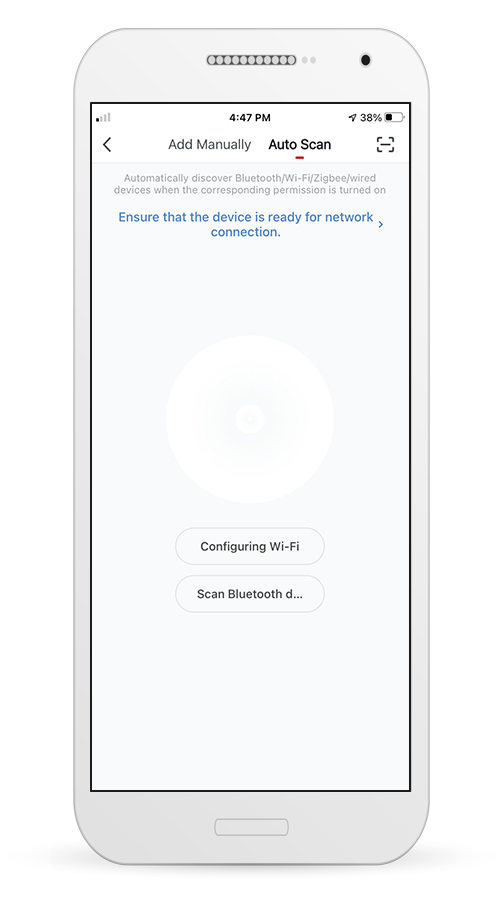
Select "Configuring Wi-Fi" to input your Wi-Fi name and password. Select "Mode" on the dehumidifier for 3 seconds to enter the pairing mode and press "Next".
Schritt 4
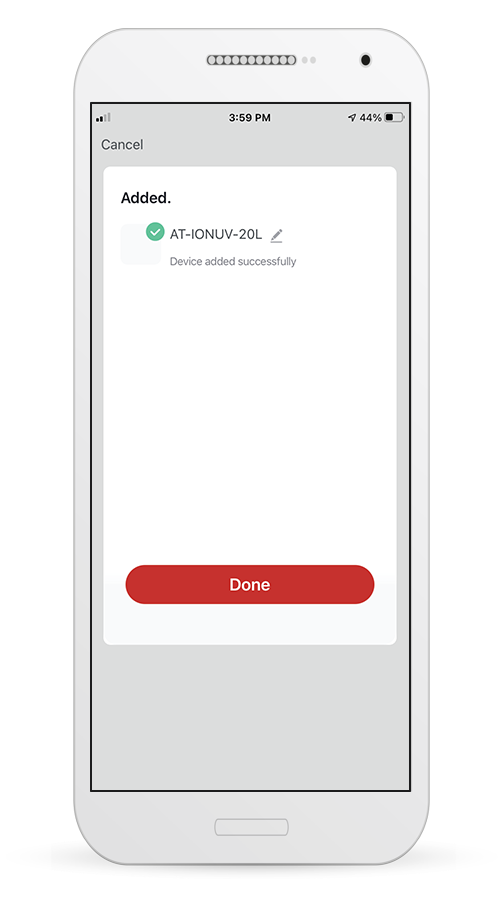
When the search is complete, your device will appear on the screen. Press “Next”.
Schritt 5
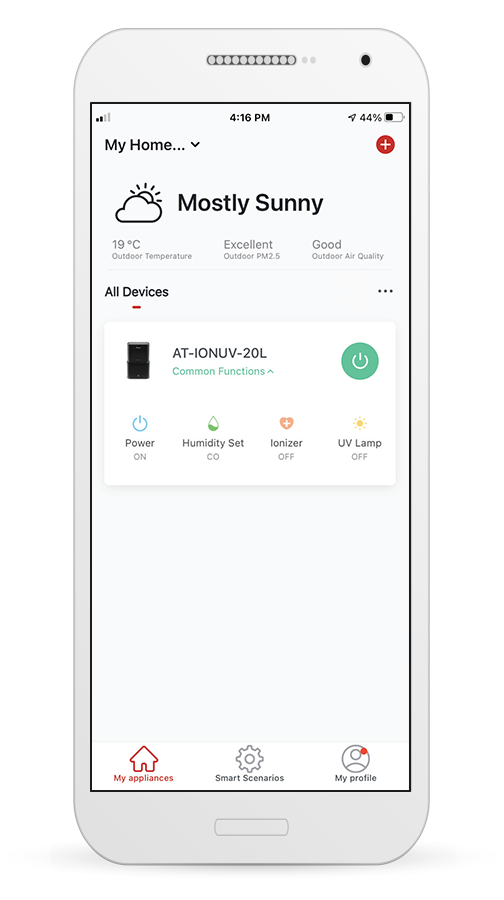
You are all set with the remote management of your appliance!
Note 1: Due to different Wi-Fi settings, the Add Automatically process might not be able to find your dehumidifier. In this case you can connect using one of the other two Manual methods.
Note 2: The process should be completed within 3 minutes. If not, please repeat it.
Bedienungsanleitung
Applikation Vorteile
Benutzervereinbarung
Hinweis zum Datenschutz
Inventor Control (for Atmosphere XL dehumidifiers)
Application Download & Account Creation
Schritt 1

Scan iOS QR code
Schritt 1

Or visit App Store and search for “Inventor Control” app
Schritt 2

Select “Register” to create a new account.
Schritt 3

Read the Privacy Policy and User Agreement and select Agree to continue.
Schritt 4

Select your Region and enter you email address or your mobile phone number to receive a verification code. Press “Get Verification Code”.
Schritt 5

Enter the verification code you have received.
Schritt 6

Proceed by setting your own password.
Creating my Home
Creating a new Home and setting up the location
Schritt 1

Press "My Home…" on the top left corner of your screen.
Schritt 2

Select “Home Management”.
Schritt 3

Select the default Home “My Home…” to edit it.
Schritt 4

Insert your Home’s identifying name and press the “Home Location”.
Schritt 5

Use the built-in map to pinpoint your Home’s Location and press "OK".
Joining an existing Home
Schritt 1

To join an existing Home, contact the administrator to get the invitation code.
Schritt 2

Then enter the code you have received to proceed.
Connecting your Dehumidifier with Inventor Control
Add Manually with Easy Pairing
Schritt 1
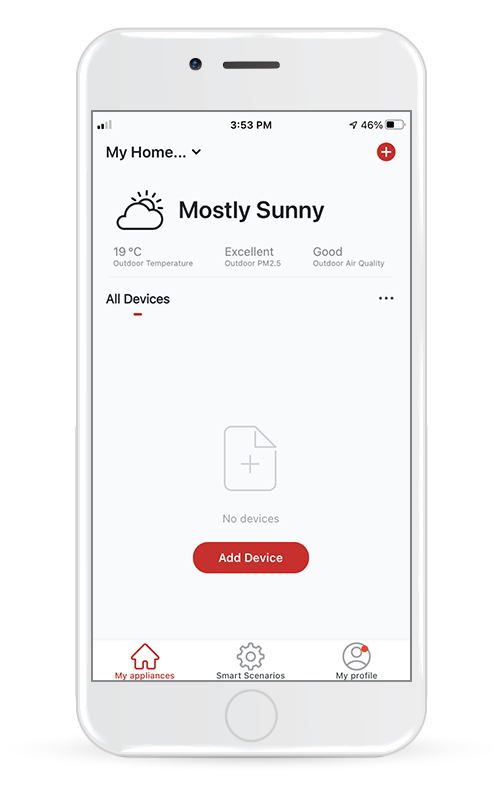
Select “Add Device” or the “+” icon on the top right of the screen.
Schritt 2
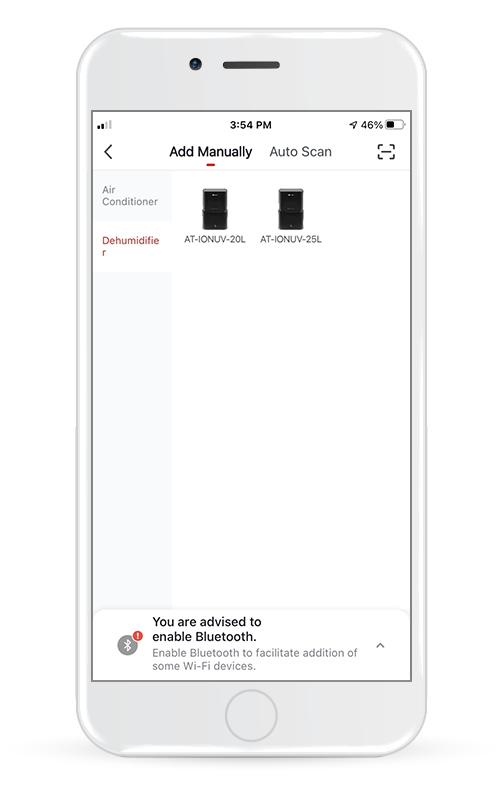
Select "Add Manually" on the top bar, select “Dehumidifier” in the left side menu and then choose the particular model.
Schritt 3
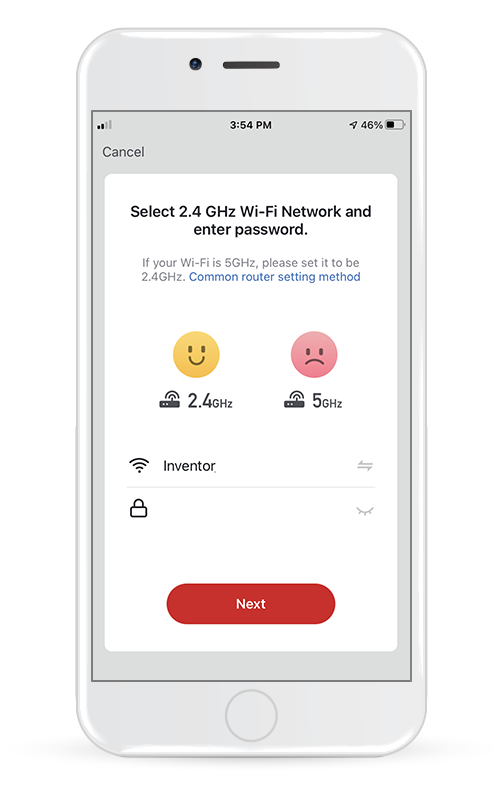
Select your Wi-Fi and input your password.
Schritt 4
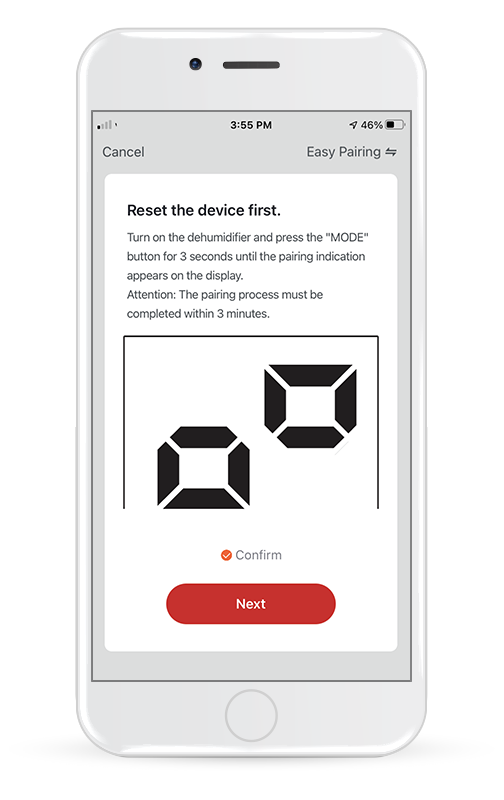
Press the "MODE" button on the dehumidifier for 3 seconds to enter the pairing mode. Verify that the pairing indication on the display of the device flashes quickly and press "Next".
Schritt 5
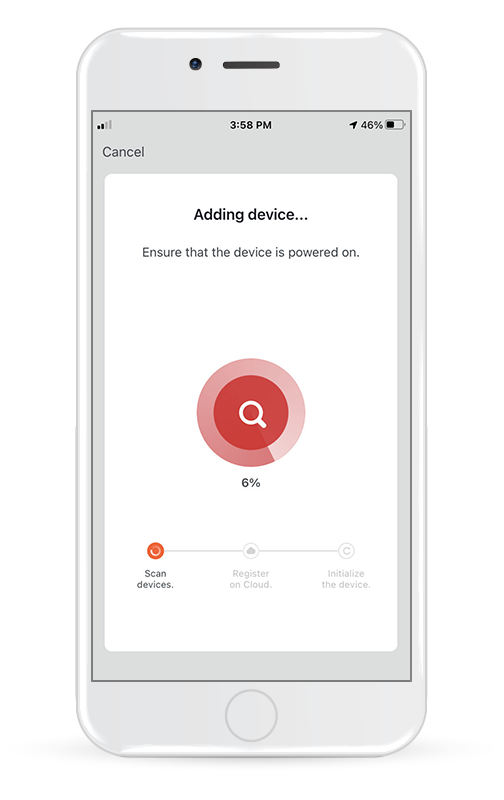
Allow a few moments for the pairing process to complete.
Schritt 6
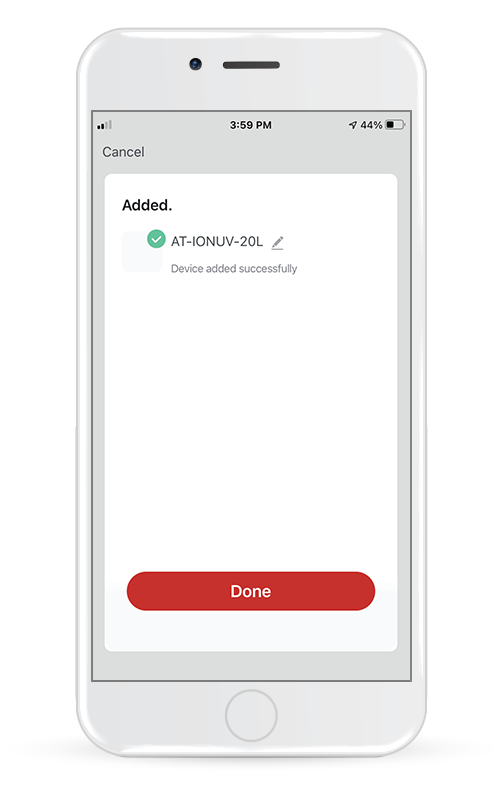
When the pairing is completed if you wish, you may rename your device. Press "Done" when ready.
Schritt 7
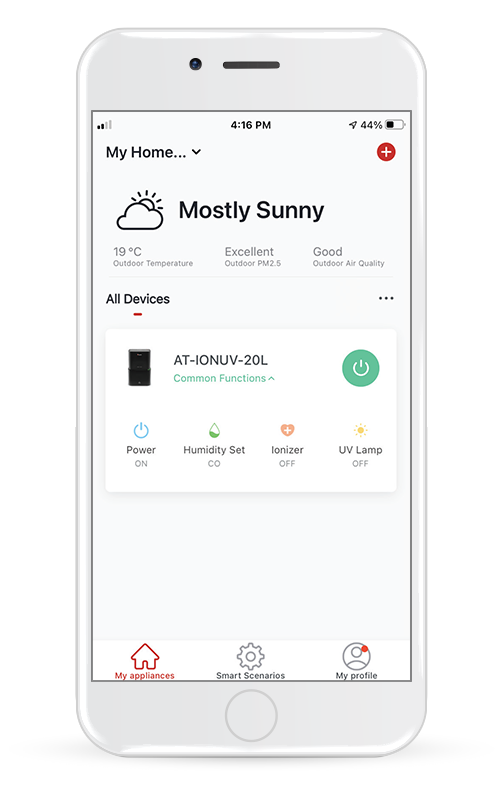
You are all set with the remote management of your appliance!
Add Manually with AP Mode
Schritt 1

Select “Add Device” or the “+” icon on the top right of the screen.
Schritt 2
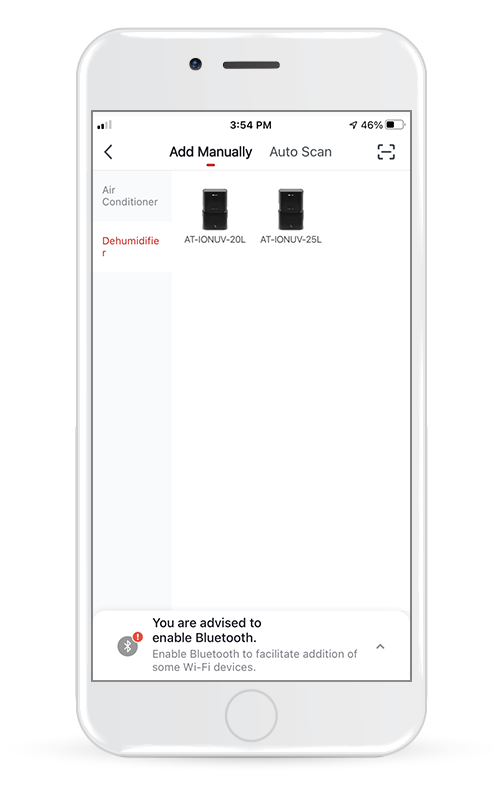
Select "Add Manually" on the top bar, then in the left side menu, select Dehumidifier and the particular model name.
Schritt 3

Select your Wi-Fi and input your password.
Schritt 4
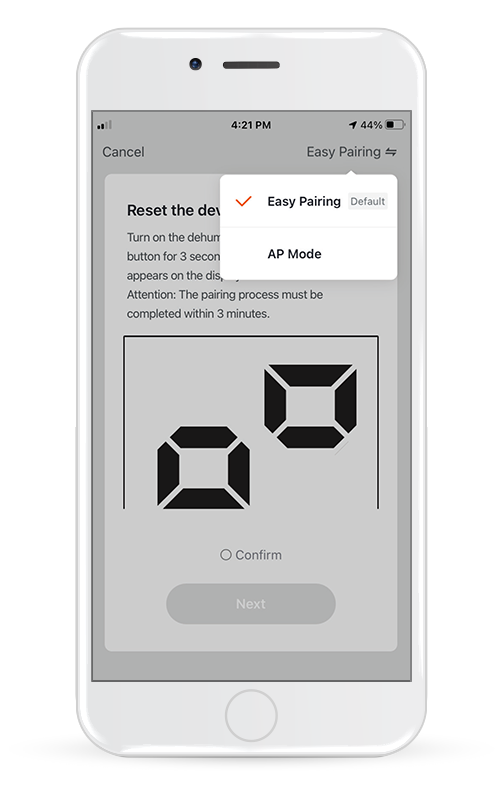
Tap on "Easy Pairing" on the top right of the screen and select "AP Mode".
Schritt 5
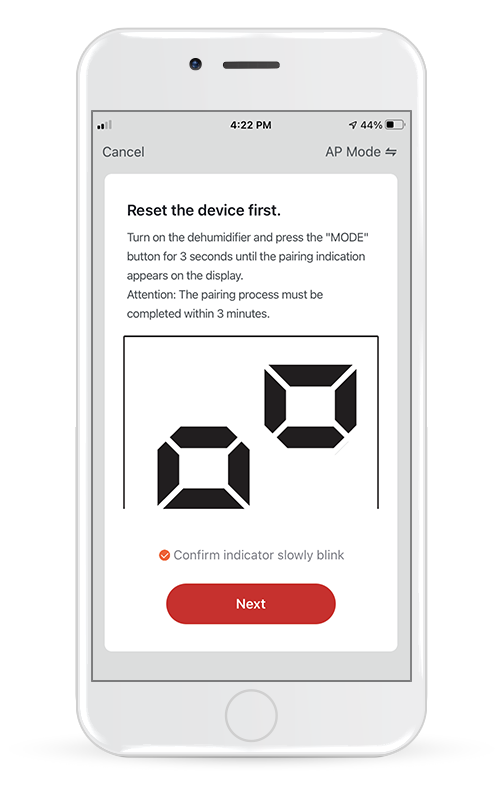
Press the "MODE" button on the dehumidifier for 3 seconds to enter the pairing mode. Verify that the pairing indication on the display of the device flashes quickly and press "Next".
Schritt 6
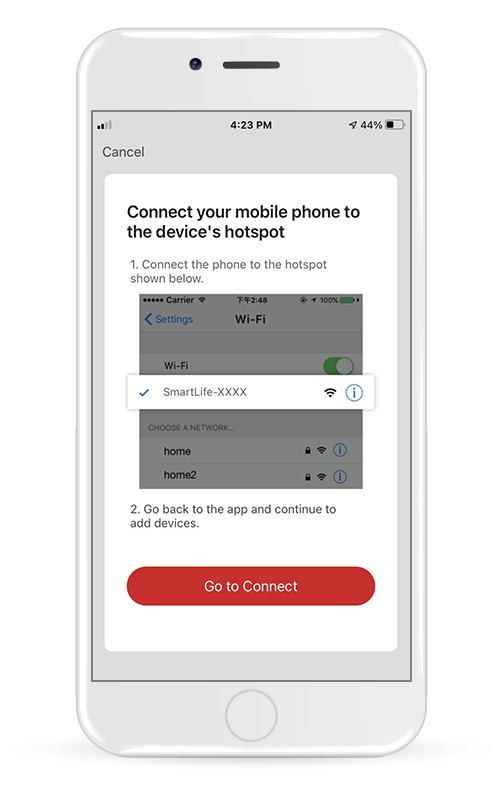
Press “Go to Connect” to enter your device’s Wi-Fi Networks.
Schritt 7
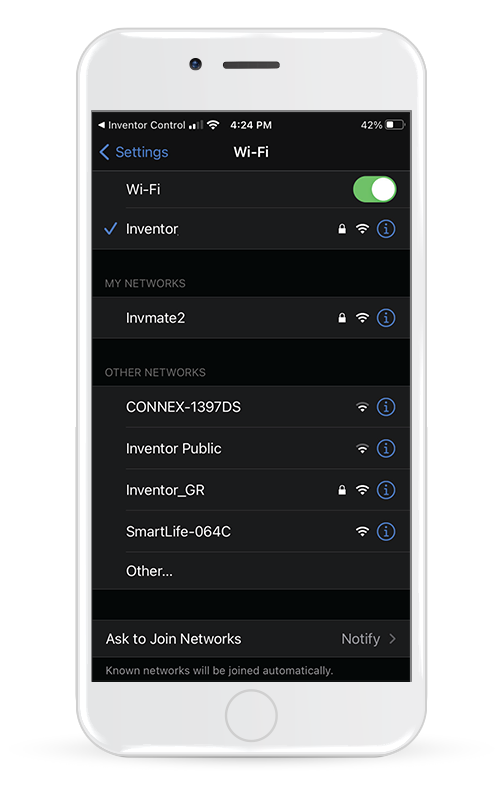
From your mobile device settings, connect to the dehumidifier's network "SmartLife-XXXX". Return to the app and press "Next".
Schritt 8

Allow a few moments for the pairing process to complete.
Schritt 9
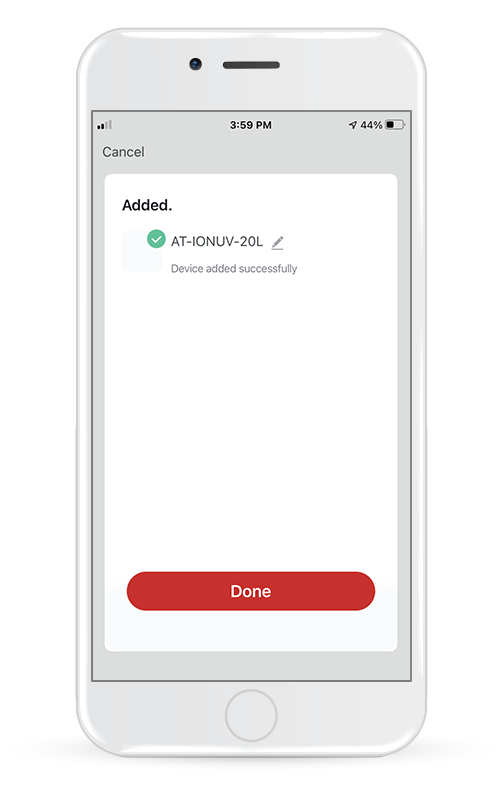
When the pairing is completed if you wish, you may rename your device. Press "Done" when ready.
Schritt 10
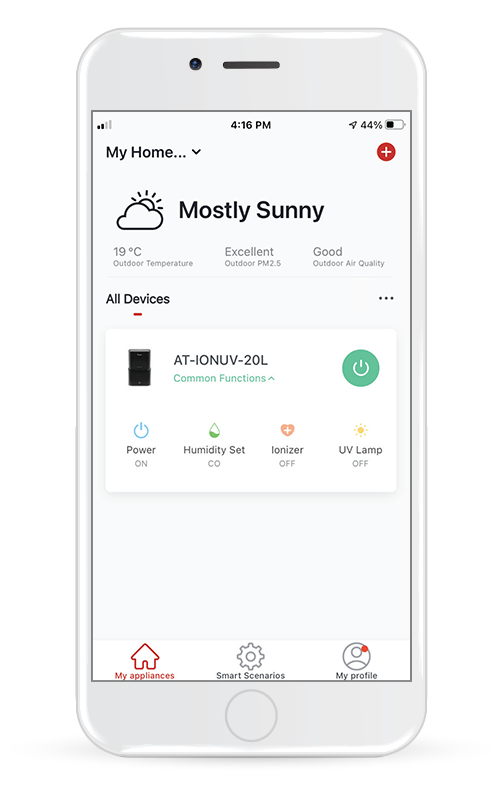
You are all set with the remote management of your appliance!
Add Automatically
Schritt 1
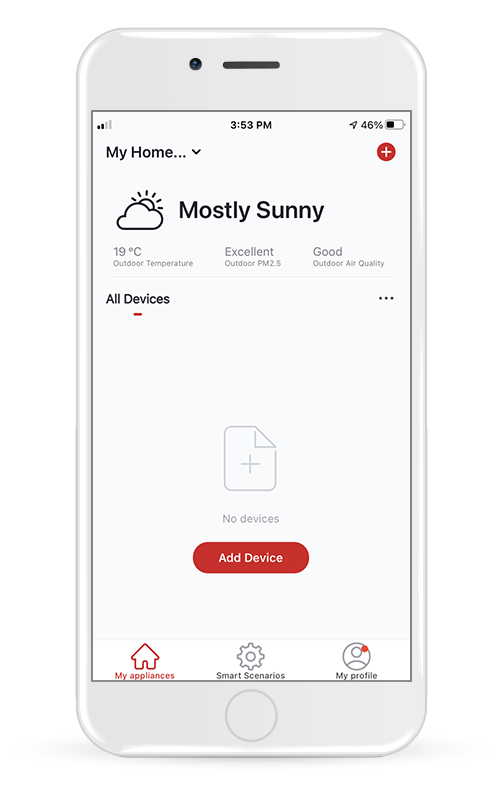
Select “Add Device” or the “+” icon on the top right of the screen.
Schritt 2
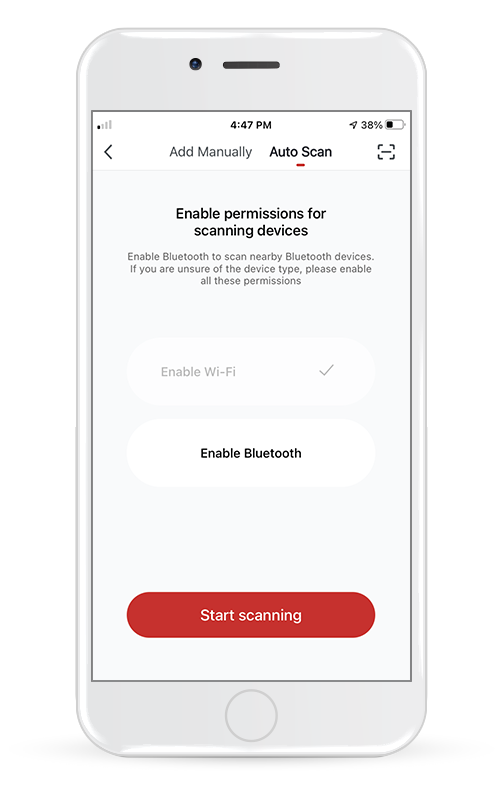
Select "Auto Scan" on the top bar and press "Start scanning".
Schritt 3
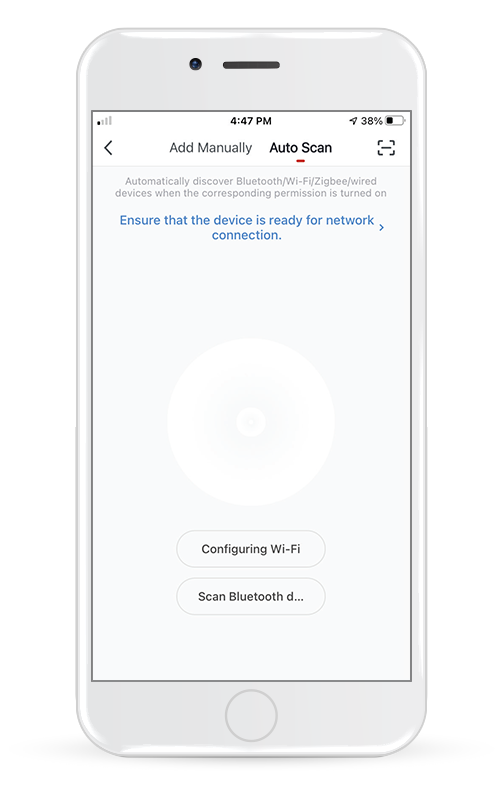
Select "Configuring Wi-Fi" to input your Wi-Fi name and password. Select "Mode" on the dehumidifier for 3 seconds to enter the pairing mode and press "Next".
Schritt 4
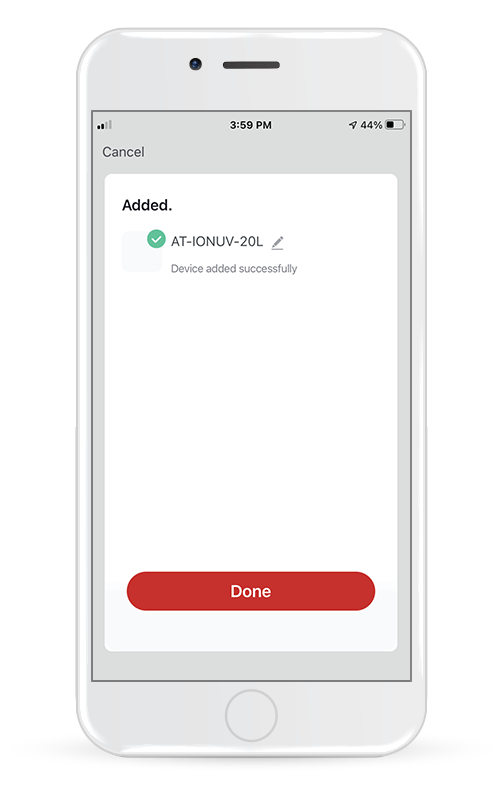
When the search is complete, your device will appear on the screen. Press “Next”.
Schritt 5
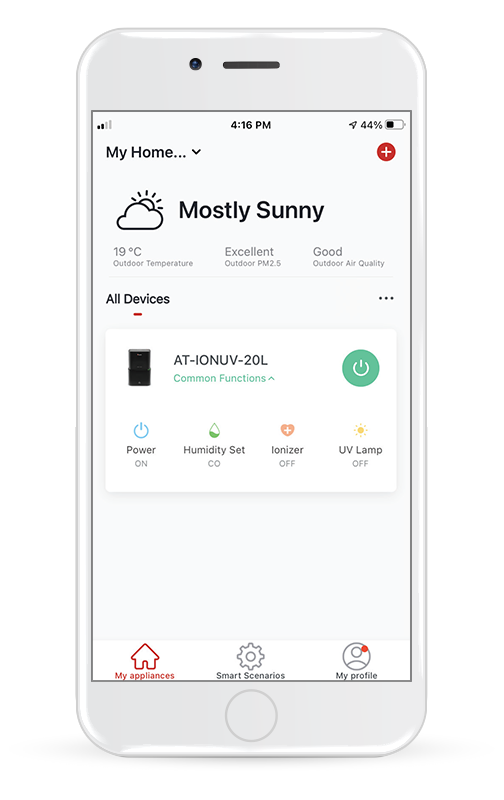
You are all set with the remote management of your appliance!
Note 1: Due to different Wi-Fi settings, the Add Automatically process might not be able to find your dehumidifier. In this case you can connect using one of the other two Manual methods.
Note 2: The process should be completed within 3 minutes. If not, please repeat it.
Bedienungsanleitung
Applikation Vorteile
Benutzervereinbarung
Hinweis zum Datenschutz
Smart Clima für Android Operationssystem (für Dark-Klimageräte)
So bedienen Sie Ihr Klimagerät über Wi-Fi:
Schritt 1

Suchen Sie die Applikation Smart Clima und laden Sie sie von Google Play herunter.
Schritt 2

Wählen Sie "Registrieren" (Register), um ein neues Konto zu erstellen.
Schritt 3

Sie können ein Konto mit Ihrer E-Mail-Adresse erstellen.
Schritt 4

Nachdem Sie Ihr Konto erstellt haben, geben Sie Ihre E-Mail und Ihr Passwort ein, um sich anzumelden.
Schritt 5

Wählen Sie auf dem Startbildschirm der Applikation das +-Symbol in der oberen rechten Ecke, um die Einrichtung Ihrer Klimaanlage mit der Applikation zu starten.
Schritt 6

Wählen Sie "Air Conditioner" (Klimaanlage) , und drücken Sie dann die Taste "Start Adding" ( Hinzufügen) unten.
Schritt 7

Nachdem Sie das Klimagerät vom Stromnetz getrennt und wieder angeschlossen haben, drücken Sie die Taste „Next“(Weiter).
Schritt 8

Schalten Sie das Klimagerät ein und drücken Sie dann die Taste „Next“ (Weiter).
Schritt 9

Stellen Sie das Klimagerät auf folgende Einstellungen: Kühlbetrieb, niedrige Lüftergeschwindigkeit und 30°C. Drücken Sie dann die Taste :Next“(Weiter).
Schritt 10

Suchen Sie von Ihrem Smartphone oder Tablet aus das WLAN des Klimagerätes mit dem Namen (SSID):"U-ACxxxx", und verbinden Sie sich mit diesem.
Wenn Sie verbunden sind, kehren Sie zur Anwendung zurück und drücken Sie die Taste "Bereits verbunden" (Already connected), um fortzufahren.
Schritt 11

Wählen Sie Ihr Heim-WLAN aus und drücken Sie die Taste „Weiter“ (Next).
Schritt 12

Geben Sie das Passwort für Ihr Heim-WLAN ein und drücken Sie "Weiter"(Next), um die Netzwerkkonfiguration zu starten.
Schritt 13

In ca. 1' ist der Vorgang automatisch abgeschlossen.
Schritt 14

Wählen Sie anschließend die Stadt aus, in der das Klimagerät installiert werden soll.
Drücken Sie "Speichern"(Save), um den Vorgang abzuschließen.
Schritt 15

Ihr Klimagerät wird auf dem Startbildschirm der Applikation angezeigt!
Smart Clima Applikation für iOS Operationssystem (für Dark-Klimageräte)
So bedienen Sie Ihr Klimagerät über Wi-Fi:
Schritt 1

Suchen Sie die Anwendung Smart Clima und laden Sie sie aus dem App Store herunter.
Schritt 2

Wählen Sie "Registrieren" (Register) , um ein neues Konto zu erstellen.
Schritt 3

Sie können ein Konto mit Ihrer E-Mail-Adresse erstellen.
Schritt 4

Nachdem Sie Ihr Konto erstellt haben, geben Sie Ihre E-Mail und Ihr Passwort ein, um sich anzumelden.
Schritt 5

Wählen Sie auf dem Startbildschirm der Anwendung das +-Symbol in der oberen rechten Ecke, um die Einrichtung Ihrer Klimaanlage mit der Applikation zu starten.
Schritt 6

Wählen Sie "Air Conditioner", und drücken Sie dann die Taste "Start Adding" unten.
Schritt 7

Nachdem Sie das Klimagerät vom Stromnetz getrennt und wieder angeschlossen haben, drücken Sie die Taste "Weiter".(Next)
Schritt 8

Schalten Sie das Klimagerät ein und drücken Sie dann die Taste „Weiter“(Next).
Schritt 9

Stellen Sie das Klimagerät auf folgende Einstellungen: Kühlbetrieb, niedrige Lüftergeschwindigkeit und 30°C. Drücken Sie dann die Taste „Weiter“(Next).
Schritt 10

Suchen Sie von Ihrem Smartphone oder Tablet aus das WLAN des Klimageräts mit dem Namen (SSID): U-ACxxxx, und verbinden Sie sich mit diesem.
Wenn Sie verbunden sind, kehren Sie zur Anwendung zurück und drücken Sie auf die Schaltfläche „Bereits verbunden“(Already connected) , um fortzufahren.
Schritt 11

Wählen Sie Ihr Heim-WLAN aus und drücken Sie die Schaltfläche Weiter.
Schritt 12

Geben Sie das Passwort für Ihr Heim-WLAN ein und drücken Sie „Weiter“(Next), um die Netzwerkkonfiguration zu starten.
Schritt 13

In ca. 1' ist der Vorgang automatisch abgeschlossen.
Schritt 14

Wählen Sie anschließend die Stadt aus, in der das Klimagerät installiert werden soll. Drücken Sie „Speichern“(Save), um den Vorgang abzuschließen.
Schritt 15

Ihr Klimagerät wird auf dem Startbildschirm der Anwendung angezeigt!
AC Freedom for Android (for Professional air conditioners)
How to operate your airconditioner via Wi-Fi:
Schritt 1
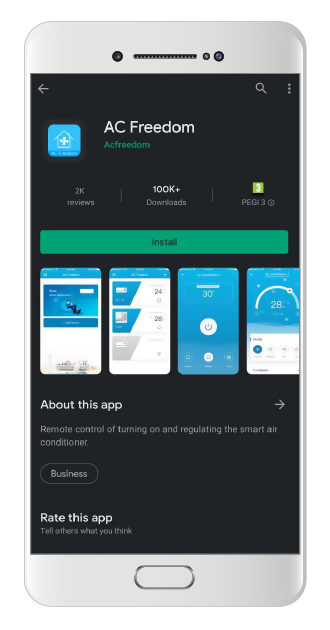
Search and download the AC Freedom application from Google Play.
Schritt 2
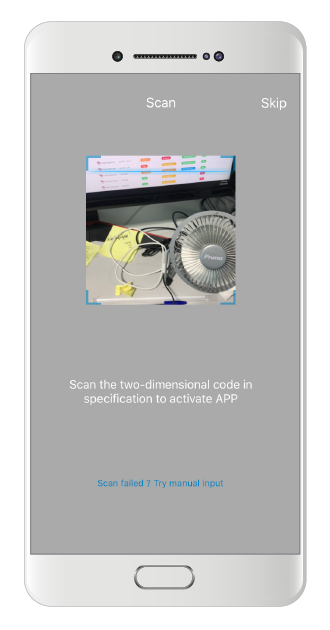
When prompted, scan the qr code provided in the equivalent page of the Wi-Fi User's Manual, or manually insert the activation code (6364d).
Schritt 3
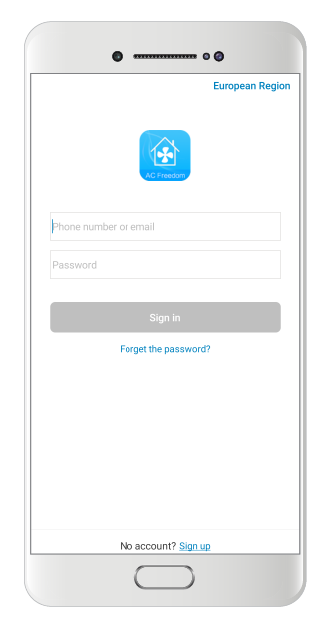
Select "Sign in" to create a new account.
Schritt 4

You can create an account with either your email address or with your phone number.
Schritt 5
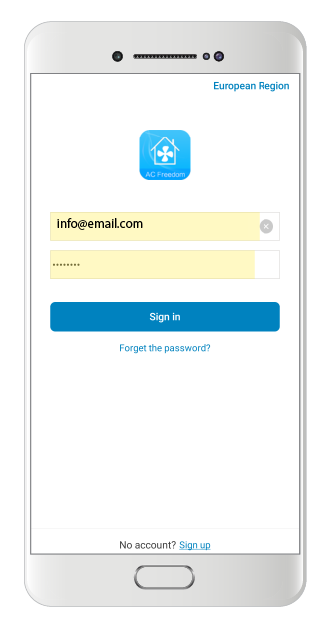
After you have created your account, enter your credentials to log in.
Schritt 6
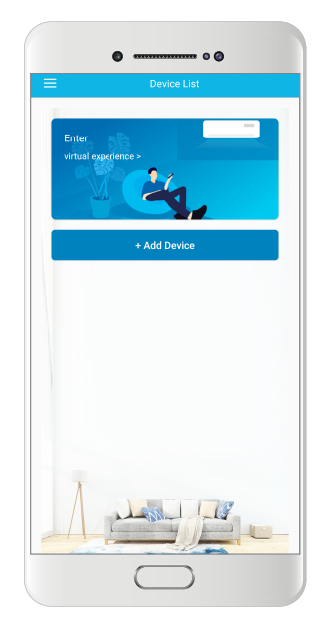
In the Home screen of the application, select "+Add Device" to start setting up your air conditioner with the app.
Schritt 7
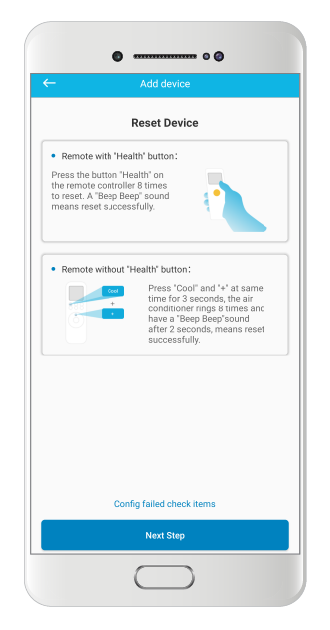
Reset your Air Conditioner from the remote controller, by pressing the "HEALTH" button 8 times, or by pressing together for 3 seconds the "Cool" and "+" buttons at the same time. 2 beeps will notify you that the reset was successful.
Schritt 8
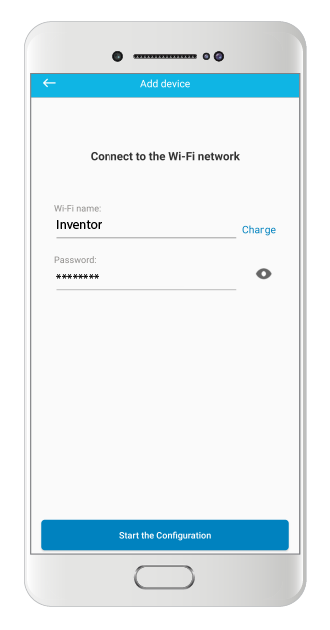
Select your local WLAN network and input the WLAN password.
Schritt 9
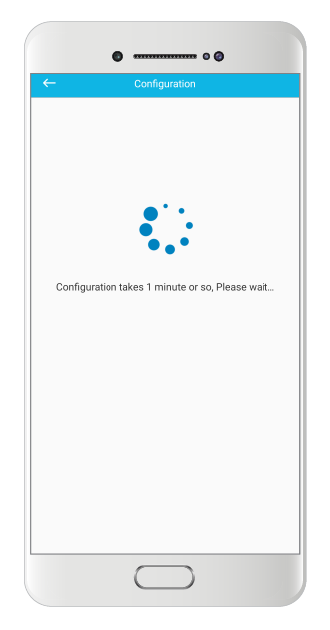
In approximately 1' the process will automatically be complete.
Schritt 10
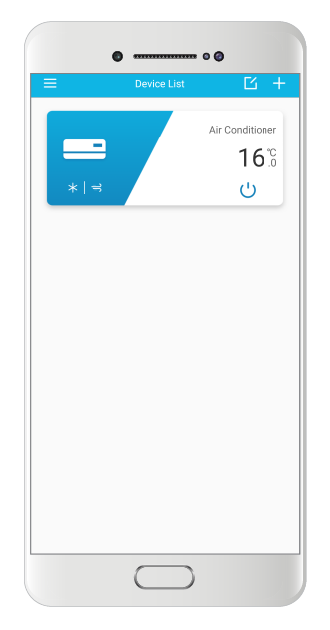
Your air conditioner will appear on the home screen of the application!
AC Freedom for iOS (for Professional air conditioners)
How to operate your airconditioner via Wi-Fi:
Schritt 1
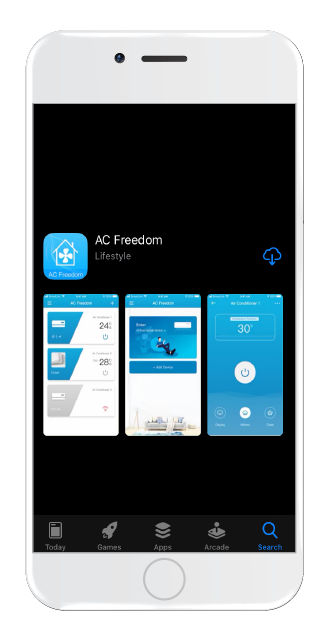
Search and download the AC Freedom application from App Store.
Schritt 2
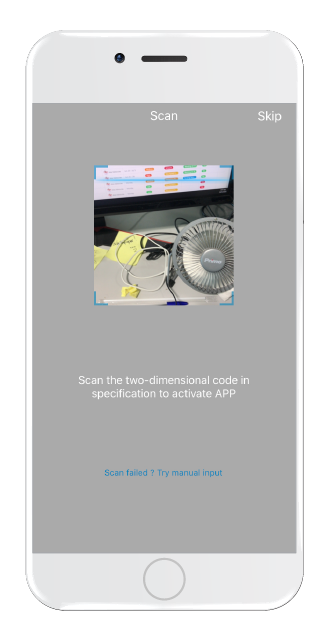
When prompted, scan the qr code provided in the equivalent page of the Wi-Fi User's Manual, or manually insert the activation code (6364d).
Schritt 3
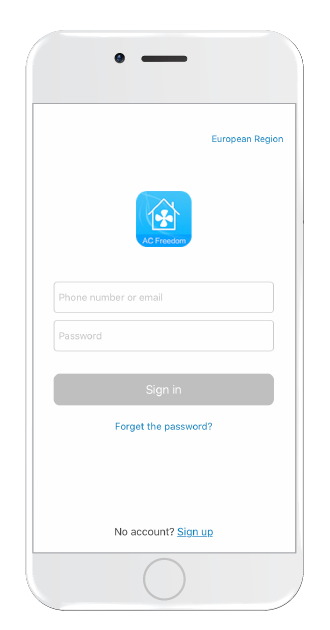
Select "Sign in" to create a new account.
Schritt 4
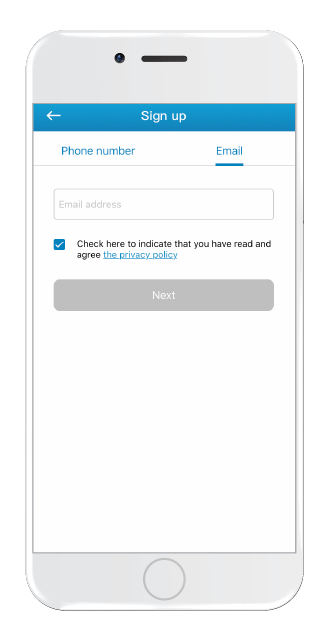
You can create an account with either your email address or with your phone number.
Schritt 5
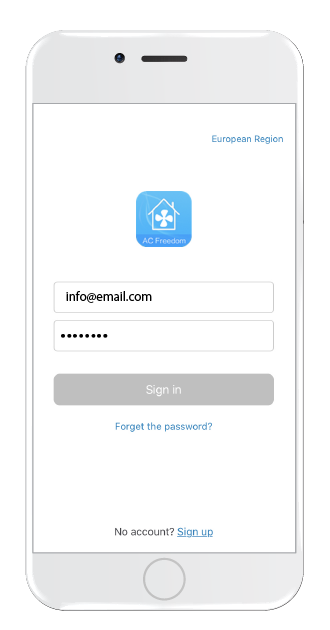
After you have created your account, enter your credentials to log in.
Schritt 6
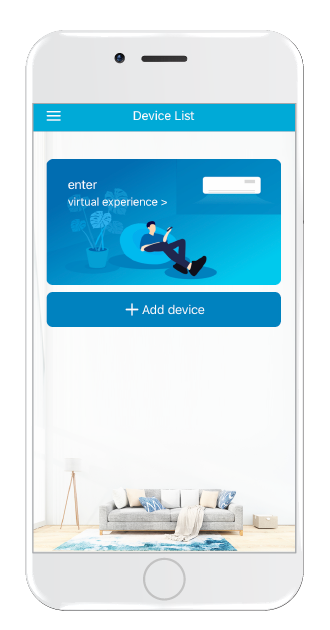
In the Home screen of the application, select "+Add Device" to start setting up your air conditioner with the app.
Schritt 7
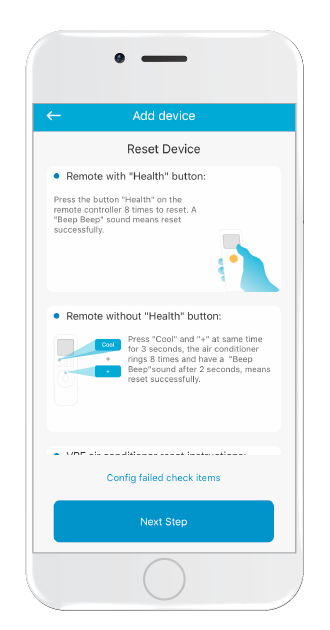
Reset your Air Conditioner from the remote controller, by pressing the "HEALTH" button 8 times, or by pressing together for 3 seconds the "Cool" and "+" buttons at the same time. 2 beeps will notify you that the reset was successful.
Schritt 8
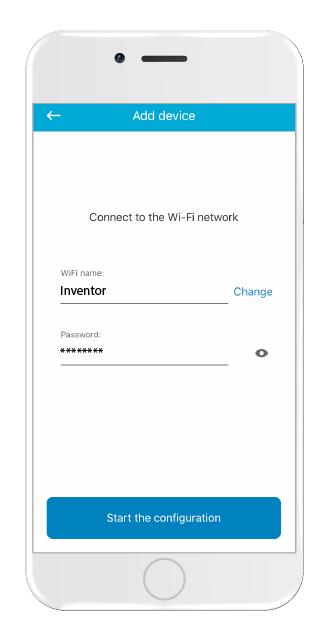
Select your local WLAN network and input the WLAN password.
Schritt 9
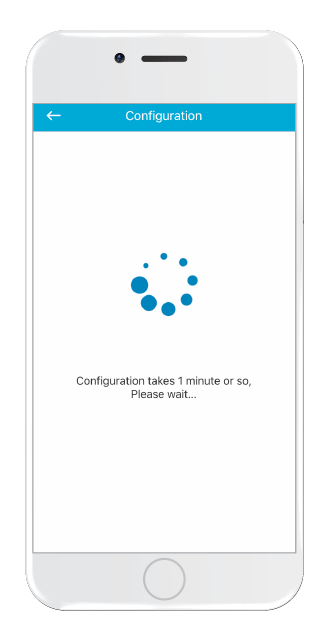
In approximately 1' the process will automatically be complete.
Schritt 10
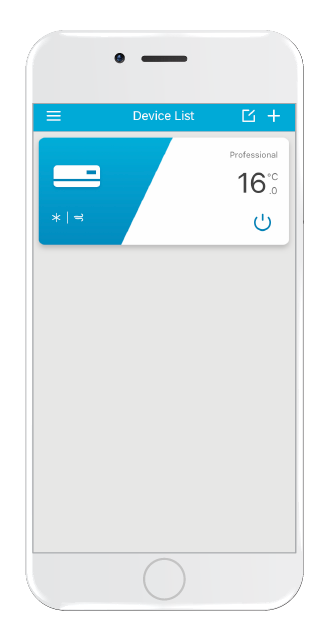
Your air conditioner will appear on the home screen of the application!
INVmate II Applikation für Android Operationssystem (Luftentfeuchter)
Wi-Fi-Installation
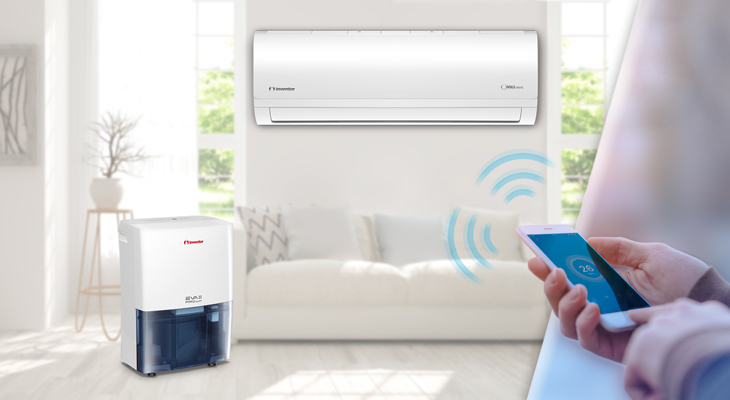
Dank der Fernzugriffsfunktion, die bei den Modellen EVA II PRO Wi-Fi & Power Wi-Fi verfügbar ist, können Sie jederzeit und von praktisch überall aus auf Ihr Gerät zugreifen! Führen Sie die folgenden Schritte aus, um den Luftentfeuchter mit dem Wi-Fi-Netzwerk Ihres Hauses zu verbinden:
Schritt 1
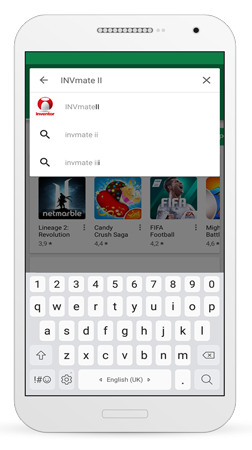
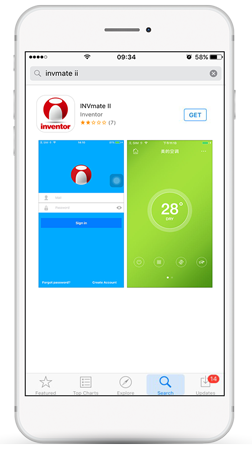
Suchen Sie im Google Play Store durch Eingabe von INVMATE II Applikation
Schritt 2
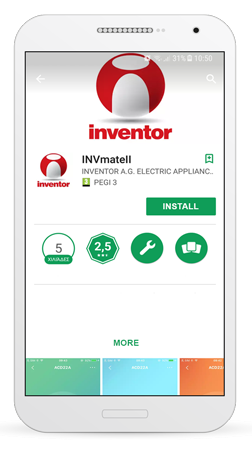
Installieren Sie die Applikation auf Ihrem Smartphone oder Tablet und öffnen Sie sie.
Schritt 3
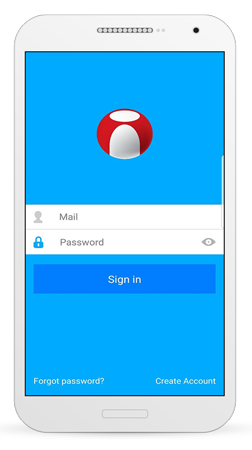
Wählen Sie "Konto erstellen" unten rechts. Erstellen Sie ein Konto. Es wird ein Bestätigungs-E-Mail mit einem Aktivierungslink gesendet.
Schritt 4
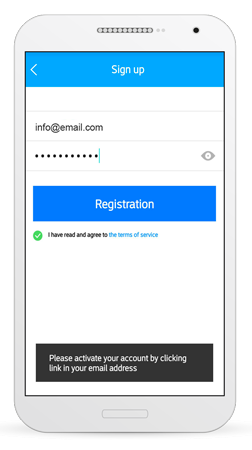
Geben Sie Ihre E-Mail-Adresse und Ihr Passwort ein. Ein Pop-up-Fenster informiert Sie, dass Sie Ihr Konto aktivieren müssen, indem Sie auf den Link klicken, der an Ihre Registrierungs-E-Mail-Adresse gesendet wurde.
Öffnen Sie dann das E-Mail, dass Sie an Ihre Registrierungs-E-Mail-Adresse erhalten haben, und klicken Sie auf den enthaltenen Link, um Ihr Konto zu aktivieren. Kehren Sie zum ersten Bildschirm der Applikation zurück, indem Sie auf das Symbol < in der oberen linken Ecke drücken.
Schritt 5
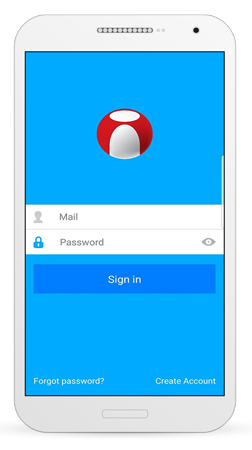
Geben Sie Ihre E-Mail-Adresse und Ihr Passwort ein und wählen Sie Sign In.
Schritt 6
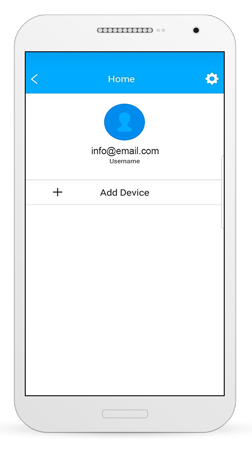
Drücken Sie "Gerät hinzufügen" (add device) wie oben angezeigt.
Schritt 7
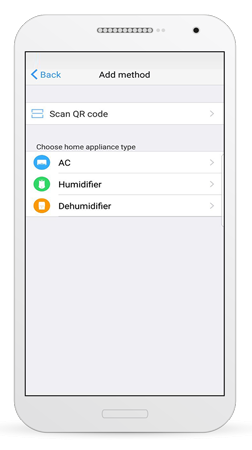
Wählen Sie im angezeigten Menü den Eintrag „Luftentfeuchter“ (Dehumidifier), um Ihr Gerät anzuschließen.
Schritt 8
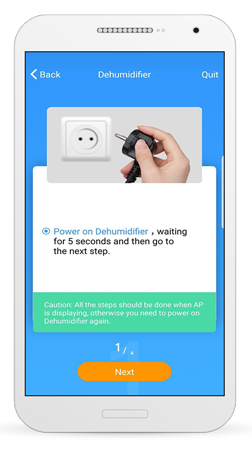
Schalten Sie Ihren Luftentfeuchter ein, warten Sie 5 Sekunden und klicken Sie dann auf "Weiter" (Next).
Wichtiger Hinweis: Alle folgenden Schritte sollten durchgeführt werden, während die „AP“-Anzeige auf dem digitalen Bedienfeld des Luftentfeuchters angezeigt wird; falls keine „AP“-Anzeige erscheint, beginnen Sie bitte erneut mit dem obigen Verfahren.
Schritt 9
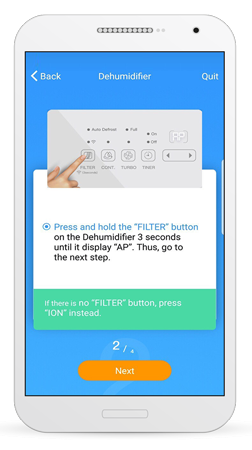
Halten Sie die Taste "FILTER" des Luftentfeuchters 3 Sekunden lang gedrückt. Sobald die Anzeige "AP" auf dem Bedienfeld erscheint, klicken Sie auf "Weiter" (Next).
Hinweis: Wenn keine "Filter"Taste vorhanden ist, drücken Sie stattdessen die "ION"Taste.
Schritt 10
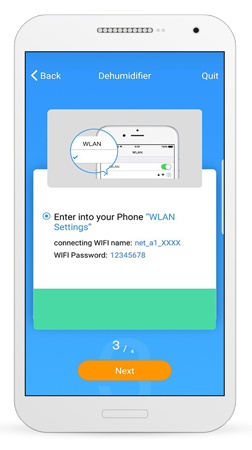
Verbinden Sie sich mit dem drahtlosen Netzwerk Ihres Luftentfeuchters wie oben angezeigt. Gehen Sie in die WiFi-Einstellungen Ihres Smartphones oder Tablets, prüfen Sie den korrekt angegebenen Netzwerknamen und geben Sie das Passwort ein.
Schritt 11
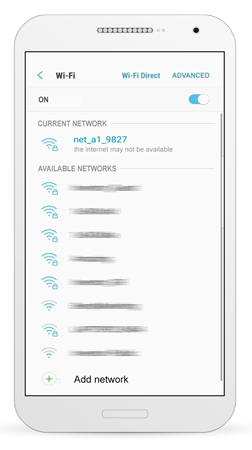
Vergewissern Sie sich, dass die Verbindung zum drahtlosen Netzwerk erfolgreich hergestellt wurde.
Schritt 12
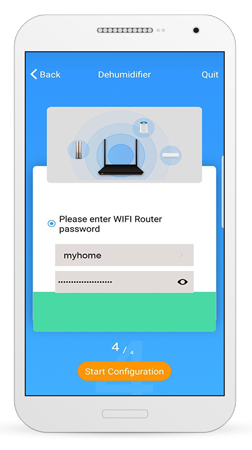
Kehren Sie zur Applikation zurück. Der Name Ihres Routers wird automatisch angezeigt. Bitte geben Sie Ihr Netzwerk-Passwort in das Feld darunter ein. Drücken Sie auf "Konfiguration starten".( Start Configuration)
Schritt 13
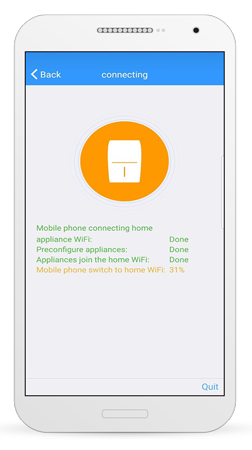
Sobald der Kopplungsvorgang abgeschlossen ist, wird die Verbindung aktiviert.
Schritt 14
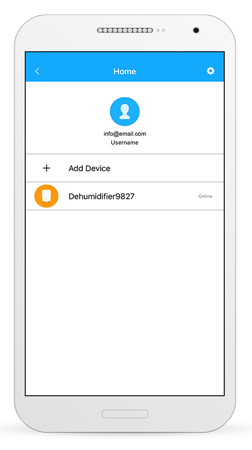
Wählen Sie den kürzlich hinzugefügten Luftentfeuchter.
Schritt 15
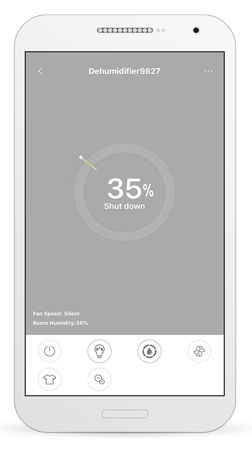
Der Luftentfeuchter ist nun erfolgreich mit Ihrem drahtlosen Netzwerk verbunden!
INVmate II Applikation für iOS Operationssystem (Luftentfeuchter)
Wi-Fi-Installation
Dank der Fernzugriffsfunktion, die bei den Modellen EVA II PRO Wi-Fi & Power Wi-Fi verfügbar ist, können Sie jederzeit und von praktisch überall aus auf Ihr Gerät zugreifen! Führen Sie die folgenden Schritte aus, um den Luftentfeuchter mit dem Wi-Fi-Netzwerk Ihres Hauses zu verbinden:/p>
Schritt 1
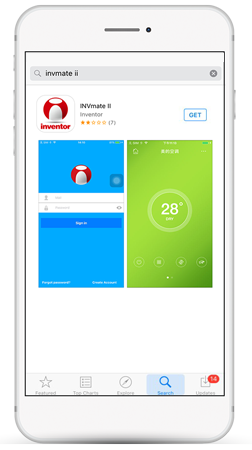
Suchen und installieren Sie die INVMATE II-Applikation auf Ihrem Smartphone/Tablet.
Schritt 2
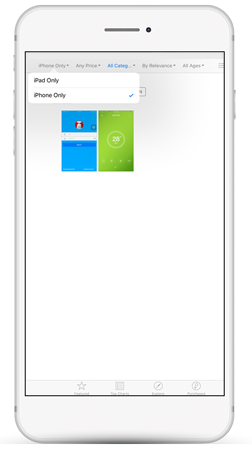
Falls Sie ein iPad verwenden, wählen Sie wie angegeben die Option "Nur iPhone". (iPhone Only)
Schritt 3
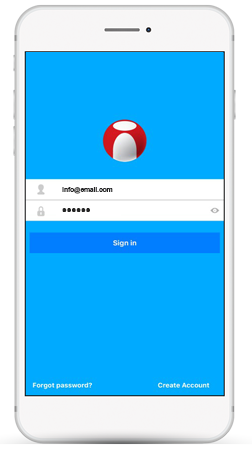
Wählen Sie unten rechts "Konto erstellen" (Create an account) . Erstellen Sie ein Konto. Es wird eine Bestätigungs-E-Mail mit einem Aktivierungslink gesendet. Folgen Sie dem angegebenen Link.
Schritt 4
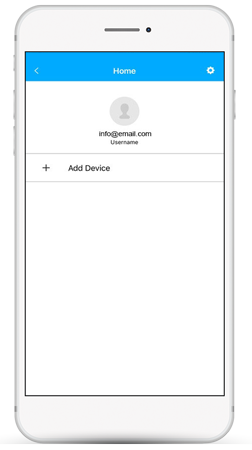
Sobald Sie das Konto aktiviert haben, kehren Sie zur App zurück und wählen Sie Gerät hinzufügen. (Add Device)
Schritt 5
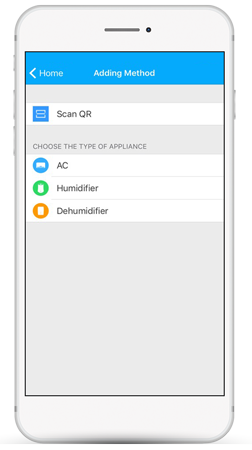
Wählen Sie im angezeigten Menü „Dehumidifier“(Luftentfeuchter) , um Ihr Gerät anzuschließen.
Schritt 6
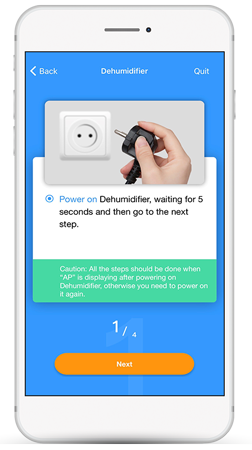
Schalten Sie den Luftentfeuchter ein, warten Sie 5 Sekunden und folgen Sie dann dem nächsten Schritt.
Wichtiger Hinweis: Alle folgenden Schritte sollten durchgeführt werden, während die „AP“ Anzeige auf dem digitalen Bedienfeld des Luftentfeuchters angezeigt wird. Wenn keine „AP“Anzeige angezeigt wird, schalten Sie den Luftentfeuchter bitte aus und starten Sie die oben genannten Schritte erneut.
Schritt 7
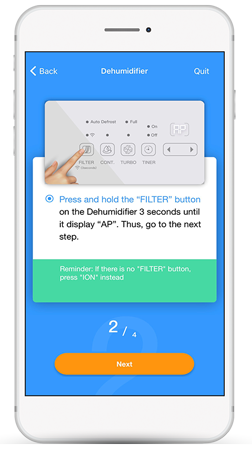
Drücken und halten Sie die "FILTER"-Taste des Luftentfeuchters für 3 Sekunden, sobald "AP" auf dem Bedienfeld angezeigt wird, folgen Sie dem nächsten Schritt.
Hinweis: Wenn keine "Filter"-Taste vorhanden ist, drücken Sie stattdessen die "ION" Taste.
Schritt 8
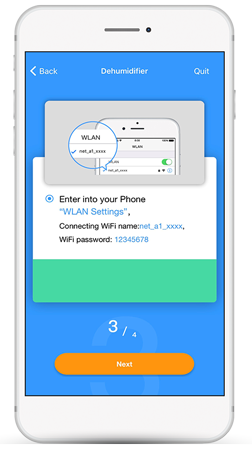
Verbinden Sie sich mit dem drahtlosen Netzwerk Ihres Luftentfeuchters wie oben gezeigt. Gehen Sie in die kabellose Einstellungen Ihres Smartphones/Tablets, prüfen Sie den korrekt angegebenen Netzwerknamen und geben Sie das Passwort ein.
Schritt 9
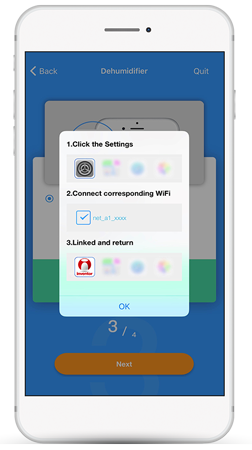
Bitte befolgen Sie die oben angegebene Vorgehensweise. Klicken Sie auf das Symbol "Einstellungen" (Settings) auf Ihrem Smartphone/Tablet. Klicken Sie auf der neuen Oberfläche auf das Symbol "EINSTELLUNGEN" (SETTINGS) , das sich oben rechts befindet. Scrollen Sie nach oben, bis Sie das Symbol Wi-Fi finden und klicken Sie es an. Wählen Sie aus der Liste:“ connect to net_a1_xxxx wireless network“ und kehren Sie dann zur Applikation zurück.
Schritt 10
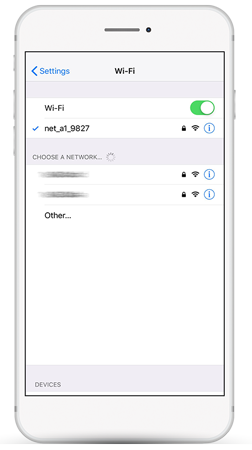
Vergewissern Sie sich, dass die Verbindung zum drahtlosen Netzwerk erfolgreich hergestellt wurde.
Schritt 11
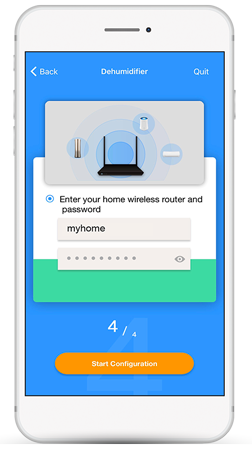
Kehren Sie zur Applikation zurück. Der Name Ihres Routers wird automatisch angezeigt. Bitte geben Sie Ihr Netzwerk-Passwort in das Feld darunter ein. Drücken Sie auf "Konfiguration starten".(Start Configuration)
Schritt 12
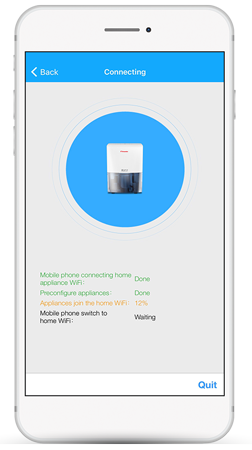
Sobald der Kopplungsvorgang abgeschlossen ist, wird die Verbindung aktiviert.
Schritt 13
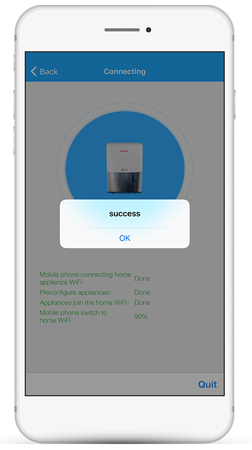
Ihre Verbindung ist hergestellt.
Schritt 14
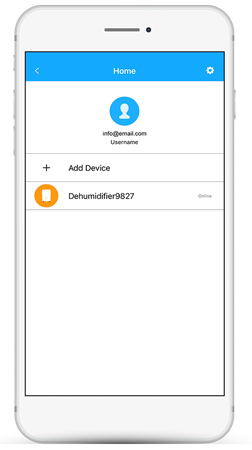
Wählen Sie den hinzugefügten Luftentfeuchter.
Schritt 15
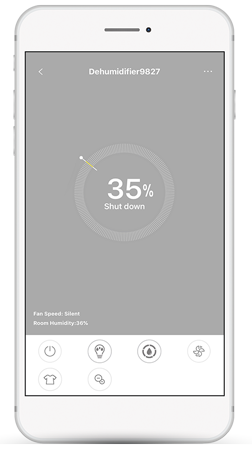
Der Luftentfeuchter ist nun erfolgreich mit Ihrem Funknetzwerk verbunden!
INVmate II Applikation für Android Operationssystem (Aria, Premium, King, Aria, Corona Klimageräte)
Wie läuft die Installation des Wi-Fi-Moduls ab?
Aktivieren Sie den "AP"-Modus am Klimagerät. Durch Aktivieren des AP-Modus fungiert das Gerät als Anschlußunkt . Erstellen Sie ein INVmate-Konto, mit dem Sie das/die Klimagerät(e) verbinden können, damit Sie das Gerät aus der Ferne verwalten können. Verbinden Sie das Klimagerät mit Ihrem Heimnetzwerk, um Zugang zum Internet zu erhalten.
Aktivieren Sie den "AP"-Modus am Klimagerät
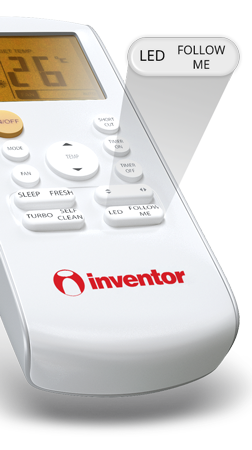
Trennen Sie das Gerät für 10 Sekunden vom Stromnetz. Schließen Sie das Gerät wieder an das Stromnetz an und drücken Sie die LED-Taste wiederholt 7 Mal, bis die Meldung "AP" auf der Frontplatte des Gerätes erscheint. Hinweis: Während der nächsten 3 Minuten nimmt das Klimagerät keine Befehle von der Fernbedienung an.
Schritt 1
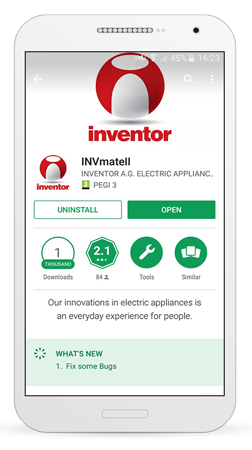
Installieren Sie die Applikation INVmate II auf Ihrem Handy/Tablet. Um die Applikation im Google Play Store zu finden, verwenden Sie bitte den folgenden Text: INVmate ii Applikation oder klicken Sie hier
Schritt 2
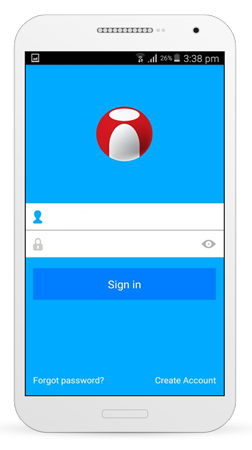
Wählen Sie "Konto erstellen", um ein Benutzerkonto anzulegen
Schritt 3
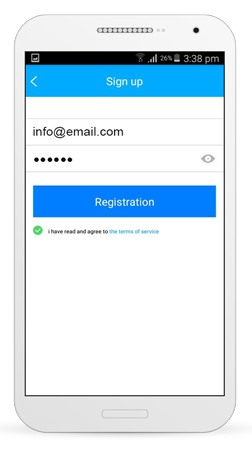
Geben Sie Ihre E-Mail-Adresse und ein Passwort ein (das Passwort muss die folgenden Kriterien erfüllen: 6-16 alphanumerische Zeichen, Klein- oder Großbuchstaben, keine Leerzeichen) und tippen Sie anschließend auf die Schaltfläche "Registrierung".
Schritt 4
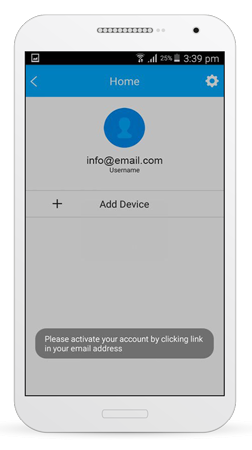
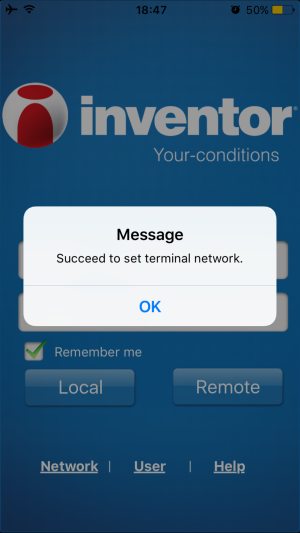
Sie erhalten die obige Meldung, drücken Sie "OK".
Schritt 5
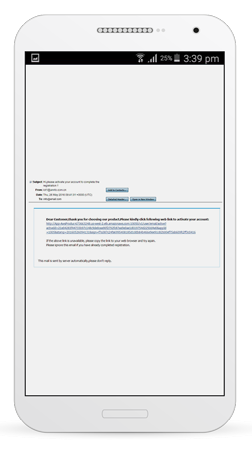
Sie erhalten eine Bestätigungs-E-Mail an Ihre E-Mail-Adresse. Folgen Sie dem Link, der sich im Bestätigungs-E-Mail befindet.
Schritt 6
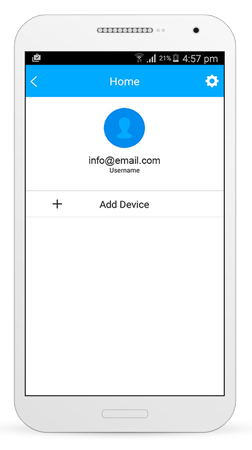
Gehen Sie nach der Registrierung Ihres Benutzerkontos zurück zur der Applikation INVmate II. Wählen Sie "+ Gerät hinzufügen".
Schritt 7
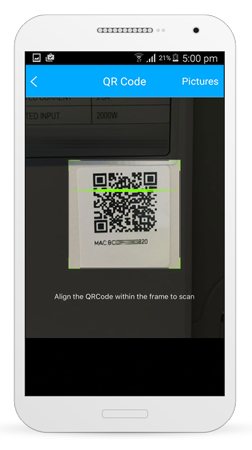
Scannen Sie den QR-Code, der sich auf dem weißen Aufkleber befindet
Schritt 8
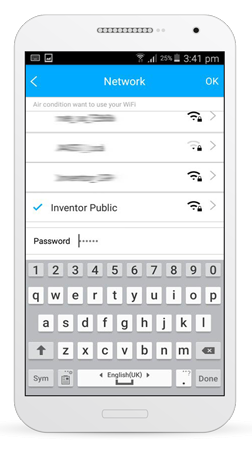
Wählen Sie Ihr aufgelistetes Wi-Fi-Netzwerk, geben Sie den Wi-Fi-Netzwerkschlüssel ein und drücken Sie dann "ΟΚ".
Schritt 9
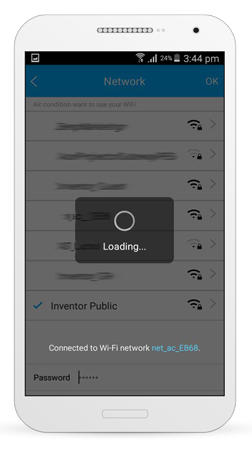
Bitte warten Sie, bis der Installationsvorgang abgeschlossen ist (An diesem Punkt verbindet sich das Mobiltelefon/Tablet- mit Ihrem Wi-Fi-Netzwerk, dann mit das Klimagerät und schließlich mit Ihrem Wi-Fi-Netzwerk)
Schritt 10
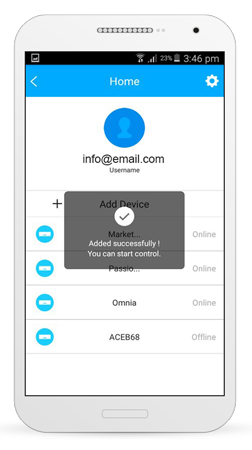
Das Klimagerät hat sich erfolgreich mit Ihrem Wi-Fi-Netzwerk verbunden. Drücken Sie "ΟΚ".
Schritt 11
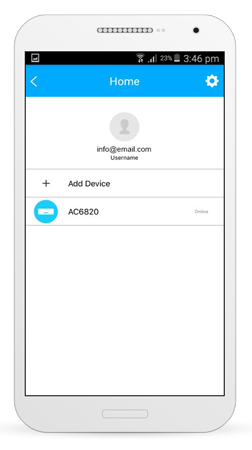
Wählen Sie das Klimagerät (z. B. AC6820)
Schritt 12
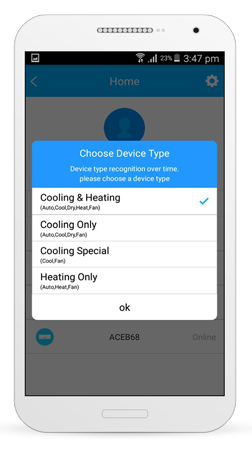
Wählen Sie die 1. Option und drücken Sie "ΟΚ".
Problems?
INVmate II Applikation für iOS Operationssystem (für Aria, Premium, King, Aria, Corona Klimageräte)
Wie läuft die Installation des Wi-Fi-Moduls ab?
Aktivieren Sie den "AP"-Modus am Klimagerät. Durch Aktivieren des AP-Modus fungiert das Gerät als Zugangspunkt. Erstellen Sie ein INVmate-Konto, mit dem Sie das/die Klimagerät(e) verbinden können, damit Sie das Gerät aus der Ferne verwalten können. Verbinden Sie das Klimagerät mit Ihrem Heimnetzwerk, um Zugang zum Internet zu erhalten.
Aktivieren Sie den "AP"-Modus am Klimagerät

Trennen Sie das Klimagerät für 10 Sekunden vom Stromnetz. Schließen Sie das Gerät wieder an das Stromnetz an und drücken Sie die LED-Taste wiederholt 7 Mal, bis die Meldung "AP" auf der Frontplatte des Gerätes erscheint. Hinweis: Während der nächsten 3 Minuten nimmt das Klimagerät keine Befehle von der Fernbedienung an.
Schritt 1b
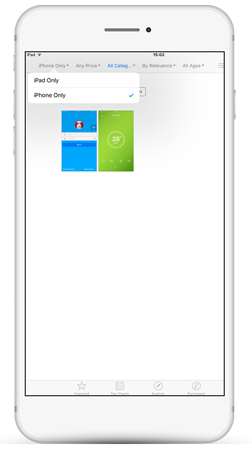
Wählen Sie "iPhone Only” wie in der Abbildung
Schritt 2

Wählen Sie "Konto erstellen" (Create Account) , um ein Benutzerkonto anzulegen
Schritt 3

Geben Sie Ihre E-Mail-Adresse und ein Passwort ein (das Passwort muss die folgenden Kriterien erfüllen: 6-16 alphanumerische Zeichen, Klein- oder Großbuchstaben, keine Leerzeichen) und tippen Sie anschließend auf die Schaltfläche "Registrierung" (Registration).
Schritt 4

Sie erhalten die obige Meldung, drücken Sie "ΟΚ".
Schritt 5

Sie erhalten eine Bestätigungs-E-Mail an Ihre E-Mail-Adresse. Folgen Sie dem Link, der sich in der Bestätigungs-E-Mail befindet.
Schritt 6

Gehen Sie nach der Registrierung Ihres Benutzerkontos zurück in die Anwendung INVmate II. Wählen Sie "+ Gerät hinzufügen".(Add Device)
Schritt 7

Drücken Sie im Falle der obigen Meldung "OK", um dem INVmate II den Zugriff auf die Kamera des Handys/Tablets zu ermöglichen.
Schritt 8

Scannen Sie den QR-Code, der sich auf dem weißen Aufkleber befindet
Schritt 9

Bitte folgen Sie den obigen Schritten
Schritt 10

Gehen Sie in die Wi-Fi-Einstellungen Ihres Mobiltelefon/Tablet-Gerätes, suchen Sie nach dem Wi-Fi-Netzwerk mit folgendem Namen: netac#### und verbinden Sie sich dann damit.
Schritt 11

Geben Sie das folgende Passwort ein: 12345678 und wählen Sie dann "ΟΚ".
Schritt 12

Vergewissern Sie sich, dass Sie sich erfolgreich mit diesem Wi-Fi-Netzwerk verbunden haben, wie im obigen Bild dargestellt
Schritt 13

Gehen Sie zurück zur INVmate II-Applikation, wählen Sie Ihr Wi-Fi-Netzwerk und geben Sie den Wi-Fi-Netzwerkschlüssel in das Feld "Passwort" (Password) ein. Wählen Sie "ΟΚ".
Schritt 14

Wählen Sie "ΟΚ" und gehen Sie zurück zu den Wi-Fi-Einstellungen Ihres Handys/Tablets
Schritt 15

Verbinden Sie sich mit Ihrem Wi-Fi-Netzwerk. Gehen Sie zurück zur INVmate II-Applikation.
Schritt 16
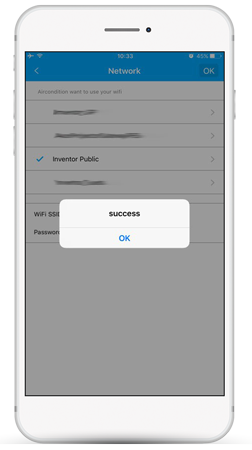
Das Klimagerät hat sich erfolgreich mit Ihrem Wi-Fi-Netzwerk verbunden. Wählen Sie "ΟΚ".
Schritt 17
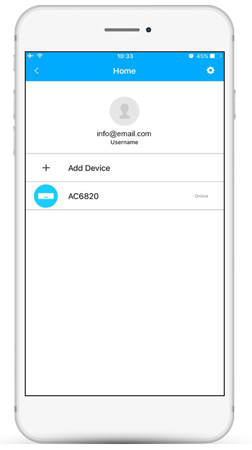
Wählen Sie das Klimagerät (z. B. AC6820)
Schritt 18
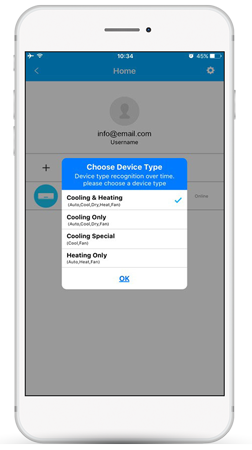
Wählen Sie die 1. Option und drücken Sie "ΟΚ". Der Vorgang der Wi-Fi-Installation ist erfolgreich.
INVmate for Android (Vision and Passion air conditioners)
LOCAL MODE (When you are at home)
(Note: Complete the following steps within 7 minutes)
Schritt 1

Go to Wi-Fi settings on your mobile/tablet and select NetHome… from the listed wireless networks
Schritt 2

Enter the default password 12345678
Schritt 3

Open up the Invmate application and press "Network"
Schritt 4

Select your home Wi-Fi network
Schritt 6
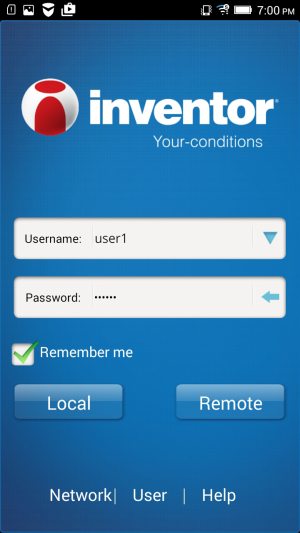
Be sure that your mobile/tablet is connected to your home Wi-Fi network. Then press "Local"
Schritt 7

Select the AC device from the list and then enter the default password: 12345678. Problems?
Remote Control Mode (Long distance control when you are outside)
(Please ensure that you have followed all the previous steps)
Open up the Invmate application and follow the steps below:
Create an account
Schritt 1

Press User
Schritt 2

Press Registration
Schritt 3

Press Agree
Schritt 4

Fill in all the required information and press OK to complete the registration process
Username: Must be 2-20 characters long, case sensitive with no spaces
Password: Must be 6-16 characters long, case sensitive with no spaces
Bind the AC device
Schritt 5

Enter your Username and Password and press Remote (You may save this information by clicking the "Remember me" checkbox)
Schritt 6

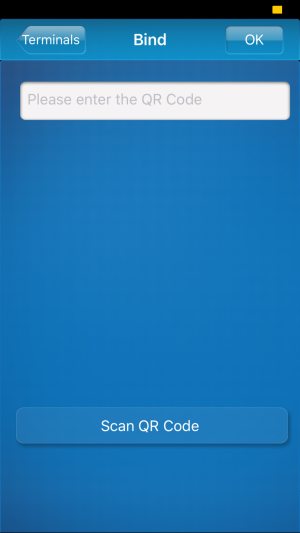
Press Bind
Schritt 8

Scan the QR packed with the Smart Kit (Please place the stick onto the AC device to avoid loss). Problems?
Press OK to complete the procedure
ΝΟΤΕ:
In case you are installing multiple air-conditioning units, follow the same procedure for the rest of the units using the same account (skipping steps 1-4).
INVmate for iOS (Vision and Passion air conditioners)
LOCAL MODE (When you are at home)
(Note: Complete the following steps within 7 minutes)
Schritt 1
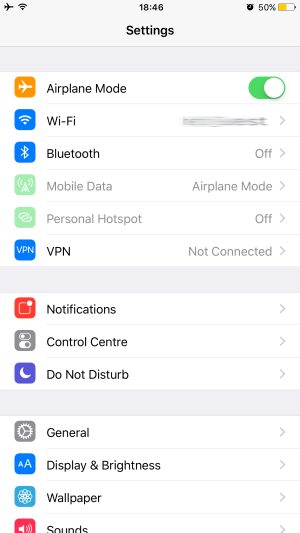
Go to the wireless settings on your mobile/tablet
Schritt 2
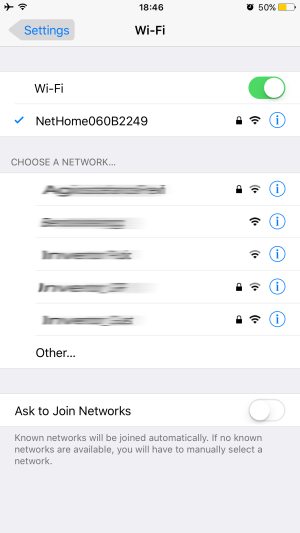
Select NetHome… from the listed wireless networks and enter the default password: 12345678
Schritt 3
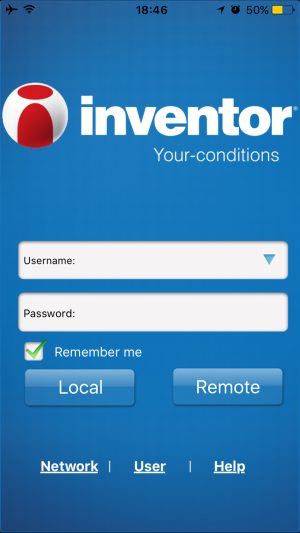
Open up the Invmate application and press "Network"
Schritt 4
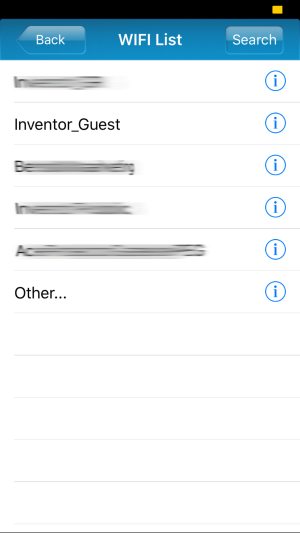
Select your home Wi-Fi network
Schritt 5
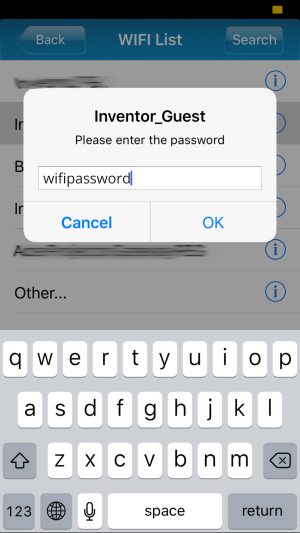
Enter your home Wi-Fi network password
Schritt 7
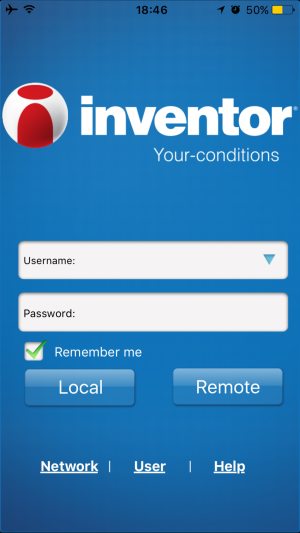
Be sure that your mobile/tablet is connected to your home Wi-Fi network. Then press "Local"
Schritt 8
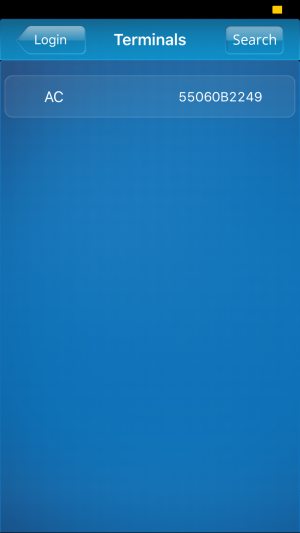
Select the AC device from the list and then enter the default password: 12345678. Problems?
Remote Control Mode (Long distance control when you are outside)
(Please ensure that you have followed all the previous steps)
Open up the Invmate application and follow the steps below:
Create an account
Schritt 1
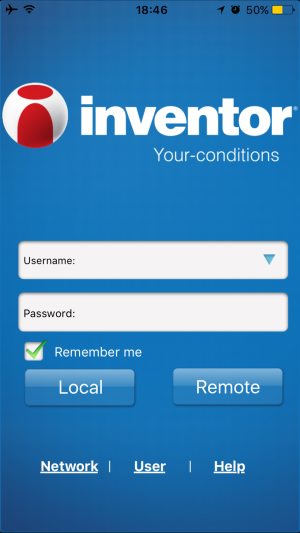
Press User
Schritt 2
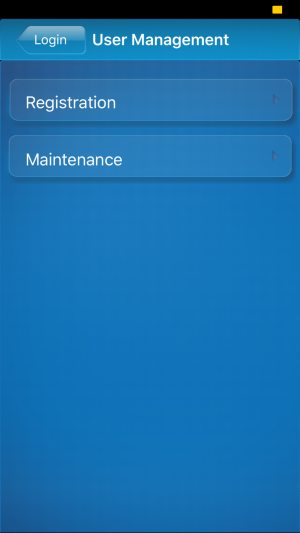
Press Registration
Schritt 3
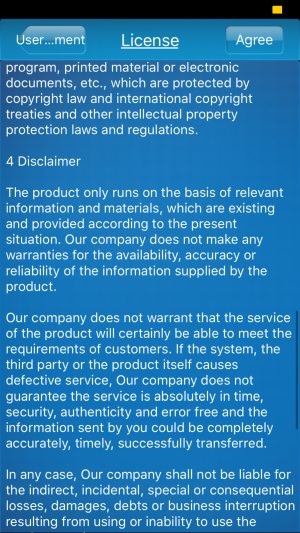
Press Agree
Schritt 4
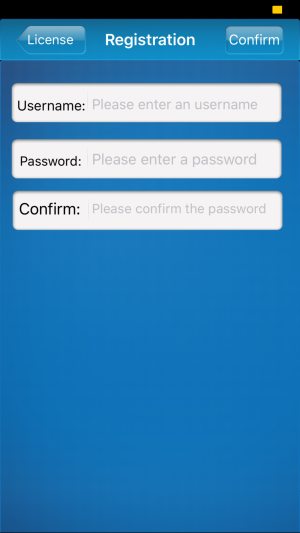
Fill in all the required information and press OK to complete the registration process
Username: Must be 2-20 characters long, case sensitive with no spaces
Password: Must be 6-16 characters long, case sensitive with no spaces
Bind the AC device
Schritt 5
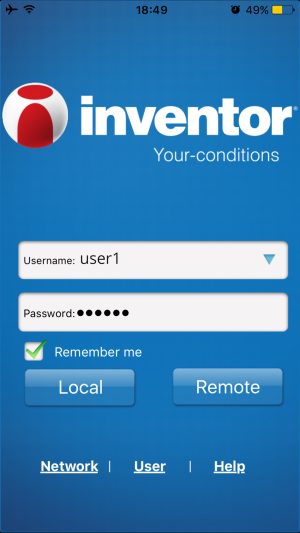
Enter your Username and Password and press Remote (You may save this information by clicking the "Remember me" checkbox)
Schritt 6

Press Bind
Schritt 8

Scan the QR packed with the Smart Kit (Please place the stick onto the AC device to avoid loss). Problems?
Press OK to complete the procedure
ΝΟΤΕ:
In case you are installing multiple air-conditioning units, follow the same procedure for the rest of the units using the same account (skipping steps 1-4).
EWPE Smart for Android (Life Pro Wi-Fi L4V air conditioners)
How to activate the Wi-Fi operation of your air conditioner
Via EWPE Smart application, create an account and connect your Smartphone with the air conditioner unit, in order to take control of your device from wherever and whenever you want. Join the air conditioning unit to your home network to have access to the internet.
Schritt 1
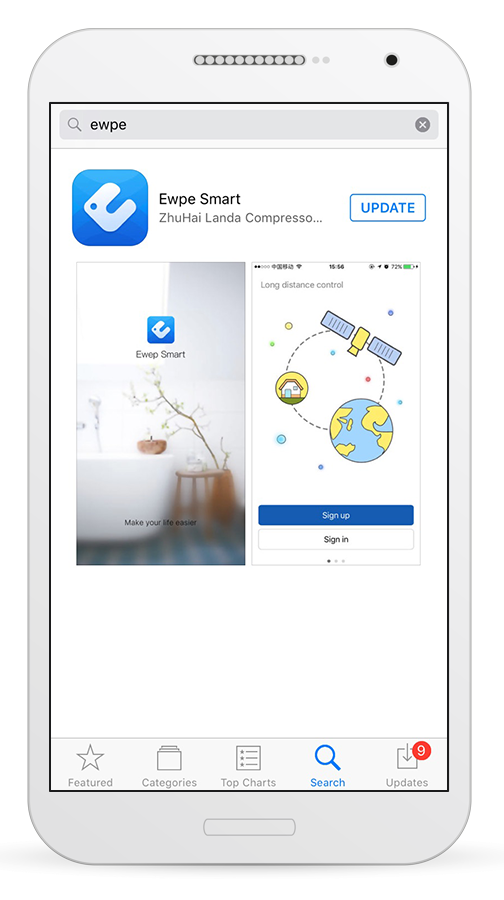
Download for free the EWPE Smart application through Google Play.
Schritt 2
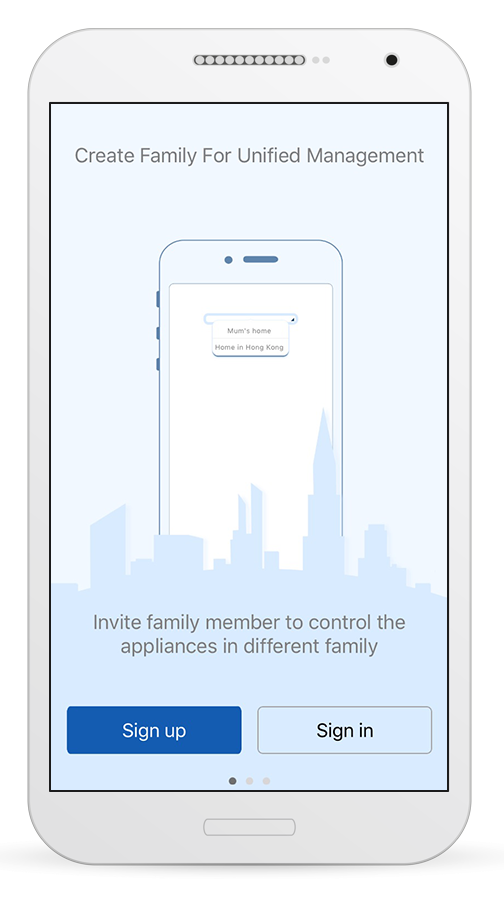
When the installation is completed, open the app to begin with the connection of your Smartphone with your air conditioner.
Schritt 3
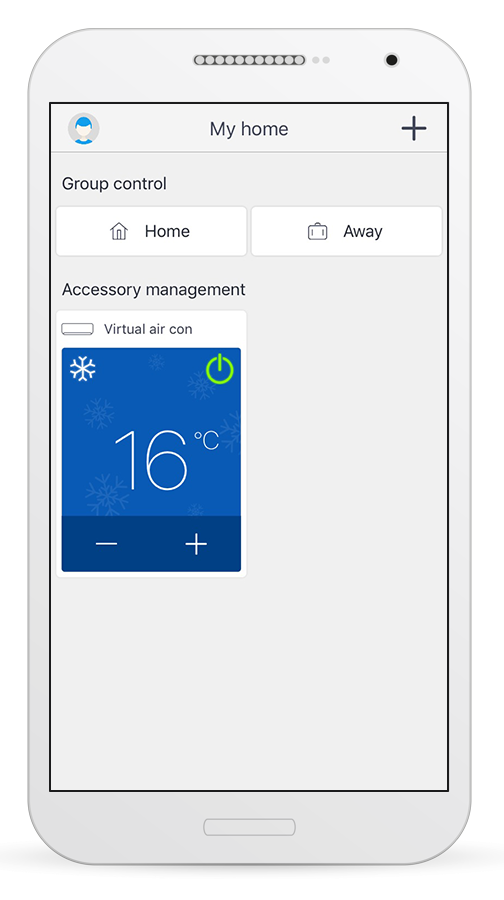
Select the icon on the upper left side of your mobile screen.
Schritt 4
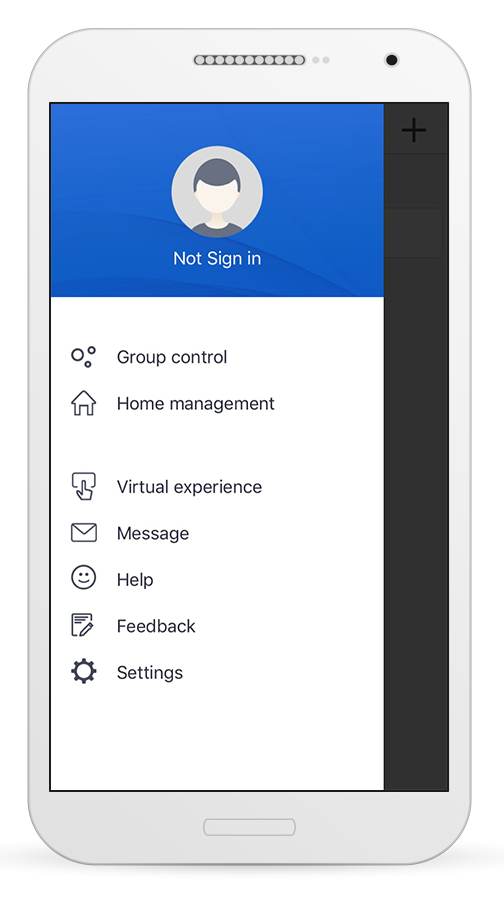
Select again the same icon at the upper side of your mobile screen.
Schritt 5
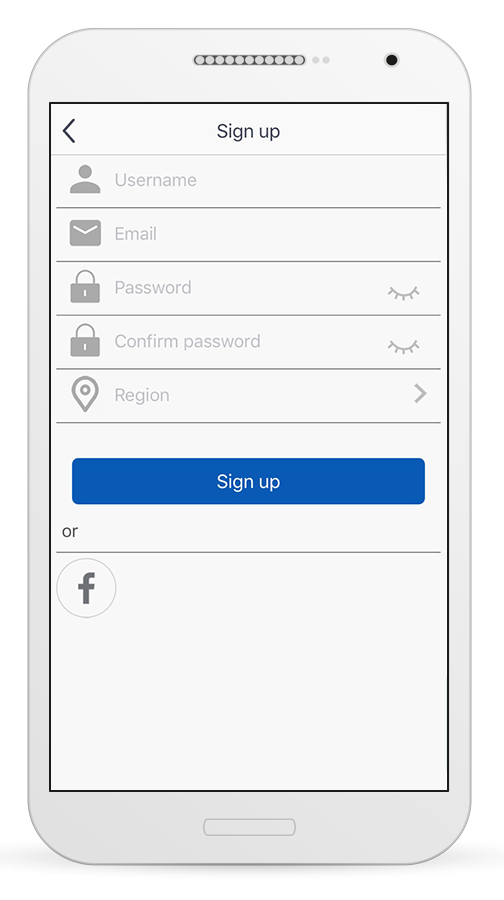
At that stage fulfill your email address and a password (the password must meet the following criteria: 6-16 alphanumeric characters, lower or uppercase, no spaces) and then press the "Sign Up" button.
Schritt 6
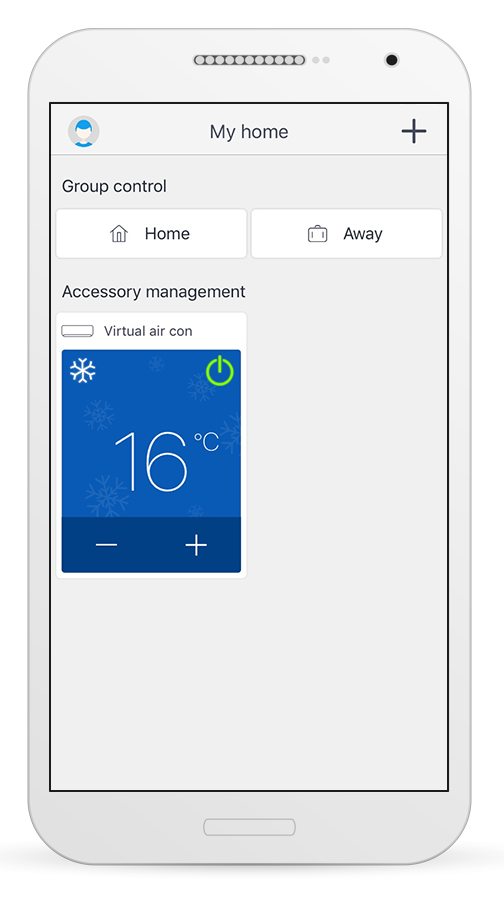
Press the "+" icon at the upper right side of the mobile screen.
Schritt 7
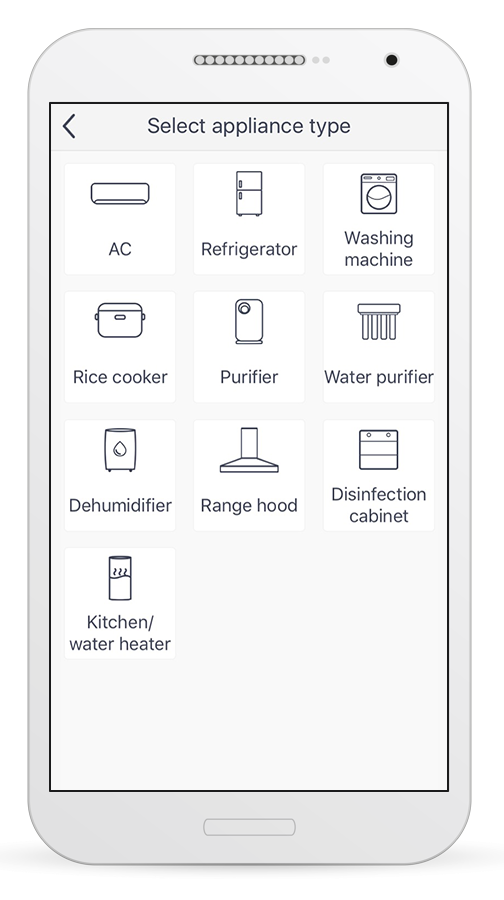
Select the type of the device you have purchased to connect with.
Schritt 8
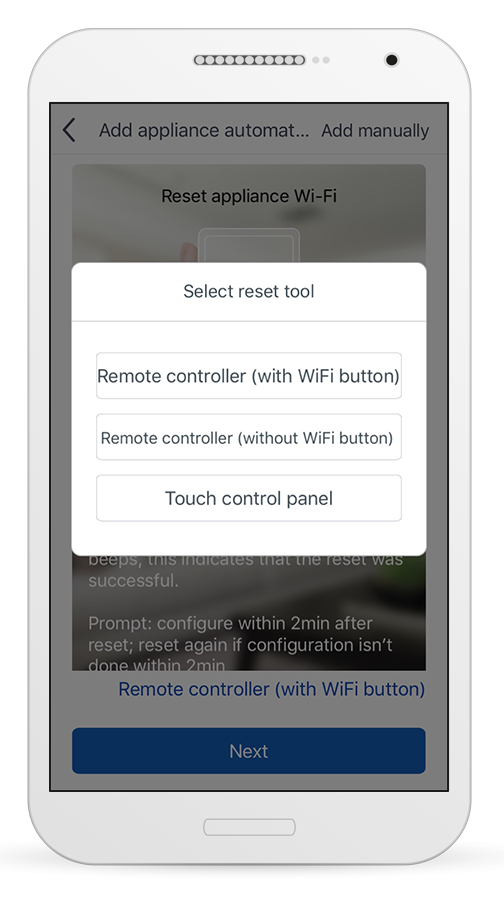
Press "Remote Controller with Wi-Fi button".
Schritt 9
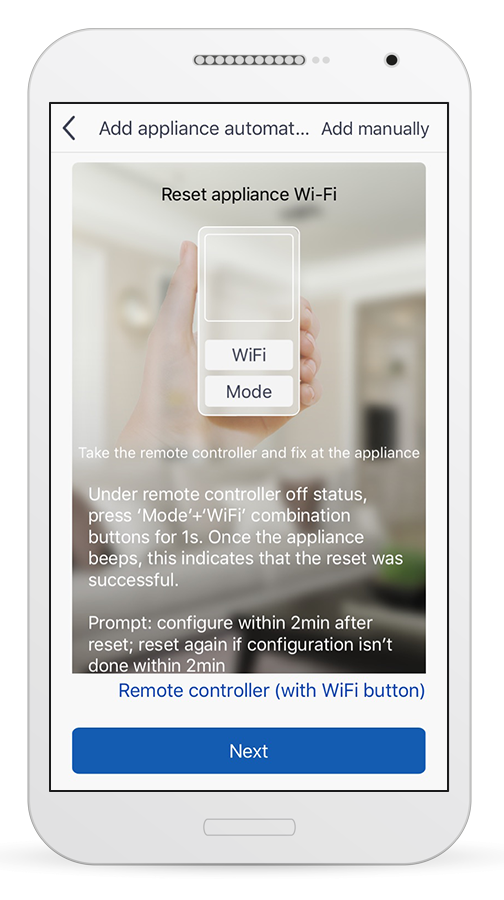
Follow the below steps that are mentioned on the above screen and afterwards select the button "Next":
1. Take the remote controller and fix at the appliance
2. Under remote controller off status, press Mode + Turbo combination buttons for 10s. once the appliance beeps for 2 seconds, this indicates that the appliance Wi-Fi reset was successful.
3. Prompt: configure within 2 min after reset; reset again if configuration isn't done within 2 min.
Schritt 10
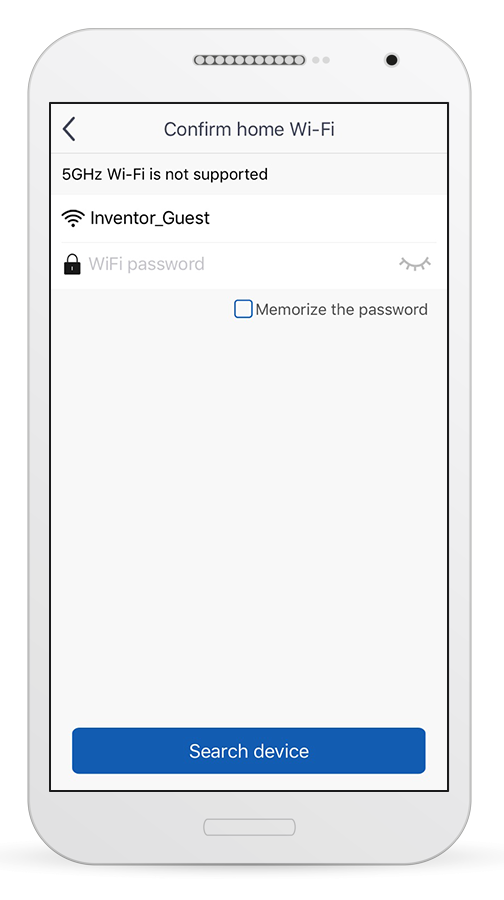
The application shows up all the available network connections, to select the one, you want to connect your device with. Fill all the necessary fields and press the "Search Device" to connect with your air conditioner.
*the 5GHz network is not supported
Schritt 11
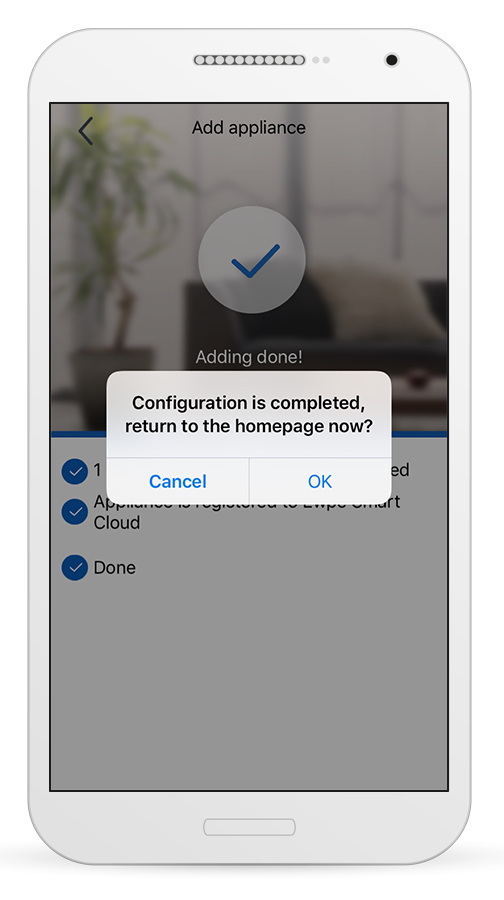
Your air conditioner has been successfully connected.
EWPE Smart for iOS (Life Pro Wi-Fi L4V air conditioners)
How to activate the Wi-Fi operation of your air conditioner
Via EWPE Smart application, create an account and connect your Smartphone with the air conditioner unit, in order to take control of your device from wherever and whenever you want. Join the air conditioning unit to your home network to have access to the internet.
Schritt 1
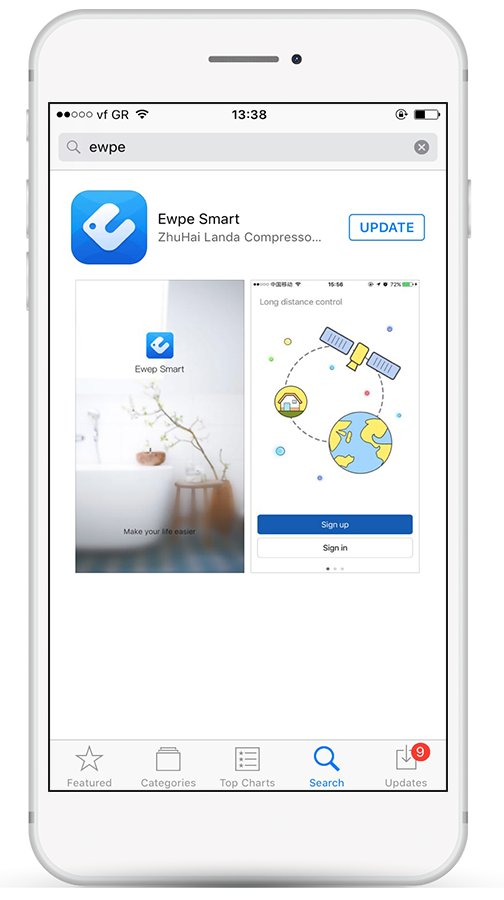
Download for free the EWPE Smart application through App Store.
Schritt 2
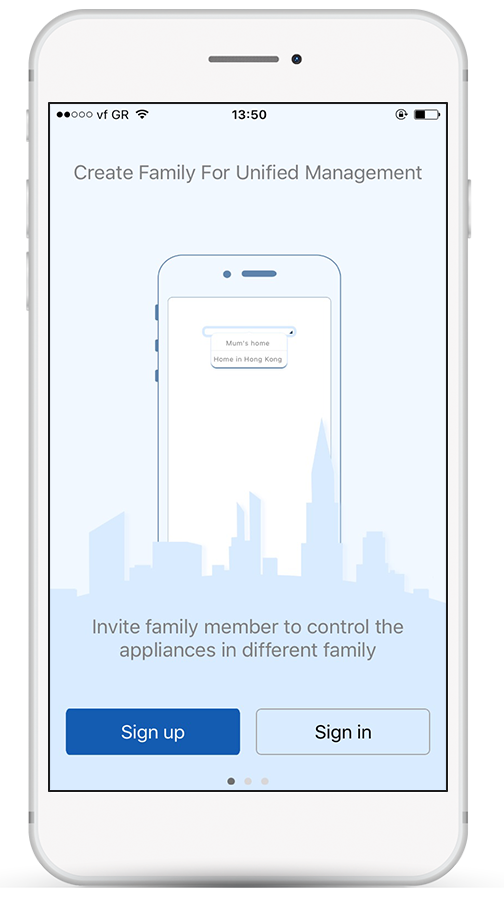
When the installation is completed, open the app to begin with the connection of your Smartphone with your air conditioner.
Schritt 3
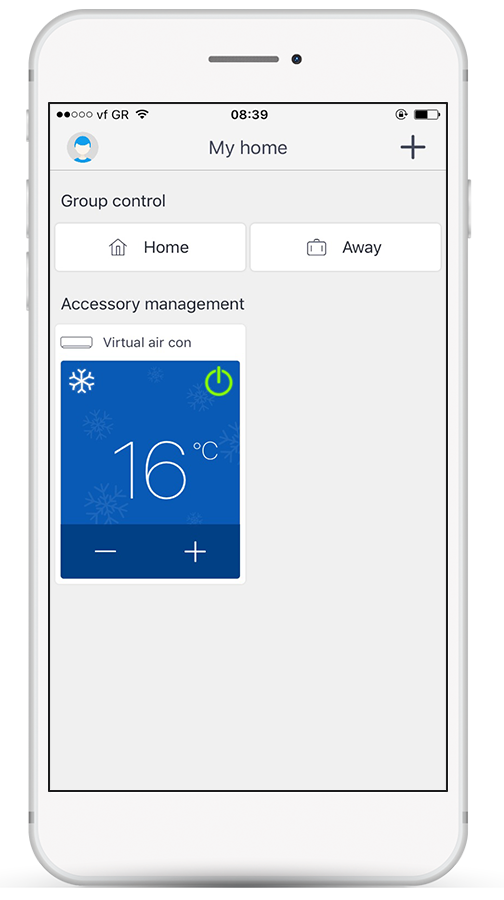
Select the icon on the upper left side of your mobile screen.
Schritt 4
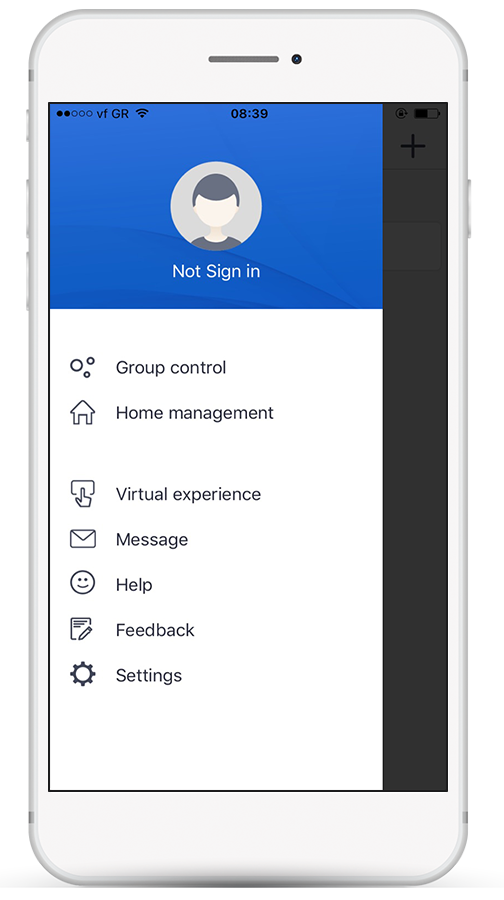
Select again the same icon at the upper side of your mobile screen.
Schritt 5
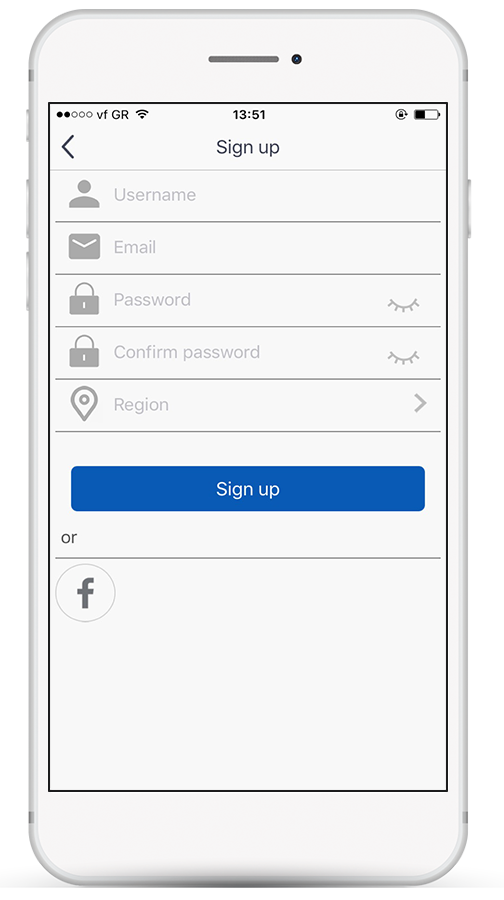
At that stage fulfill your email address and a password (the password must meet the following criteria: 6-16 alphanumeric characters, lower or uppercase, no spaces) and then press the "Sign Up" button.
Schritt 6
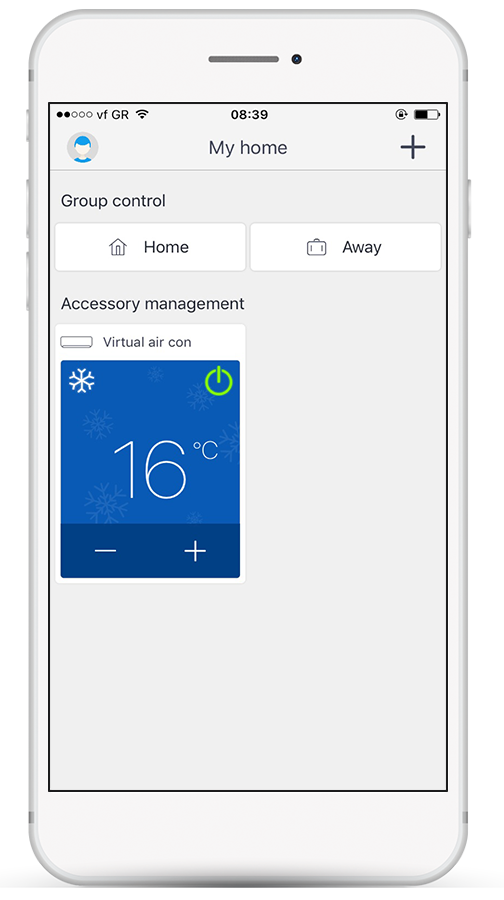
Press the "+" icon at the upper right side of the mobile screen.
Schritt 7
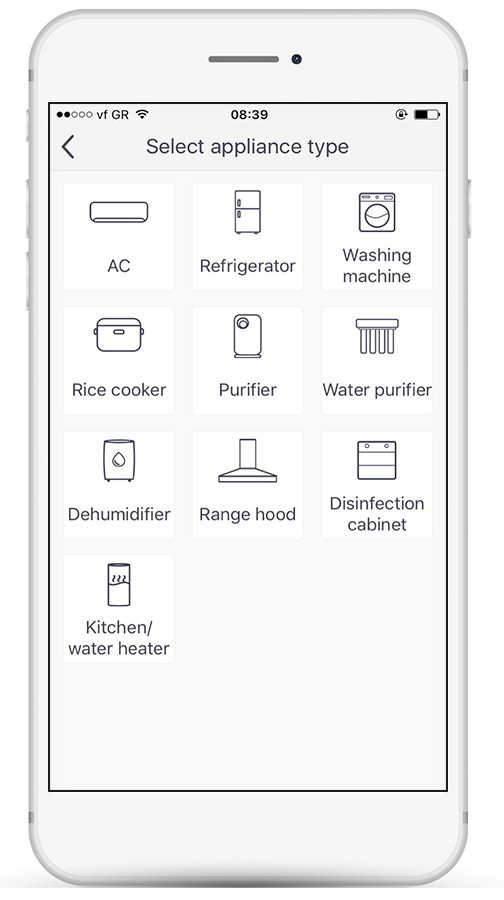
Select the type of the device you have purchased to connect with.
Schritt 8
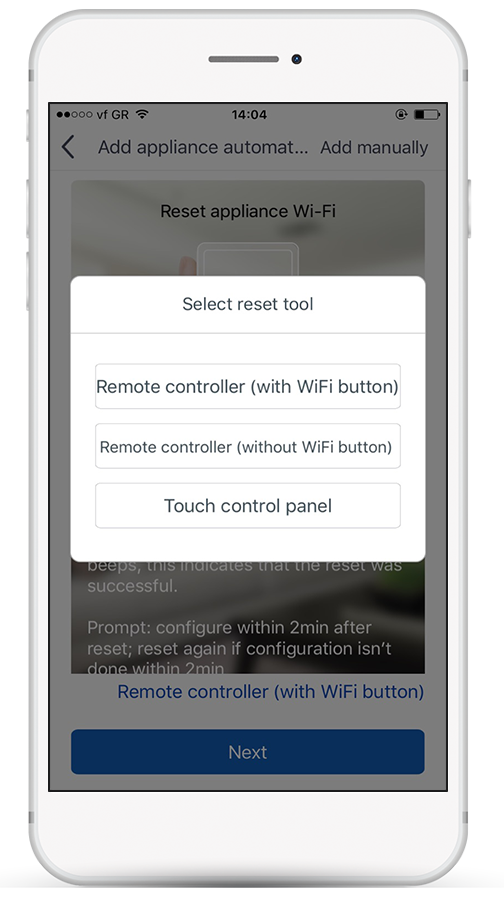
Press "Remote Controller with Wi-Fi button".
Schritt 9
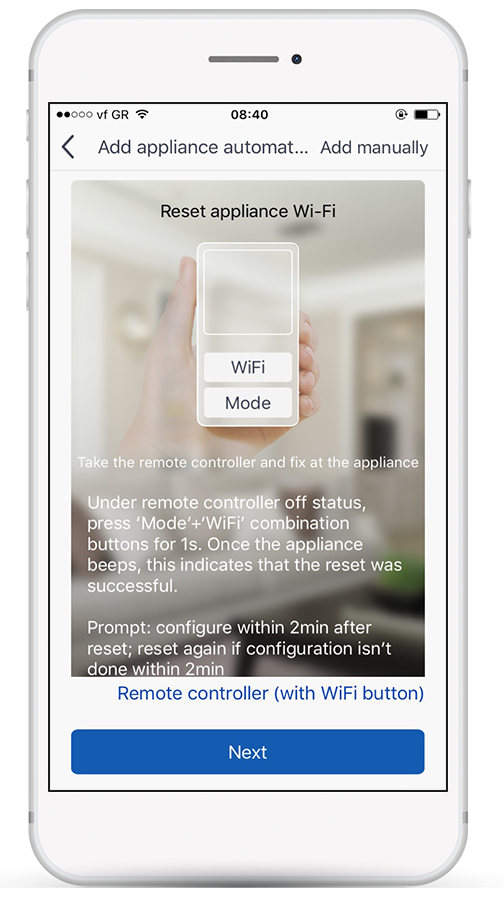
Follow the below steps that are mentioned on the above screen and afterwards select the button "Next":
1. Take the remote controller and fix at the appliance
2. Under remote controller off status, press Mode + Turbo combination buttons for 10s. once the appliance beeps for 2 seconds, this indicates that the appliance Wi-Fi reset was successful.
3. Prompt: configure within 2 min after reset; reset again if configuration isn't done within 2 min.
Schritt 10
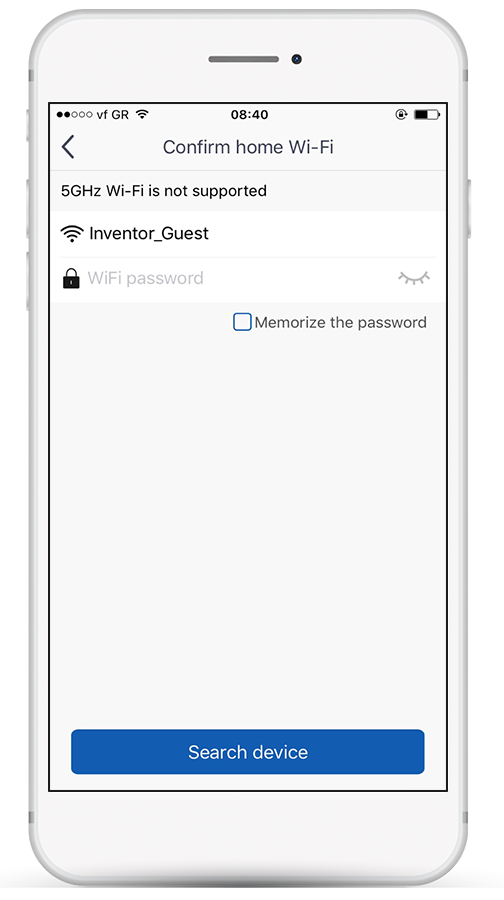
The application shows up all the available network connections, to select the one, you want to connect your device with. Fill all the necessary fields and press the "Search Device" to connect with your air conditioner.
*the 5GHz network is not supported
Schritt 11
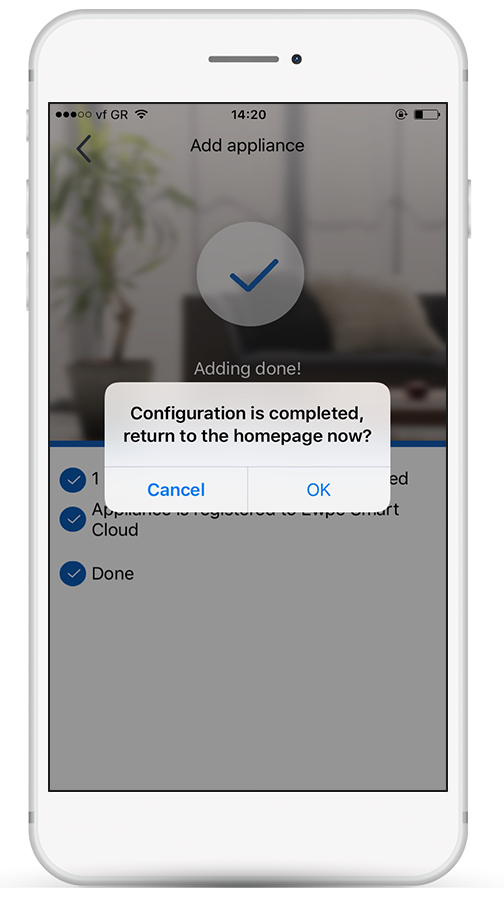
Your air conditioner has been successfully connected.
EWPE Smart for Android (Nemesis Pro air conditioners)
How to activate the Wi-Fi operation of your air conditioner
Via EWPE Smart application, create an account and connect your Smartphone with the air conditioner unit, in order to take control of your device from wherever and whenever you want. Join the air conditioning unit to your home network to have access to the internet.
Schritt 1

Download for free the EWPE Smart application through Google Play.
Schritt 2

When the installation is completed, open the app to begin with the connection of your Smartphone with your air conditioner.
Schritt 3

Select the icon on the upper left side of your mobile screen.
Schritt 4

Select again the same icon at the upper side of your mobile screen.
Schritt 5

At that stage fulfill your email address and a password (the password must meet the following criteria: 6-16 alphanumeric characters, lower or uppercase, no spaces) and then press the "Sign Up" button.
Schritt 6

Press the "+" icon at the upper right side of the mobile screen.
Schritt 7

Select the type of the device you have purchased to connect with.
Schritt 8

Press "Remote Controller without Wi-Fi button".
Schritt 9

Follow the below steps that are mentioned on the above screen and afterwards select the button "Next":
1. Take the remote controller and fix at the appliance
2. Under remote controller off status, press Mode + Turbo combination buttons for 10s. once the appliance beeps for 2 seconds, this indicates that the appliance Wi-Fi reset was successful.
3. Prompt: configure within 2 min after reset; reset again if configuration isn't done within 2 min.
Schritt 10

The application shows up all the available network connections, to select the one, you want to connect your device with. Fill all the necessary fields and press the "Search Device" to connect with your air conditioner.
*the 5GHz network is not supported
Schritt 11

Your air conditioner has been successfully connected.
EWPE Smart for iOS (Nemesis Pro air conditioners)
How to activate the Wi-Fi operation of your air conditioner
Via EWPE Smart application, create an account and connect your Smartphone with the air conditioner unit, in order to take control of your device from wherever and whenever you want. Join the air conditioning unit to your home network to have access to the internet.
Schritt 1

Download for free the EWPE Smart application through App Store.
Schritt 2

When the installation is completed, open the app to begin with the connection of your Smartphone with your air conditioner.
Schritt 3

Select the icon on the upper left side of your mobile screen.
Schritt 4

Select again the same icon at the upper side of your mobile screen.
Schritt 5

At that stage fulfill your email address and a password (the password must meet the following criteria: 6-16 alphanumeric characters, lower or uppercase, no spaces) and then press the "Sign Up" button.
Schritt 6

Press the "+" icon at the upper right side of the mobile screen.
Schritt 7

Select the type of the device you have purchased to connect with.
Schritt 8

Press "Remote Controller without Wi-Fi button".
Schritt 9

Follow the below steps that are mentioned on the above screen and afterwards select the button "Next":
1. Take the remote controller and fix at the appliance
2. Under remote controller off status, press Mode + Turbo combination buttons for 10s. once the appliance beeps for 2 seconds, this indicates that the appliance Wi-Fi reset was successful.
3. Prompt: configure within 2 min after reset; reset again if configuration isn't done within 2 min.
Schritt 10

The application shows up all the available network connections, to select the one, you want to connect your device with. Fill all the necessary fields and press the "Search Device" to connect with your air conditioner.
*the 5GHz network is not supported
Schritt 11

Your air conditioner has been successfully connected.
